I was looking at my logs and analytics, and I saw something interesting. I had a few requests to these endpoints which they do not exist on my blog!
.git/config
.aws/credentials
.aws/config
config.php
So I started looking into this …
On my old web server, I had an extensive defensing mechanism with mod security, fail2ban and many more. At some point I had some OWASP prevention mechanism, so I had them connected to fail2ban and fail2ban blocked IPs via iptables.
On my new setup, I use traefik reverse proxy and I was thinking that for sure, there is a way to connect traefik with fail2ban. So after a quick research, I ended to fail2ban traefik plugin. Which does something similar to fail2ban, but it does not need fail2ban, iptables or nftables to block incoming traffic.
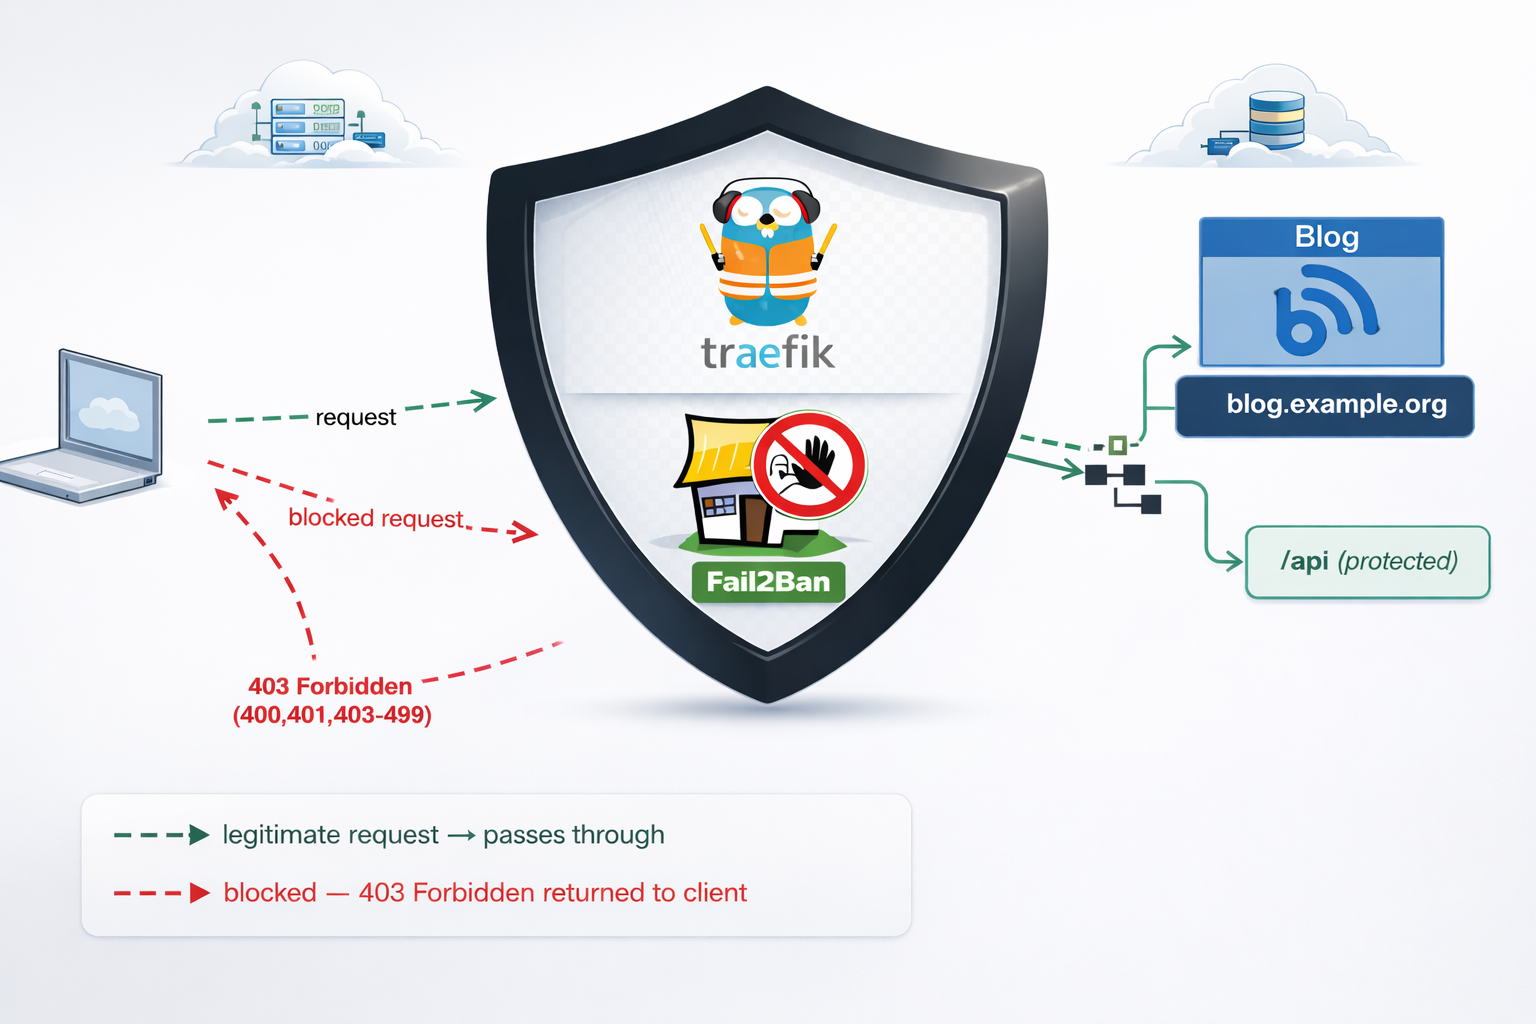
So, if you’re running services behind Traefik, you’ve got a powerful tool right at your fingertips: the fail2ban plugin. Unlike the traditional Linux fail2ban package that operates at the kernel level with iptables, Traefik’s fail2ban plugin works at the middleware level—meaning it can protect specific routes, integrate seamlessly with your containerized stack, and start banning malicious IPs within seconds.
Prerequisites & How the Plugin Works
What You Need
- Traefik 3.0 or later (the plugin requires traefik experimental plugin system)
- Basic familiarity with Traefik (routers, services, middleware concepts)
- Docker Compose or Kubernetes (we’ll focus on Docker in this guide)
- Administrative access to your Traefik configuration files
The Traefik Fail2ban Plugin
If you’re familiar with traditional fail2ban on Linux, Traefik’s version works differently—and that’s actually good news. Instead of relying on log file parsing and kernel-level packet filtering, the Traefik plugin watches HTTP responses in real-time at the middleware level. When it detects a pattern of failures (e.g., four 401 “Unauthorized” responses from the same IP within eg. 10 minutes), it blocks that IP for a configurable duration for x hours.
Here’s the flow:
Incoming Request
      ↓
Traefik Router (matches domain/path)
      ↓
Middleware Chain (security headers → rate-limit → fail2ban)
      ↓
Fail2ban Plugin checks: Is this IP banned?
      ├─→ YES: Return 403 Forbidden, block request
      └─→ NO: Continue to backend service
      ↓
Backend responds (200, 401, 403, etc.)
      ↓
Fail2ban updates counters: Track failures by IP
      ↓
Threshold exceeded? Ban this IP for 3 hours
Key Advantages
- Application-aware: Works at the HTTP level, not raw packets
- URL-specific: Protect only sensitive routes; allow legitimate traffic to other endpoints
- Dynamic: No service restarts needed; configuration reloads on-the-fly
- Container-friendly: Zero external dependencies; runs inside your Traefik container
- Flexible: Whitelist trusted IPs, customize ban duration, define custom rules per endpoint
Installation & Plugin Setup
Add the Plugin to Your Traefik Configuration
First, declare the fail2ban plugin in your traefik.yml. This tells Traefik where to find and how to load the plugin.
# traefik.yml
experimental:
  plugins:
    fail2ban:
      moduleName: github.com/tomMoulard/fail2ban
      version: v0.9.0  # or use the latest stable version
Restart Traefik
After updating traefik.yml, restart the Traefik container:
docker-compose down traefik && docker-compose up -d traefikVerify Plugin Initialization
Check the container logs for successful plugin loading:
docker-compose logs traefik | grep -i fail2banYou should see output something like:
traefik | 2024-04-05 14:32:15 INF Loaded plugin fail2ban from github.com/tomMoulard/fail2ban@v0.9.0If you see an error instead, verify:
- Traefik version is 3.0+
- Plugin module name is spelled correctly
- The version tag exists in the GitHub repository
Configuration: Building Your Protection Rules
Now comes the interesting part. Configuring what and how fail2ban protects your services. All middleware definitions live in dynamic/ directory and usually in middlewares.yml or a similar file that Traefik loads from the dynamic/ directory. For this blog post, we will use this file.
Understanding Each Configuration Parameter
Here’s a complete fail2ban middleware definition with detailed explanations:
# etc_traefik/dynamic/middlewares.yml
http:
  middlewares:
    my-fail2ban:
      plugin:
        fail2ban:
          # ============================================
          # ALLOWLIST: IPs that bypass the plugin
          # ============================================
          allowlist:
            ip:
              - "::1"                    # IPv6 localhost
              - "127.0.0.1"              # IPv4 localhost
              - "10.0.0.5"               # Your monitoring system
              - "203.0.113.0/24"         # Your corporate network

          # ============================================
          # DENYLIST: IPs to proactively ban (optional)
          # ============================================
          denylist:
            ip:
              - "192.0.2.50"             # Known attacker IP
              - "198.51.100.0/24"        # Suspicious range

          # ============================================
          # RULES: The banning logic
          # ============================================
          rules:
            enabled: "true"              # Enable/disable rule
            bantime: 3h                  # Ban duration (3 hours)
            findtime: 10m                # Time window for counting
            maxretry: "4"                # Trigger ban after N failures
            statuscode: "400,401,403-499"  # Which codes = failure

            # ============================================
            # URL-SPECIFIC RULES (optional)
            # ============================================
            urlregexps:
              - regexp: "^/admin"        # Protect /admin routes
                mode: "block"            # Immediate ban on match
              - regexp: "^/api/auth"     # Protect auth endpoints
                mode: "block"
Configuration Strategy: Tuning for Your Use Case
Choosing maxretry:
- For public API endpoints: Use
4–5retries. Few legitimate users fail 4 times. - For admin panels: Use
3retries. Admin accounts should rarely mistype passwords. - For sensitive operations (password reset): Use
2retries. Minimize brute-force exposure.
If maxretry is too low, legitimate users with forgotten passwords get blocked (false positives). Too high, and attackers get many free attempts.
Choosing bantime:
- 3 hours: Balanced default. Long enough to deter automated attacks; short enough that legitimate users aren’t locked out overnight.
- 1 hour: Faster recovery for false positives; less deterrent for attackers.
- 24 hours: Maximum security; risk of user frustration.
Choosing findtime:
- 5–10 minutes: Standard for authentication. Most humans retry a few times within 10 minutes, then try again the next day.
- 30 minutes: If you expect bots to spread attacks over time (less common).
Monitoring IPs for the Allowlist:
If you run monitoring software (Prometheus, Uptime Robot, etc.), add those IPs to your allowlist. Otherwise, repeated health checks triggering non-200 responses will get your monitoring blocked!
allowlist:
  ip:
    - "127.0.0.1"        # Localhost
    - "10.0.1.10"        # Your Prometheus instance
    - "203.0.113.100/32"  # UptimeRobot static IP
URL-Specific Blocking: Protecting Critical Routes
One of the plugin’s most powerful features is the ability to apply different rules—or no rules at all—to specific URLs. This prevents false positives on high-traffic public endpoints while aggressively protecting authentication gateways.
Real-World Scenarios
and part of my setup :)
http:
  middlewares:

    my-fail2ban:
        plugin:
            fail2ban:
                allowlist:
                    ip:
                      - "::1"
                      - "127.0.0.1"
                      - "203.0.113.100"
                denylist:
                    ip: 192.168.0.0/24
                rules:
                    bantime: 3h
                    enabled: "true"
                    findtime: 10m
                    maxretry: "4"
                    statuscode: 400,401,403-499
                    urlregexps:
                    - regexp: "/do-not-access"
                      mode: block
Applying Fail2ban Plugin to Multiple Services
Now that you understand the configuration, let’s apply it across your infrastructure. The key insight: define the middleware once, reference it everywhere.
Apply to Services
In each service’s routing configuration, reference the middleware by name. Here are three examples:
Example 1: Blog Admin Panel
# etc_traefik/dynamic/blog.yml
http:
  routers:
    blog-https:
      rule: "Host(`blog.example.com`)"
      service: "blog-backend"
      entryPoints:
        - websecure
      tls:
        certResolver: letsencrypt
      middlewares:
        - security-headers@file
        - rate-limit@file
        - my-fail2ban@file          # <--- Applied here

    blog-http:
      rule: "Host(`blog.example.com`)"
      entryPoints:
        - web
      middlewares:
        - redirect-to-https@file

  services:
    blog-backend:
      loadBalancer:
        servers:
          - url: "http://blog:8080"
Best Practices for Middleware Ordering
Order matters. Here’s the recommended chain:
middlewares:
  - security-headers@file    # First: Set HTTP headers (no performance impact)
  - rate-limit@file          # Second: Rate limit (broad protection against bots)
  - my-fail2ban@file         # Third: Fail2ban (targeted protection against auth attacks)
Why this order?
- Security headers are light and should run first.
- Rate-limiting stops bots before they generate many auth failures.
- Fail2ban picks up remaining aggressive auth attackers.
Verifying Your Setup
Configuration is only half the battle.
Test Banning Behavior
Simulate authentication failures and watch fail2ban trigger:
curl -I https://blog.example.org
HTTP/2 200

cache-control: no-store, no-cache, must-revalidate, post-check=0, pre-check=0
content-security-policy: default-src https:; script-src 'self' 'unsafe-inline' 'unsafe-eval'; style-src 'self' 'unsafe-inline'; font-src 'self' data:; connect-src 'self'; frame-ancestors 'none';
content-type: text/html; charset=utf-8
date: Fri, 10 Apr 2026 14:59:05 GMT
expires: Thu, 19 Nov 1981 08:52:00 GMT
permissions-policy: geolocation=(), microphone=(), camera=()
pragma: no-cache
server: Apache/2.4.25 (Debian)
set-cookie: fpsess_fp-8654f976=06c0e118e99442af9a7ebd89d04a2657; path=/
strict-transport-security: max-age=15768000; includeSubDomains; preload
x-content-type-options: nosniff
x-frame-options: DENY
x-powered-by: PHP/5.6.40
x-xss-protection: 1; mode=block
Do Not Access
curl -I https://blog.example.org/do-not-access
HTTP/2 429

content-security-policy: default-src https:; script-src 'self' 'unsafe-inline' 'unsafe-eval'; style-src 'self' 'unsafe-inline'; font-src 'self' data:; connect-src 'self'; frame-ancestors 'none';
permissions-policy: geolocation=(), microphone=(), camera=()
strict-transport-security: max-age=15768000; includeSubDomains; preload
x-content-type-options: nosniff
x-frame-options: DENY
x-xss-protection: 1; mode=block
date: Fri, 10 Apr 2026 15:02:47 GMT
So you will see the 429 status which is defined from fail2ban plugin
now if you check again, nothing will be shown :
~> curl https://blog.example.org
~>
~>
That’s it my friends ! 🛡️
Disclaimer: coding agent helped with the blog post but all technical notes and examples are mine.
Prologue – Why do this at all?
Running services at home is fun. Running them securely and reliably is where things get interesting.
In my homelab, I run many applications, like Immich on a legacy PC, behind a residential ISP connection, dynamic IPs, and without opening ports on my router. This setup provides my test lab and a way to play and learn without the use of any cloud. At the same time, I want to use some of my internal services from the internet as securely as I can.
This post describes how to achieve exactly that using:
- Tailscale as a secure private network between hosts
- DNS-01 Let’s Encrypt challenges for automated TLS
- A remote homelab service (Immich) reachable only over Tailscale
Important: The DNS record must exist before Traefik requests certificates.
High-level architecture
Before diving into configs, let’s clarify the flow:
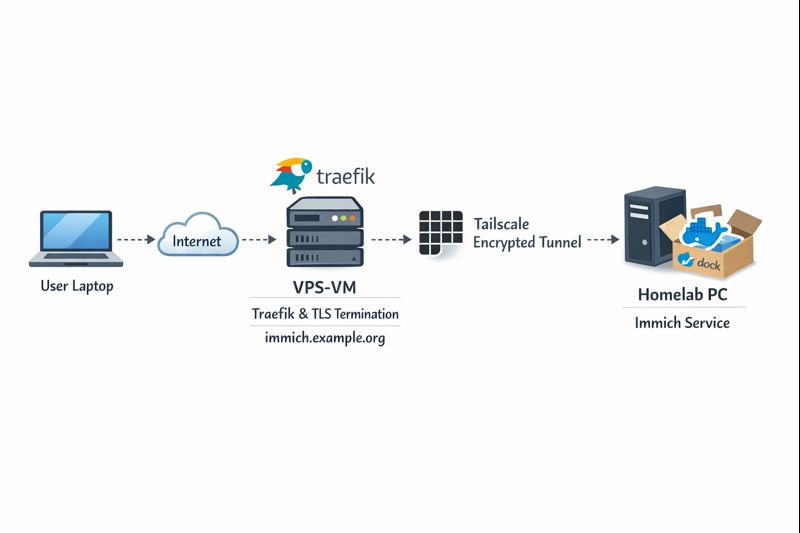
Key points:
- DNS entry (eg. immich.example.org) exists before Traefik starts, enabling ACME issuance
- Traefik as an internet-facing reverse proxy - Only Traefik is exposed to the internet
- Immich listens on a private Tailscale IP (100.x.x.x)
- Valid TLS certificates from Let’s Encrypt - TLS is terminated at Traefik
- No inbound firewall rules on my home network - No port forwarding on the home router
- Minimal attack surface
- Clean separation between edge and internal services
Why not expose Immich directly?
Opening ports on a home router comes with downsides:
- Public IP changes
- Consumer-grade firewalling
- Direct exposure of application vulnerabilities
- Harder TLS automation
This setup avoids all of that.
Why Tailscale?
Tailscale gives you:
- WireGuard-based encryption by default
- Stable private IPs
- Mutual authentication
- No inbound NAT rules
- Fine-grained ACLs (optional, but recommended)
Even if Traefik were compromised, the blast radius is limited to what it can access over Tailscale.
Why DNS-01 instead of HTTP-01?
DNS-01 lets Traefik:
- Obtain certificates without the backend being reachable
- Issue certs before the service is live
- Avoid exposing port 80 on internal services
This is especially useful when the backend is private or remote.
Prerequisites
Before starting, make sure you have:
- A domain name (e.g.
example.org) - A DNS provider supported by Traefik (LuaDNS in this case)
- A public server (VPS, cloud VM) for Traefik
-
Tailscale installed on:
- The Traefik host
- Your homelab / home PC
-
A DNS record:
immich.example.org → <Traefik public IP>
Important: The DNS record must exist before Traefik requests certificates.
Traefik setup (edge host)
Docker Compose
Traefik runs as a standalone service on the edge host:
---
services:
  traefik:
    image: traefik:v3.6
    container_name: traefik
    hostname: traefik
    env_file:
      - ./.env
    environment:
      - TRAEFIK_CERTIFICATESRESOLVERS_LETSENCRYPT_ACME_EMAIL=${LUADNS_API_USERNAME}
    restart: unless-stopped
    ports:
      - 8080:8080 # Dashboard (secured, no insecure mode)
      - 80:80     # HTTP
      - 443:443   # HTTPS
    volumes:
      - ./certs:/certs             # For static certificates
      - ./etc_traefik:/etc/traefik # Traefik configuration files
      - /var/run/docker.sock:/var/run/docker.sock:ro  # So that Traefik can listen to the Docker events
    healthcheck:
      test: ["CMD", "traefik", "healthcheck"]
      interval: 30s
      retries: 3
      timeout: 10s
      start_period: 10s
Static Traefik configuration (traefik.yml)
This file defines entrypoints, providers, logging, and ACME:
ping: {}

api:
  dashboard: true
  insecure: false

log:
  filePath: /etc/traefik/traefik.log
  level: INFO

entryPoints:
  web:
    address: ":80"
    reusePort: true
  websecure:
    address: ":443"
    reusePort: true

providers:
  docker:
    exposedByDefault: false
  file:
    directory: /etc/traefik/dynamic/
    watch: true
We explicitly disable auto-exposure of Docker containers and rely on file-based dynamic config to have more control on which docker services we want traefik to “see”.
Let’s Encrypt via DNS-01 (LuaDNS)
certificatesResolvers:
  letsencrypt:
    acme:
      email: ""
      storage: "/certs/acme.json"
      caServer: https://acme-v02.api.letsencrypt.org/directory
      dnsChallenge:
        provider: luadns
        delayBeforeCheck: 0
        resolvers:
          - "8.8.8.8:53"
          - "1.1.1.1:53"
Why this matters:
- Certificates can be issued even if Immich is offline
- No need for port 80 reachability
- Works cleanly with private backends
Dynamic routing to Immich over Tailscale
This is where the magic happens.
Dynamic config (dynamic/immich.yml)
http:
  routers:
    immich:
      rule: 'Host(`immich.example.org`)'
      entryPoints: ["websecure"]
      service: "immich"
      tls:
        certResolver: letsencrypt

  services:
    immich:
      loadBalancer:
        servers:
          - url: "http://100.80.90.101:2283"
        passHostHeader: true
Explanation:
Host()rule matches your public domain- TLS is terminated at Traefik
- Backend URL is a Tailscale IP
- No exposure of Immich to the public internet
Homelab: Immich setup
On the home PC, Immich runs normally, bound to a local port:
ports:
  - '2283:2283'
Make sure to use the docker-compose.yml of the current release:
This port does not need to be:
- Exposed to the internet
- Forwarded on your router
- Secured with TLS
It only needs to be reachable from the Traefik host via Tailscale.
Verifying the setup
Visit: https://immich.example.org
You should get a valid Let’s Encrypt certificate and a working Immich UI.

Hardening ideas (recommended)
Once this works, consider:
- Tailscale ACLs limiting Traefik → Immich access
- Middleware for:
- Security headers
- Rate limiting
- IP allowlists
- Traefik dashboard behind auth
- Separate internal / external entrypoints
That's it !