I spent some time trying to connect a Yeelight Wireless Smart Dimmer to Home Assistant.

Disclaimer: This dimmer is compatible with Yeelight smart ceiling light series, Yeelight Crystal Pendant Lamp and Yeelight Smart Curtain Motor. Control the devices freely anytime and anywhere.
project page: Yeelight
YLKG07YL
The device I used is:
Dimmer Switch 2B0B
Model: YLKG07YL / YLKG08YL
Bluetooth name: yee-rc
Firmware: Xiaomi MiBeacon V3 encrypted
The goal was simple: use the Yeelight dimmer knob inside Home Assistant as I made a mistake buying it. I do not have a ceiling light but a few yeelight lamps. Thus I wanted to setup this dimmer to HA, so could use it to any device, to rotate it, to change brightness and press it to toggle a lamp or play a text to speech to my soundbar!
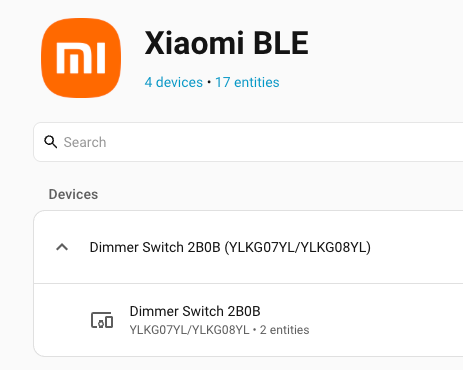
The final result works nicely with the Home Assistant Xiaomi BLE integration.
The project
The code I used is available here:
https://github.com/ebal/yeelight-dimmer-pythonThis repository is a fork, and contains a Python handler for the Yeelight YLKG07YL / YLKG08YL Bluetooth dimmer. It can receive, decrypt, and handle Bluetooth notifications from the dimmer. The repository README also shows how to run the demo script and retrieve the beacon_key, which is needed because the dimmer broadcasts encrypted sensor data. I forked the original project as my firmware version is newer than previous models and original project didnt work.d
Finding the dimmer
First, I scanned for Bluetooth LE devices.
sudo hcitool lescanor better, use bluetoothctl directly:
bluetoothctl scan onThe dimmer appeared as:
F8:24:41:C9:2B:0B yee-rcSo the MAC address of my dimmer was:
F8:24:41:C9:2B:0BGetting the beacon key
The Yeelight dimmer sends encrypted data, so Home Assistant needs a 24-character hexadecimal bindkey / beacon key.
The repository provides a demo script for this:
sudo python3 demo.py F8:24:41:C9:2B:0BWhen the script asks you to press the Pair button, press the small pairing button on the dimmer.
A successful run should print something like:
using mac F8:24:41:C9:2B:0B
! Press the "Pair" button at the dimmer...
Connecting... done
Authenticating.. done
beacon_key: xxxxxxxxxxxxxxxxxxxxxxxx
The beacon_key is the value that must be added to Home Assistant.
Adding it to Home Assistant
After getting the key, I added the dimmer through the Xiaomi BLE integration in Home Assistant.
Home Assistant detected it as a dimmer device. After that, I could use the 5 dimmer events in automations, such as:
Long Press
Press
Rotate Left
Rotate Left (Pressed)
Rotate Right
Rotate Right (Pressed)
Automations
to make it more interesting, here are some (random) automations:
Rotate right to increase brightness
When I rotate the dimmer to the right, I increase the brightness by 25.
alias: Dimmer_Rotate_Right
description: ""
triggers:
  - trigger: event.received
    target:
      device_id: defd42d5517df84480bc151db714a0d3
    options:
      event_type:
        - rotate_right
conditions: []
actions:
  - action: number.set_value
    target:
      entity_id: number.yeelink_de_470134772_colorb_brightness_with_zero_p_3_5
    data:
      value: >-
        {{
        [states('number.yeelink_de_470134772_colorb_brightness_with_zero_p_3_5')
        | float(0) + 25, 100] | min }}
mode: single
This reads the current brightness value, adds 25, and makes sure it does not go above 100.
Rotate left to decrease brightness
When I rotate the dimmer to the left, I decrease the brightness by 25.
alias: Dimmer_Rotate_Left
description: ""
triggers:
  - trigger: event.received
    target:
      device_id: defd42d5517df84480bc151db714a0d3
    options:
      event_type:
        - rotate_left
conditions: []
actions:
  - action: number.set_value
    target:
      entity_id: number.yeelink_de_470134772_colorb_brightness_with_zero_p_3_5
    data:
      value: >-
        {{
        [states('number.yeelink_de_470134772_colorb_brightness_with_zero_p_3_5')
        | float(0) - 25, 100] | min }}
mode: single
This works, but there should be some small improvements, to keep the brightness between 0 and 100.
I will update the blog post if needed in the future to fix this.
Press to toggle the lamp
Pressing the dimmer toggles the bedside lamp.
alias: Dimmer_Press
description: ""
triggers:
  - device_id: defd42d5517df84480bc151db714a0d3
    domain: xiaomi_ble
    type: dimmer
    subtype: press
    trigger: device
conditions: []
actions:
  - action: light.toggle
    metadata: {}
    target:
      entity_id: light.mibedsidelamp2_77c5_mijia_bedside_lamp_sw_auth
    data: {}
mode: single
This is the most useful automation for daily use: press the knob and the lamp turns on or off.
That’s it !
Evaggelos
I want a simple way to experiment with LLMs from my (very old) archlinux machine that has no GPU. OpenRouter provides a pay-as-you-go solution by selecting the model you want for the job you need. It’s quite easy and also provides some free models!
Important limitation
Free OpenRouter models usually have rate limits, availability limits, and sometimes slower routing. Some may disappear, change provider, or become temporarily unavailable. It’s not always reliable.
Running Open WebUI with OpenRouter Free Models
In this post we will build a simple local AI chat setup using Open WebUI, LiteLLM, and OpenRouter free models.
The goal is to have a clean web interface where we can chat with an OpenRouter model, while LiteLLM acts as a small proxy layer between Open WebUI and OpenRouter.
Disclaimer: You do not need LiteLLM. OpenRouter provides an OpenAI API. I am going to share both setups, as I use LiteLLM as a proxy for other use cases too.
The final architecture looks like this:
Browser
  -> Open WebUI
  -> OpenRouter
  -> Free LLM model
or with LiteLLM
Browser
  -> Open WebUI
  -> LiteLLM
  -> OpenRouter
  -> Free LLM model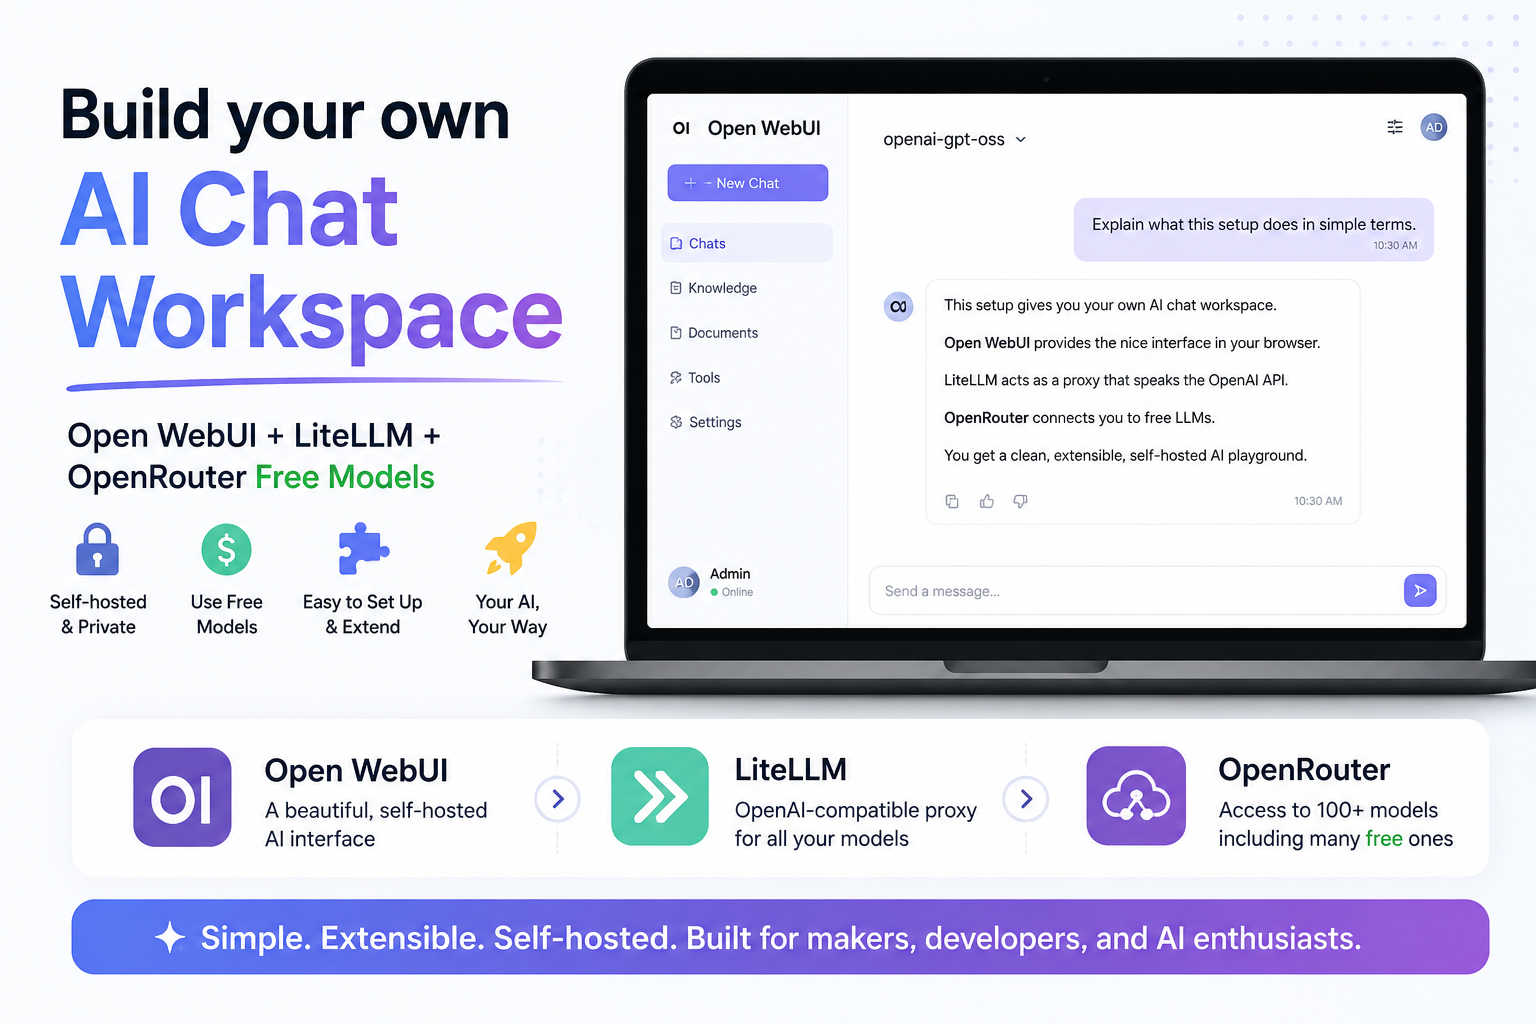
What are we building?
We are going to run two containers:
-
LiteLLM
A lightweight proxy that exposes an OpenAI-compatible API and forwards requests to OpenRouter or to any other LLM provider. -
Open WebUI
A self-hosted ChatGPT-like web interface that connects either to OpenRouter and/or to LiteLLM.
- Open WebUI will talk to OpenRouter in scenario A.
- Open WebUI will talk to LiteLLM, and LiteLLM will talk to OpenRouter in scenario B.
Requirements
You need:
- Docker
- Docker Compose
- An OpenRouter account
- An OpenRouter API key
You can create an API key from your OpenRouter account settings.
Project files
Create a new directory for the project:
mkdir openwebui
cd openwebui
Scenario A - OpenWebUI with OpenRouter
We will create a single docker compose file:
---
services:
  openwebui:
    image: ghcr.io/open-webui/open-webui:main-slim
    container_name: openwebui
    ports:
      - "8080:8080"
    volumes:
      - open-webui:/app/backend/data

volumes:
  open-webui:
In this scenario, I use Open WebUI slim edition.
Open WebUI provides a slim variant designed to reduce the initial container size by excluding pre-bundled AI models and heavy dependencies. Smaller initial size, but the first startup may take longer as the container downloads these necessary models.
Start OpenWebUI
Run:
docker compose -v up -dCheck that both containers are running:
docker compose -v psYou should see something like:
❯ docker compose -v ps -a

NAME      IMAGE                                    COMMAND          SERVICE    CREATED         STATUS   PORTS
openwebui ghcr.io/open-webui/open-webui:main-slim  "bash start.sh"  openwebui  31 minutes ago  Up 30 minutes (healthy)   0.0.0.0:8080->8080/tcp,  [::]:8080->8080/tcp
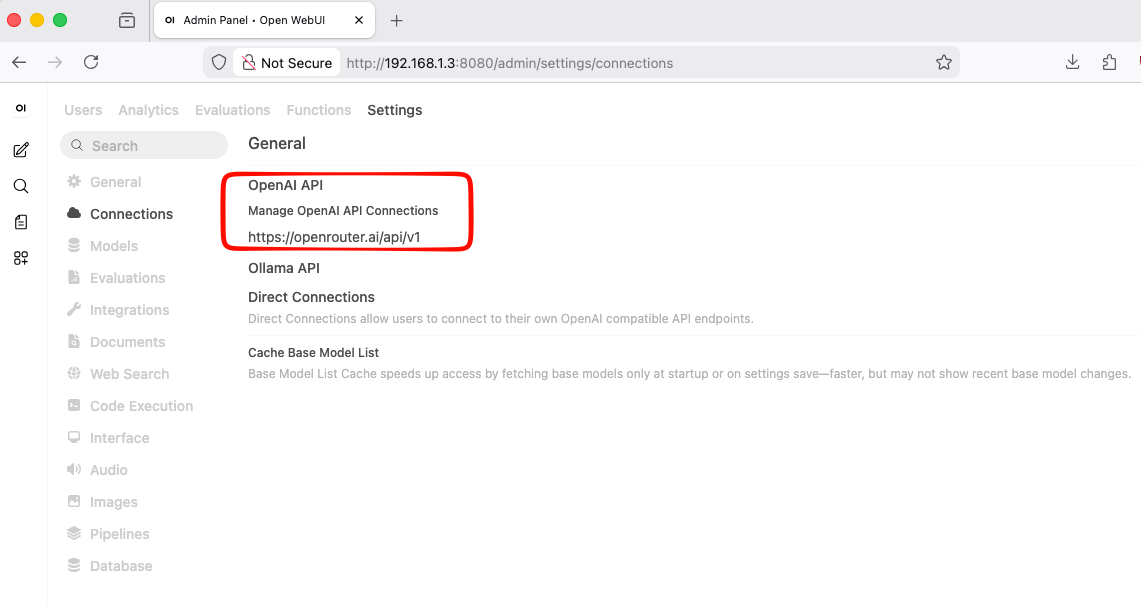
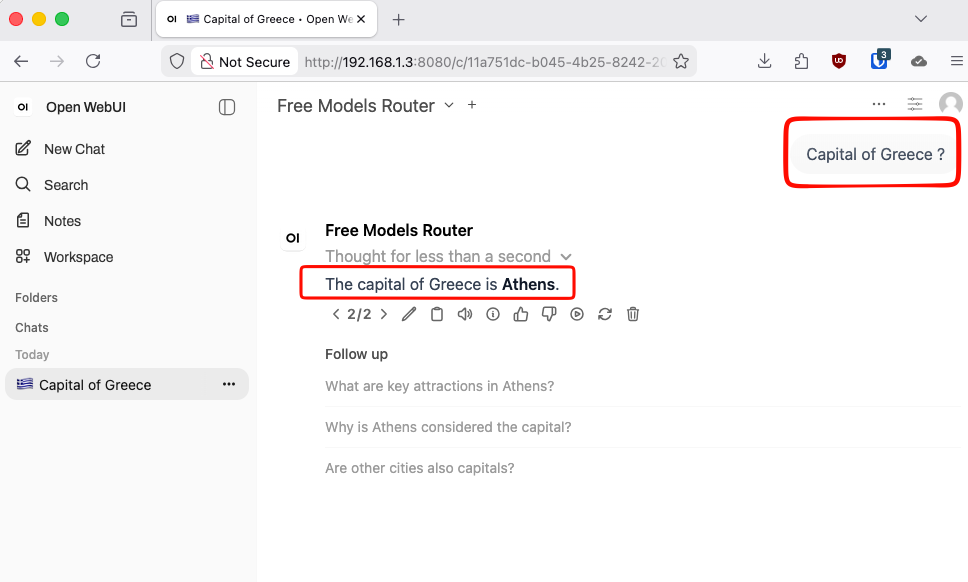
Setup OpenWebUI to OpeRouter
In bottom left, Go to:
Admin settings --> Settings --> Admin Settings --> Connections
Add OpenRouter as below
openwebui with openrouter
Scenario Β - OpenWebUI with LiteLLM to OpenRouter
We will create three files:
.env
docker-compose.yml
litellm_config.yaml
Environment file
Create a file named .env:
cat > .env <<'EOF'
OPENROUTER_API_KEY=sk-...
OPENROUTER_BASE_URL="https://openrouter.ai/api/v1"
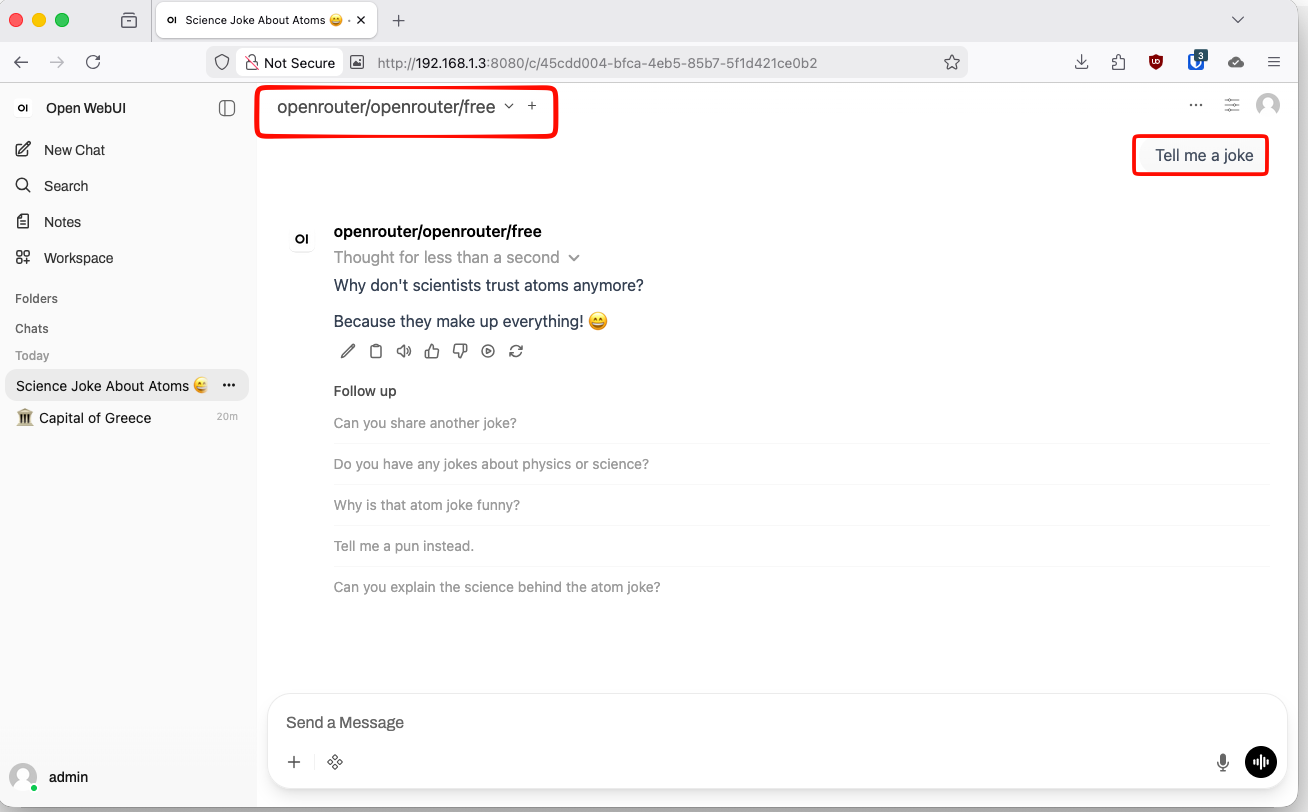
OPENROUTER_MODEL="openrouter/openrouter/free"
OPENROUTER_MODEL_NAME="openrouter-free"
EOFReplace this value with your real OpenRouter API key:
sk-...The simplest way to get free inference is with
openrouter/freewhich is a router that selects free models at random from the models available on OpenRouter.
LiteLLM configuration
Create litellm_config.yaml:
cat > litellm_config.yaml <<'EOF'
model_list:
  - model_name: os.environ/OPENROUTER_MODEL_NAME
    litellm_params:
      model: os.environ/OPENROUTER_MODEL
      api_base: os.environ/OPENROUTER_API_BASE
      api_key: os.environ/OPENROUTER_API_KEY
EOF
This file tells LiteLLM:
- expose a local model called
openrouter-free - forward requests to OpenRouter
- use the OpenRouter model defined in
.env - authenticate using the OpenRouter API key
So Open WebUI does not need to know the exact OpenRouter model name. It only talks to LiteLLM.
Docker Compose file
Create docker-compose.yml:
cat > docker-compose.yml <<'EOF'
---
services:

  litellm:
    image: docker.litellm.ai/berriai/litellm:main-latest
    container_name: litellm
    command: --config /app/config.yaml # --detailed_debug
    volumes:
      - ./litellm_config.yaml:/app/config.yaml:ro
    restart: unless-stopped
    env_file:
      - .env

  openwebui:
    image: ghcr.io/open-webui/open-webui:main-slim
    container_name: openwebui
    ports:
      - "8080:8080"
    volumes:
      - open-webui:/app/backend/data
    depends_on:
      litellm:
        condition: service_started

volumes:
  open-webui:

EOF
This starts two services.
docker compose -v up -dKeeping the same volume means that keeps your Open WebUI settings, users, and chat history even if the container is recreated.
Configure Open WebUI
Open your browser and go to the admin settings and configure the OpenAI-compatible connection.
Use this as the API base URL:
http://litellm:4000Depending on your Open WebUI version, it may ask for the full OpenAI-compatible base URL. In that case use:
http://litellm:4000/v1Test the setup
In Open WebUI, start a new chat. If everything is configured correctly, Open WebUI will send the message to LiteLLM, LiteLLM will forward it to OpenRouter, and the model response will appear in your browser.
The OpenRouter model does not respond
Free OpenRouter models can have rate limits, queueing, or temporary availability issues.
Try another free model from OpenRouter and update:
OPENROUTER_MODEL=openrouter/openai/gpt-oss-120b:freeThen restart:
docker compose restart litellmand check LiteLLM logs with:
docker compose logs -f litellmThat’s it !
Evaggelos
I use multiple computers and multiple mobile devices. This is mostly because I like keeping my personal devices/accounts separated from my work-related things, also … company policy. The last 4 years I am using an apple macbook, it’s a managed and restricted device. With managed devices, a lot of features like virtualization, containers or even VPN, anything that has network access and many other functionality were restricted. Recently I got a replacement macbook, thanks to our IT, and now for the first time I can use my old device as an unmanaged macbook.
Oh, I missed a lot!

Tart
To start my journey, I want to quickly spawn virtual machines (mostly ubuntu server) to test/run self hosted applications. I found Tart Virtualization to be excellent for this.
Tart is a virtualization toolset to build, run and manage macOS and Linux virtual machines on Apple Silicon.
To install and use tart is extremely easy:
brew install cirruslabs/cli/tart

tart clone ghcr.io/cirruslabs/macos-tahoe-base:latest tahoe-base
tart run tahoe-base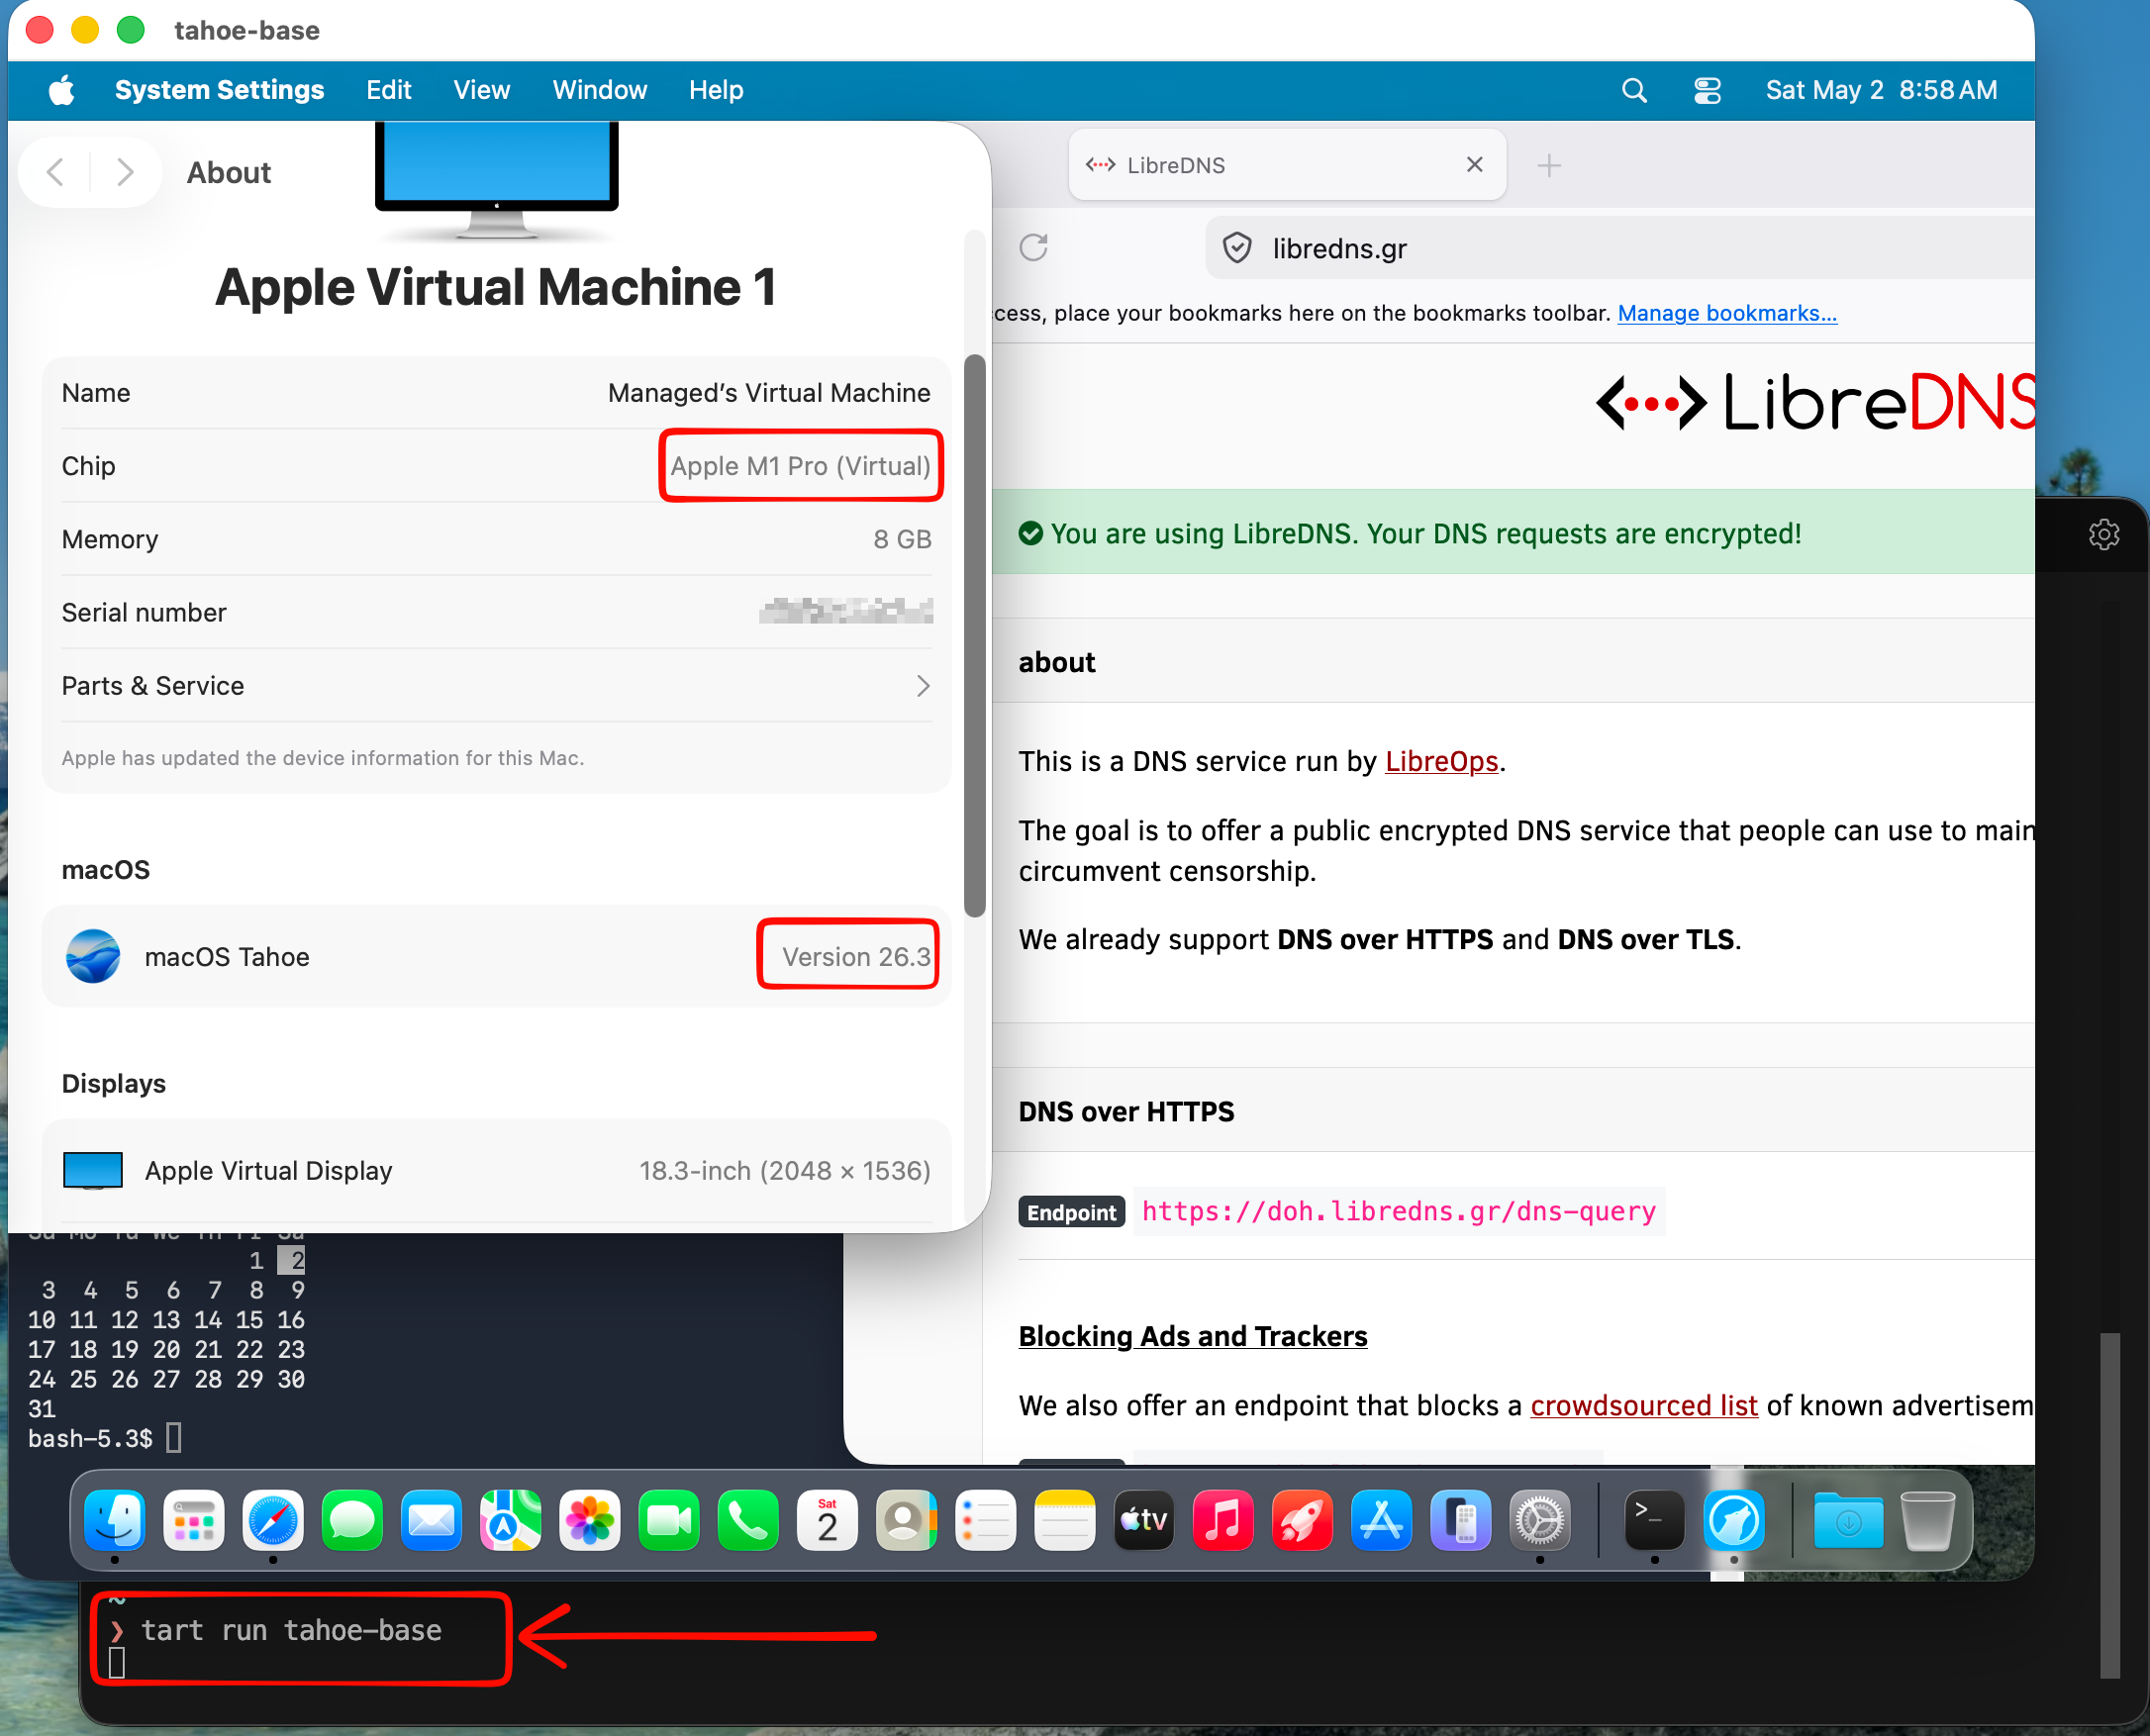
Ubuntu virtual machine
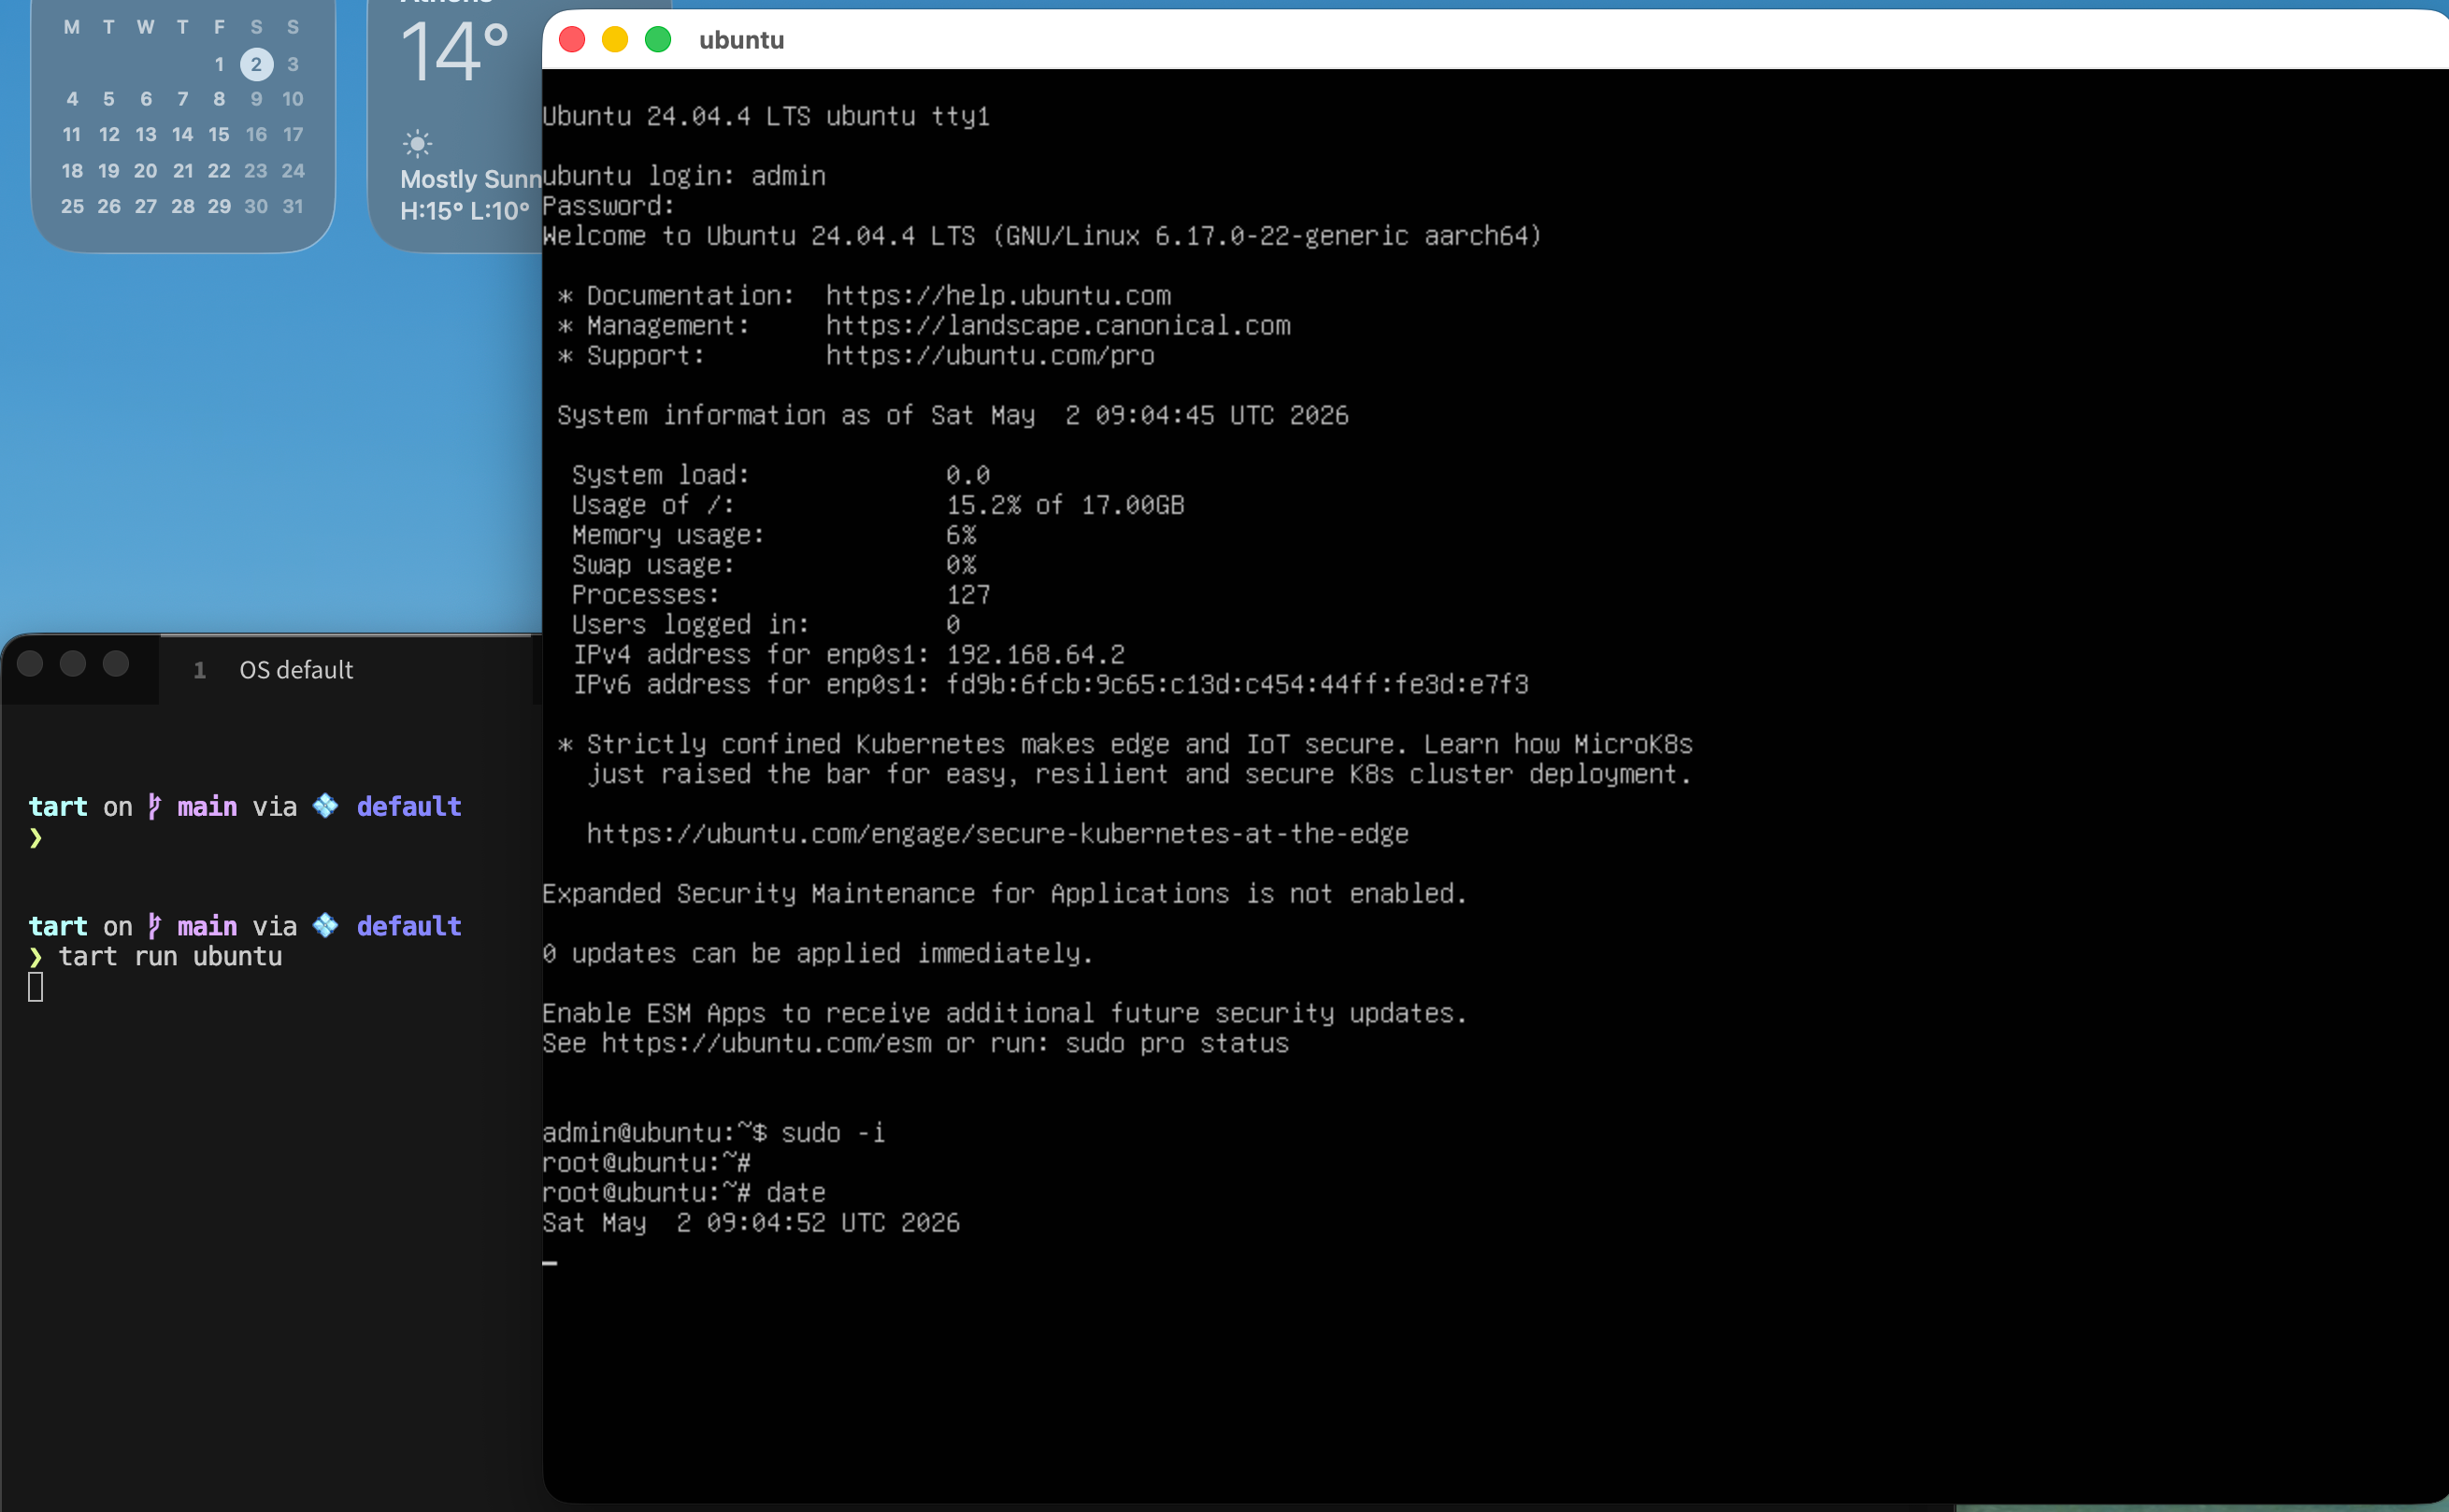
is very easy to setup an ubuntu virtual machine with tart, as an ubuntu image already exist
tart clone ghcr.io/cirruslabs/ubuntu:24.04 ubuntu
tart set ubuntu --disk-size 20
tart run ubuntu
and the default credentials are:
Username: admin
Password: admin
caveat: Change them if you are going to use them in production.
We can also change the default values
like cpu and/or memory settings, as disk size above
❯ tart set ubuntu --memory 8192
❯ tart set ubuntu --cpu 4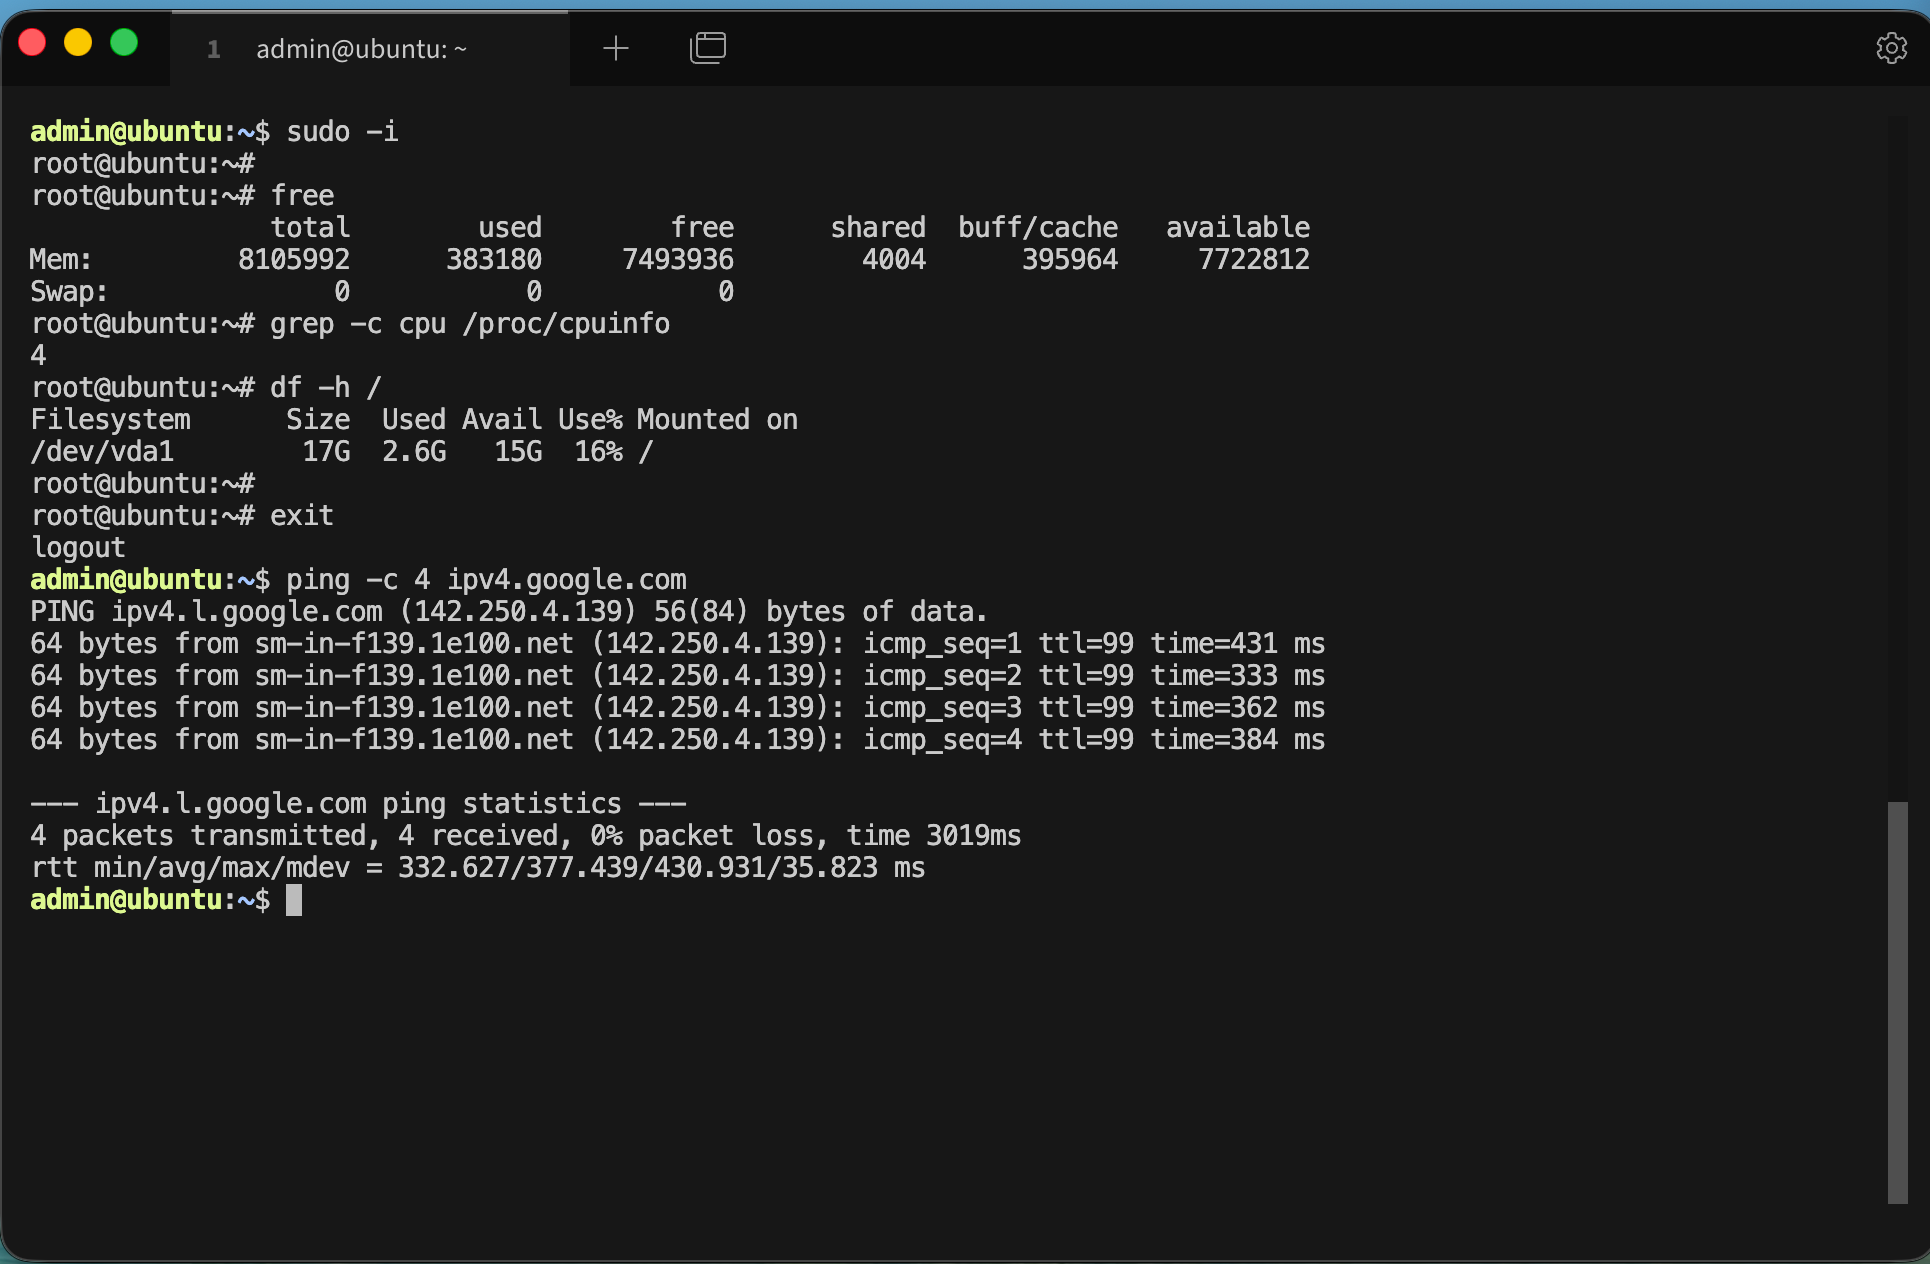
We can start the VM without graphics
❯ tart run ubuntu --no-graphics &Is this vm running ?
✦ ❯ tart list | grep -i ubuntu
local  ubuntu                                      20   3    6 seconds ago running

OCI    ghcr.io/cirruslabs/ubuntu:24.04             20   5    14 hours ago  stopped
OCI    ghcr.io/cirruslabs/ubuntu@sha256:9e71b46... 20   5    14 hours ago  stopped
We can find the IP of the virtual machine
✦ ❯ tart ip ubuntu
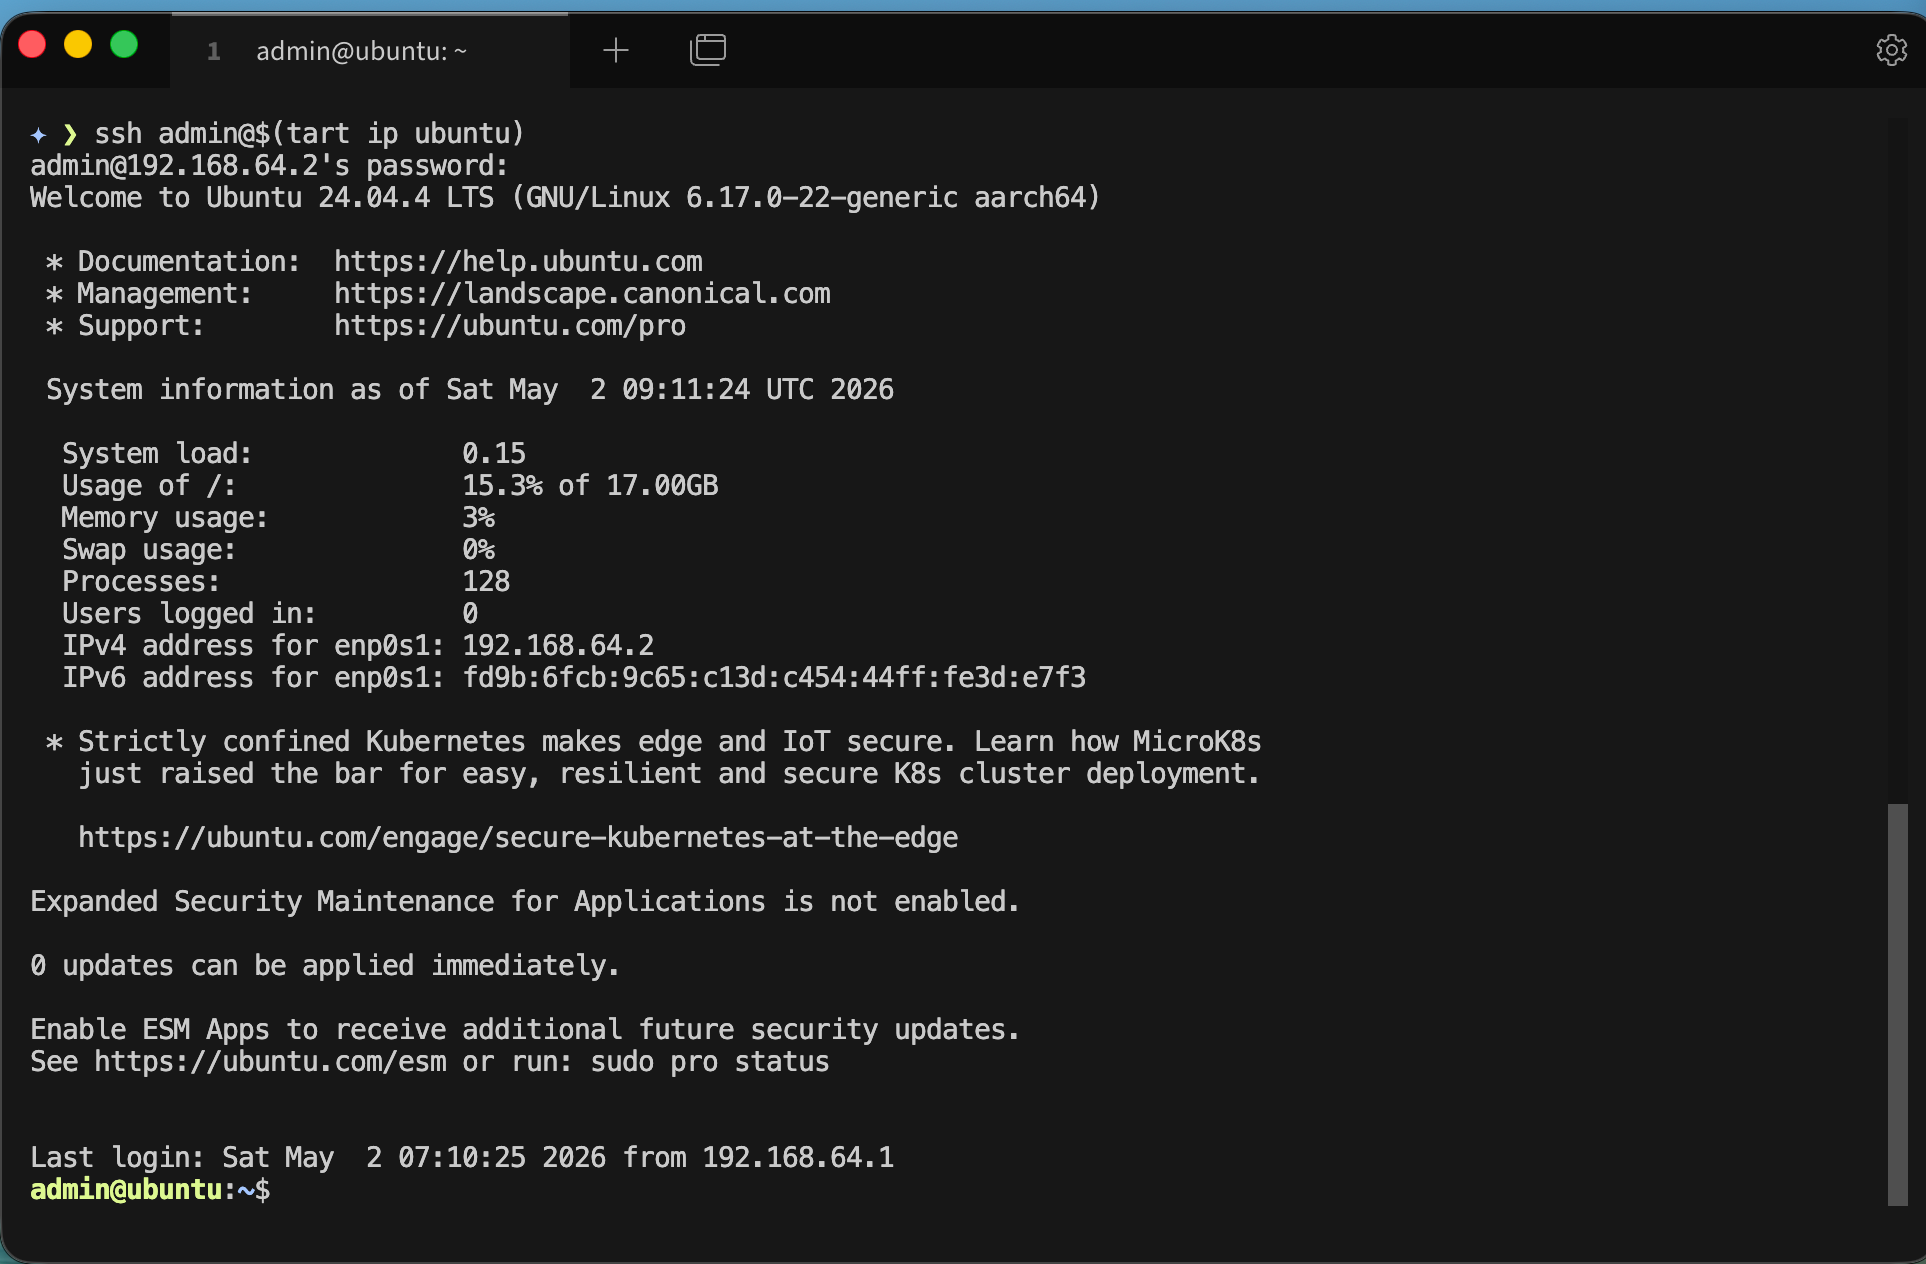
192.168.64.2… and we can ssh into the VM
✦ ❯ ssh admin@$(tart ip ubuntu)
admin@192.168.64.2's password:
We can even add it to our tailscale network
I guess you already know how to add machines to your tailnet
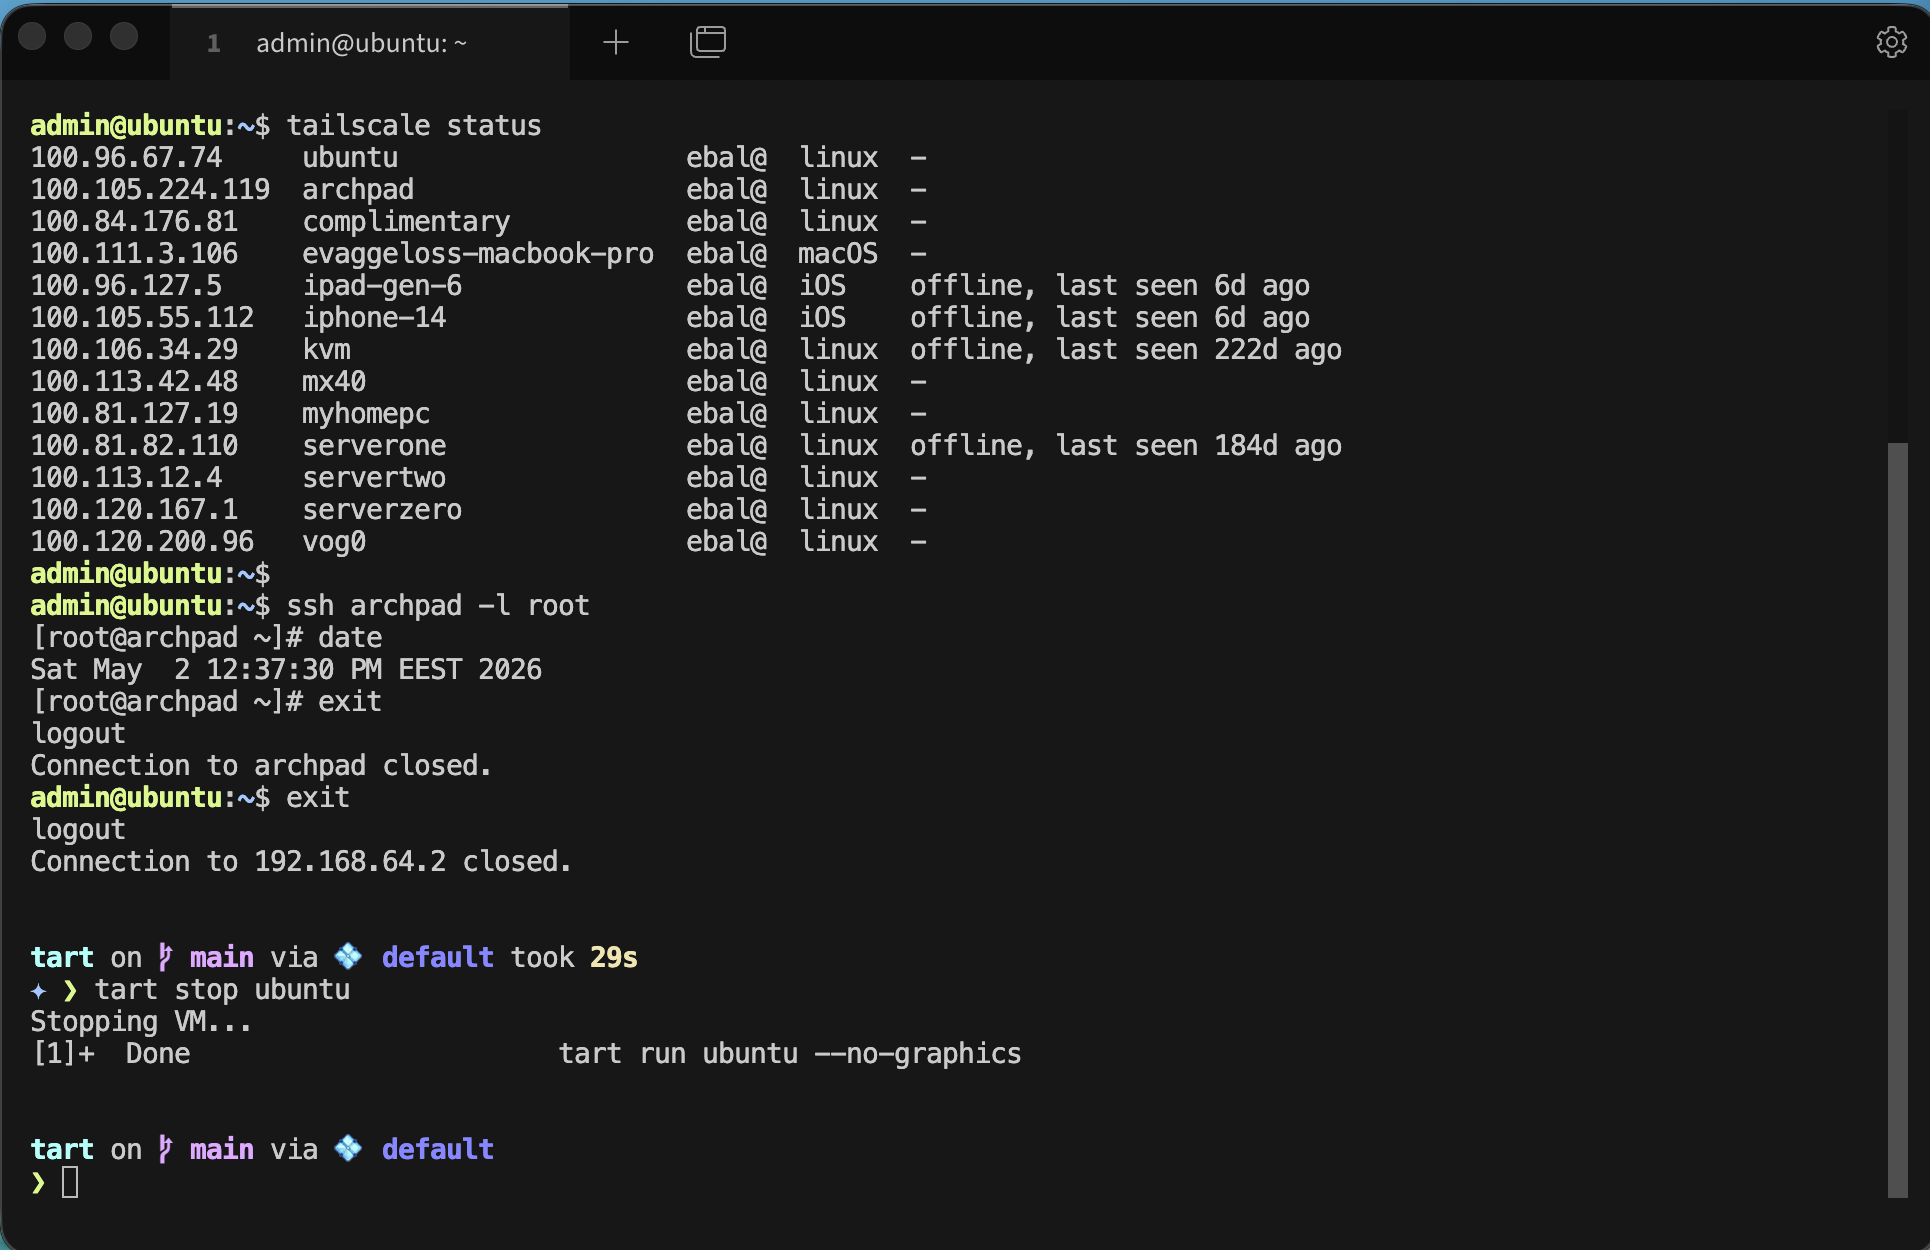
and don’t forget to stop or delete your VMs if you do not need them
tart stop ubuntu
tart delete ubuntu
That’s it !
Evaggelos
I was looking at my logs and analytics, and I saw something interesting. I had a few requests to these endpoints which they do not exist on my blog!
.git/config
.aws/credentials
.aws/config
config.php
So I started looking into this …
On my old web server, I had an extensive defensing mechanism with mod security, fail2ban and many more. At some point I had some OWASP prevention mechanism, so I had them connected to fail2ban and fail2ban blocked IPs via iptables.
On my new setup, I use traefik reverse proxy and I was thinking that for sure, there is a way to connect traefik with fail2ban. So after a quick research, I ended to fail2ban traefik plugin. Which does something similar to fail2ban, but it does not need fail2ban, iptables or nftables to block incoming traffic.
So, if you’re running services behind Traefik, you’ve got a powerful tool right at your fingertips: the fail2ban plugin. Unlike the traditional Linux fail2ban package that operates at the kernel level with iptables, Traefik’s fail2ban plugin works at the middleware level—meaning it can protect specific routes, integrate seamlessly with your containerized stack, and start banning malicious IPs within seconds.
Prerequisites & How the Plugin Works
What You Need
- Traefik 3.0 or later (the plugin requires traefik experimental plugin system)
- Basic familiarity with Traefik (routers, services, middleware concepts)
- Docker Compose or Kubernetes (we’ll focus on Docker in this guide)
- Administrative access to your Traefik configuration files
The Traefik Fail2ban Plugin
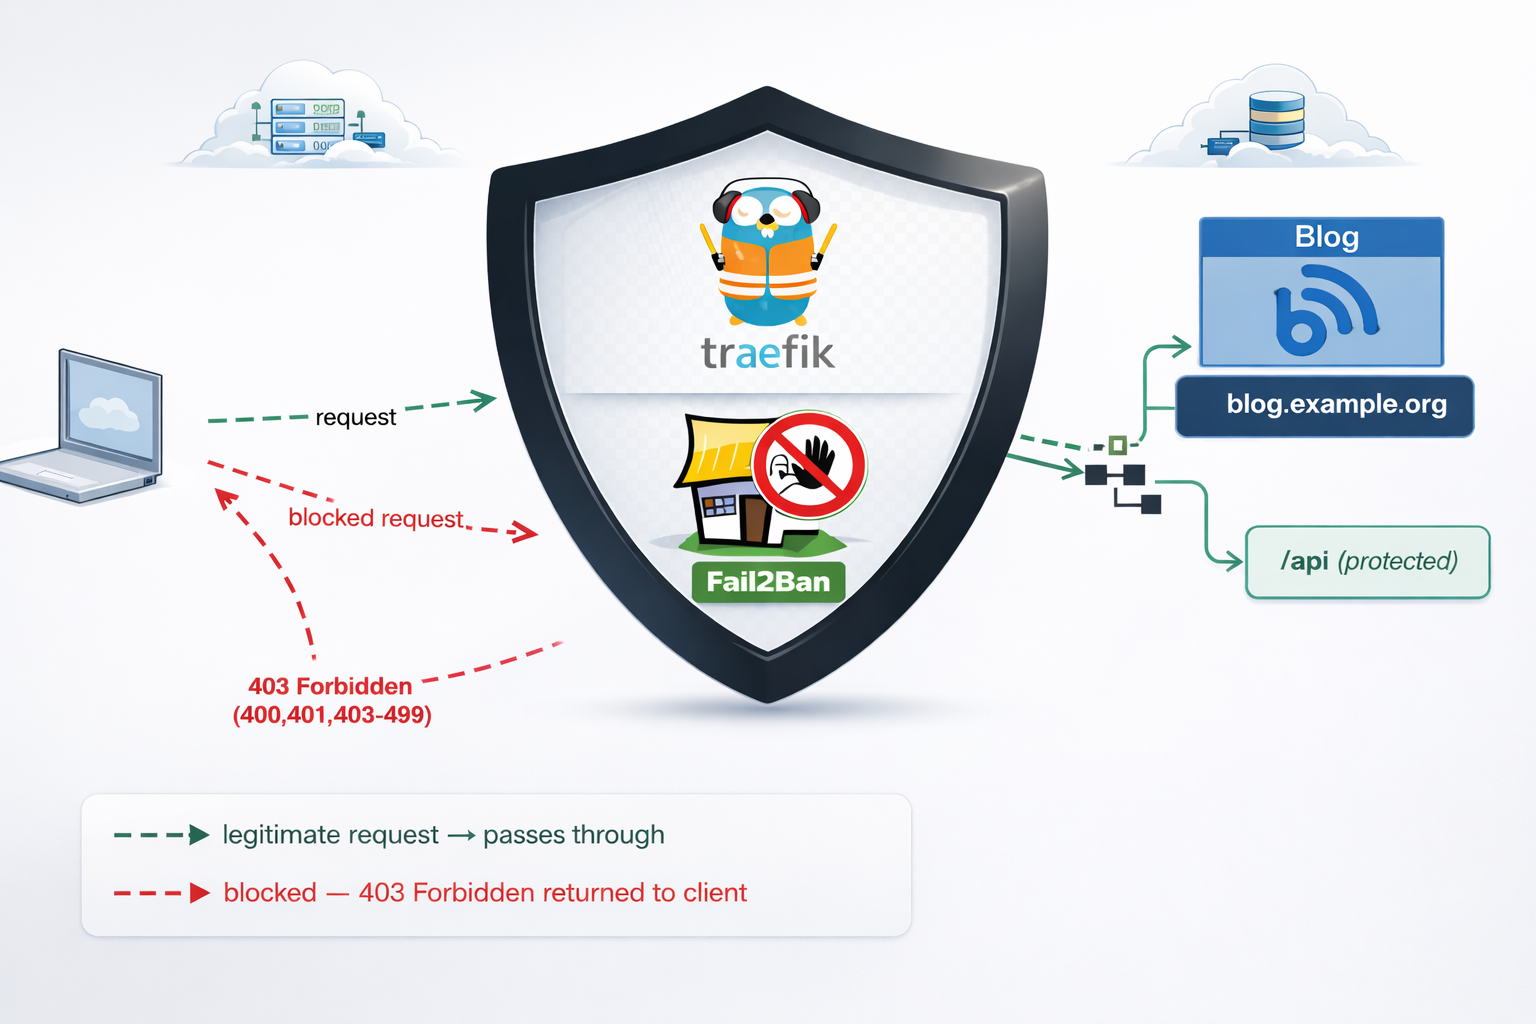
If you’re familiar with traditional fail2ban on Linux, Traefik’s version works differently—and that’s actually good news. Instead of relying on log file parsing and kernel-level packet filtering, the Traefik plugin watches HTTP responses in real-time at the middleware level. When it detects a pattern of failures (e.g., four 401 “Unauthorized” responses from the same IP within eg. 10 minutes), it blocks that IP for a configurable duration for x hours.
Here’s the flow:
Incoming Request
      ↓
Traefik Router (matches domain/path)
      ↓
Middleware Chain (security headers → rate-limit → fail2ban)
      ↓
Fail2ban Plugin checks: Is this IP banned?
      ├─→ YES: Return 403 Forbidden, block request
      └─→ NO: Continue to backend service
      ↓
Backend responds (200, 401, 403, etc.)
      ↓
Fail2ban updates counters: Track failures by IP
      ↓
Threshold exceeded? Ban this IP for 3 hours
Key Advantages
- Application-aware: Works at the HTTP level, not raw packets
- URL-specific: Protect only sensitive routes; allow legitimate traffic to other endpoints
- Dynamic: No service restarts needed; configuration reloads on-the-fly
- Container-friendly: Zero external dependencies; runs inside your Traefik container
- Flexible: Whitelist trusted IPs, customize ban duration, define custom rules per endpoint
Installation & Plugin Setup
Add the Plugin to Your Traefik Configuration
First, declare the fail2ban plugin in your traefik.yml. This tells Traefik where to find and how to load the plugin.
# traefik.yml
experimental:
  plugins:
    fail2ban:
      moduleName: github.com/tomMoulard/fail2ban
      version: v0.9.0  # or use the latest stable version
Restart Traefik
After updating traefik.yml, restart the Traefik container:
docker-compose down traefik && docker-compose up -d traefikVerify Plugin Initialization
Check the container logs for successful plugin loading:
docker-compose logs traefik | grep -i fail2banYou should see output something like:
traefik | 2024-04-05 14:32:15 INF Loaded plugin fail2ban from github.com/tomMoulard/fail2ban@v0.9.0If you see an error instead, verify:
- Traefik version is 3.0+
- Plugin module name is spelled correctly
- The version tag exists in the GitHub repository
Configuration: Building Your Protection Rules
Now comes the interesting part. Configuring what and how fail2ban protects your services. All middleware definitions live in dynamic/ directory and usually in middlewares.yml or a similar file that Traefik loads from the dynamic/ directory. For this blog post, we will use this file.
Understanding Each Configuration Parameter
Here’s a complete fail2ban middleware definition with detailed explanations:
# etc_traefik/dynamic/middlewares.yml
http:
  middlewares:
    my-fail2ban:
      plugin:
        fail2ban:
          # ============================================
          # ALLOWLIST: IPs that bypass the plugin
          # ============================================
          allowlist:
            ip:
              - "::1"                    # IPv6 localhost
              - "127.0.0.1"              # IPv4 localhost
              - "10.0.0.5"               # Your monitoring system
              - "203.0.113.0/24"         # Your corporate network

          # ============================================
          # DENYLIST: IPs to proactively ban (optional)
          # ============================================
          denylist:
            ip:
              - "192.0.2.50"             # Known attacker IP
              - "198.51.100.0/24"        # Suspicious range

          # ============================================
          # RULES: The banning logic
          # ============================================
          rules:
            enabled: "true"              # Enable/disable rule
            bantime: 3h                  # Ban duration (3 hours)
            findtime: 10m                # Time window for counting
            maxretry: "4"                # Trigger ban after N failures
            statuscode: "400,401,403-499"  # Which codes = failure

            # ============================================
            # URL-SPECIFIC RULES (optional)
            # ============================================
            urlregexps:
              - regexp: "^/admin"        # Protect /admin routes
                mode: "block"            # Immediate ban on match
              - regexp: "^/api/auth"     # Protect auth endpoints
                mode: "block"
Configuration Strategy: Tuning for Your Use Case
Choosing maxretry:
- For public API endpoints: Use
4–5retries. Few legitimate users fail 4 times. - For admin panels: Use
3retries. Admin accounts should rarely mistype passwords. - For sensitive operations (password reset): Use
2retries. Minimize brute-force exposure.
If maxretry is too low, legitimate users with forgotten passwords get blocked (false positives). Too high, and attackers get many free attempts.
Choosing bantime:
- 3 hours: Balanced default. Long enough to deter automated attacks; short enough that legitimate users aren’t locked out overnight.
- 1 hour: Faster recovery for false positives; less deterrent for attackers.
- 24 hours: Maximum security; risk of user frustration.
Choosing findtime:
- 5–10 minutes: Standard for authentication. Most humans retry a few times within 10 minutes, then try again the next day.
- 30 minutes: If you expect bots to spread attacks over time (less common).
Monitoring IPs for the Allowlist:
If you run monitoring software (Prometheus, Uptime Robot, etc.), add those IPs to your allowlist. Otherwise, repeated health checks triggering non-200 responses will get your monitoring blocked!
allowlist:
  ip:
    - "127.0.0.1"        # Localhost
    - "10.0.1.10"        # Your Prometheus instance
    - "203.0.113.100/32"  # UptimeRobot static IP
URL-Specific Blocking: Protecting Critical Routes
One of the plugin’s most powerful features is the ability to apply different rules—or no rules at all—to specific URLs. This prevents false positives on high-traffic public endpoints while aggressively protecting authentication gateways.
Real-World Scenarios
and part of my setup :)
http:
  middlewares:

    my-fail2ban:
        plugin:
            fail2ban:
                allowlist:
                    ip:
                      - "::1"
                      - "127.0.0.1"
                      - "203.0.113.100"
                denylist:
                    ip: 192.168.0.0/24
                rules:
                    bantime: 3h
                    enabled: "true"
                    findtime: 10m
                    maxretry: "4"
                    statuscode: 400,401,403-499
                    urlregexps:
                    - regexp: "/do-not-access"
                      mode: block
Applying Fail2ban Plugin to Multiple Services
Now that you understand the configuration, let’s apply it across your infrastructure. The key insight: define the middleware once, reference it everywhere.
Apply to Services
In each service’s routing configuration, reference the middleware by name. Here are three examples:
Example 1: Blog Admin Panel
# etc_traefik/dynamic/blog.yml
http:
  routers:
    blog-https:
      rule: "Host(`blog.example.com`)"
      service: "blog-backend"
      entryPoints:
        - websecure
      tls:
        certResolver: letsencrypt
      middlewares:
        - security-headers@file
        - rate-limit@file
        - my-fail2ban@file          # <--- Applied here

    blog-http:
      rule: "Host(`blog.example.com`)"
      entryPoints:
        - web
      middlewares:
        - redirect-to-https@file

  services:
    blog-backend:
      loadBalancer:
        servers:
          - url: "http://blog:8080"
Best Practices for Middleware Ordering
Order matters. Here’s the recommended chain:
middlewares:
  - security-headers@file    # First: Set HTTP headers (no performance impact)
  - rate-limit@file          # Second: Rate limit (broad protection against bots)
  - my-fail2ban@file         # Third: Fail2ban (targeted protection against auth attacks)
Why this order?
- Security headers are light and should run first.
- Rate-limiting stops bots before they generate many auth failures.
- Fail2ban picks up remaining aggressive auth attackers.
Verifying Your Setup
Configuration is only half the battle.
Test Banning Behavior
Simulate authentication failures and watch fail2ban trigger:
curl -I https://blog.example.org
HTTP/2 200

cache-control: no-store, no-cache, must-revalidate, post-check=0, pre-check=0
content-security-policy: default-src https:; script-src 'self' 'unsafe-inline' 'unsafe-eval'; style-src 'self' 'unsafe-inline'; font-src 'self' data:; connect-src 'self'; frame-ancestors 'none';
content-type: text/html; charset=utf-8
date: Fri, 10 Apr 2026 14:59:05 GMT
expires: Thu, 19 Nov 1981 08:52:00 GMT
permissions-policy: geolocation=(), microphone=(), camera=()
pragma: no-cache
server: Apache/2.4.25 (Debian)
set-cookie: fpsess_fp-8654f976=06c0e118e99442af9a7ebd89d04a2657; path=/
strict-transport-security: max-age=15768000; includeSubDomains; preload
x-content-type-options: nosniff
x-frame-options: DENY
x-powered-by: PHP/5.6.40
x-xss-protection: 1; mode=block
Do Not Access
curl -I https://blog.example.org/do-not-access
HTTP/2 429

content-security-policy: default-src https:; script-src 'self' 'unsafe-inline' 'unsafe-eval'; style-src 'self' 'unsafe-inline'; font-src 'self' data:; connect-src 'self'; frame-ancestors 'none';
permissions-policy: geolocation=(), microphone=(), camera=()
strict-transport-security: max-age=15768000; includeSubDomains; preload
x-content-type-options: nosniff
x-frame-options: DENY
x-xss-protection: 1; mode=block
date: Fri, 10 Apr 2026 15:02:47 GMT
So you will see the 429 status which is defined from fail2ban plugin
now if you check again, nothing will be shown :
~> curl https://blog.example.org
~>
~>
That’s it my friends ! 🛡️
Disclaimer: coding agent helped with the blog post but all technical notes and examples are mine.
Run OpenCode, an AI coding agent on your own machine — no cloud, no API, no data ever leaving your computer privacy first and no costs!
Introduction
If you’ve been curious about running AI coding agents entirely on your own machine then this blog post is for you. We will walk through setting up OpenCode, a terminal-based AI coding agent, and connecting it to LM Studio so it uses our local language models (LLMs) that you control.
What You’ll Need
Before we begin, make sure you have the following:
- A reasonably modern computer (macbook M series Pro with Apple Silicon work great, for this blog post I am using Macbook M4 Pro)
- LM Studio installed — download it from lmstudio.ai
- Additional you can install/use Visual Studio Code!
What is a AI coding Agent ?
so OpenCode is an open source AI coding agent that
- Turn Ideas into Real Tools
- Automate Boring Repetitive Tasks
- Fix Broken Things
- Connect Different Apps Together
- Explain Technical Jargon
eg.
I need a simple website for my dog-walking business where people can book a time and see my prices.
and opencode starts working on that
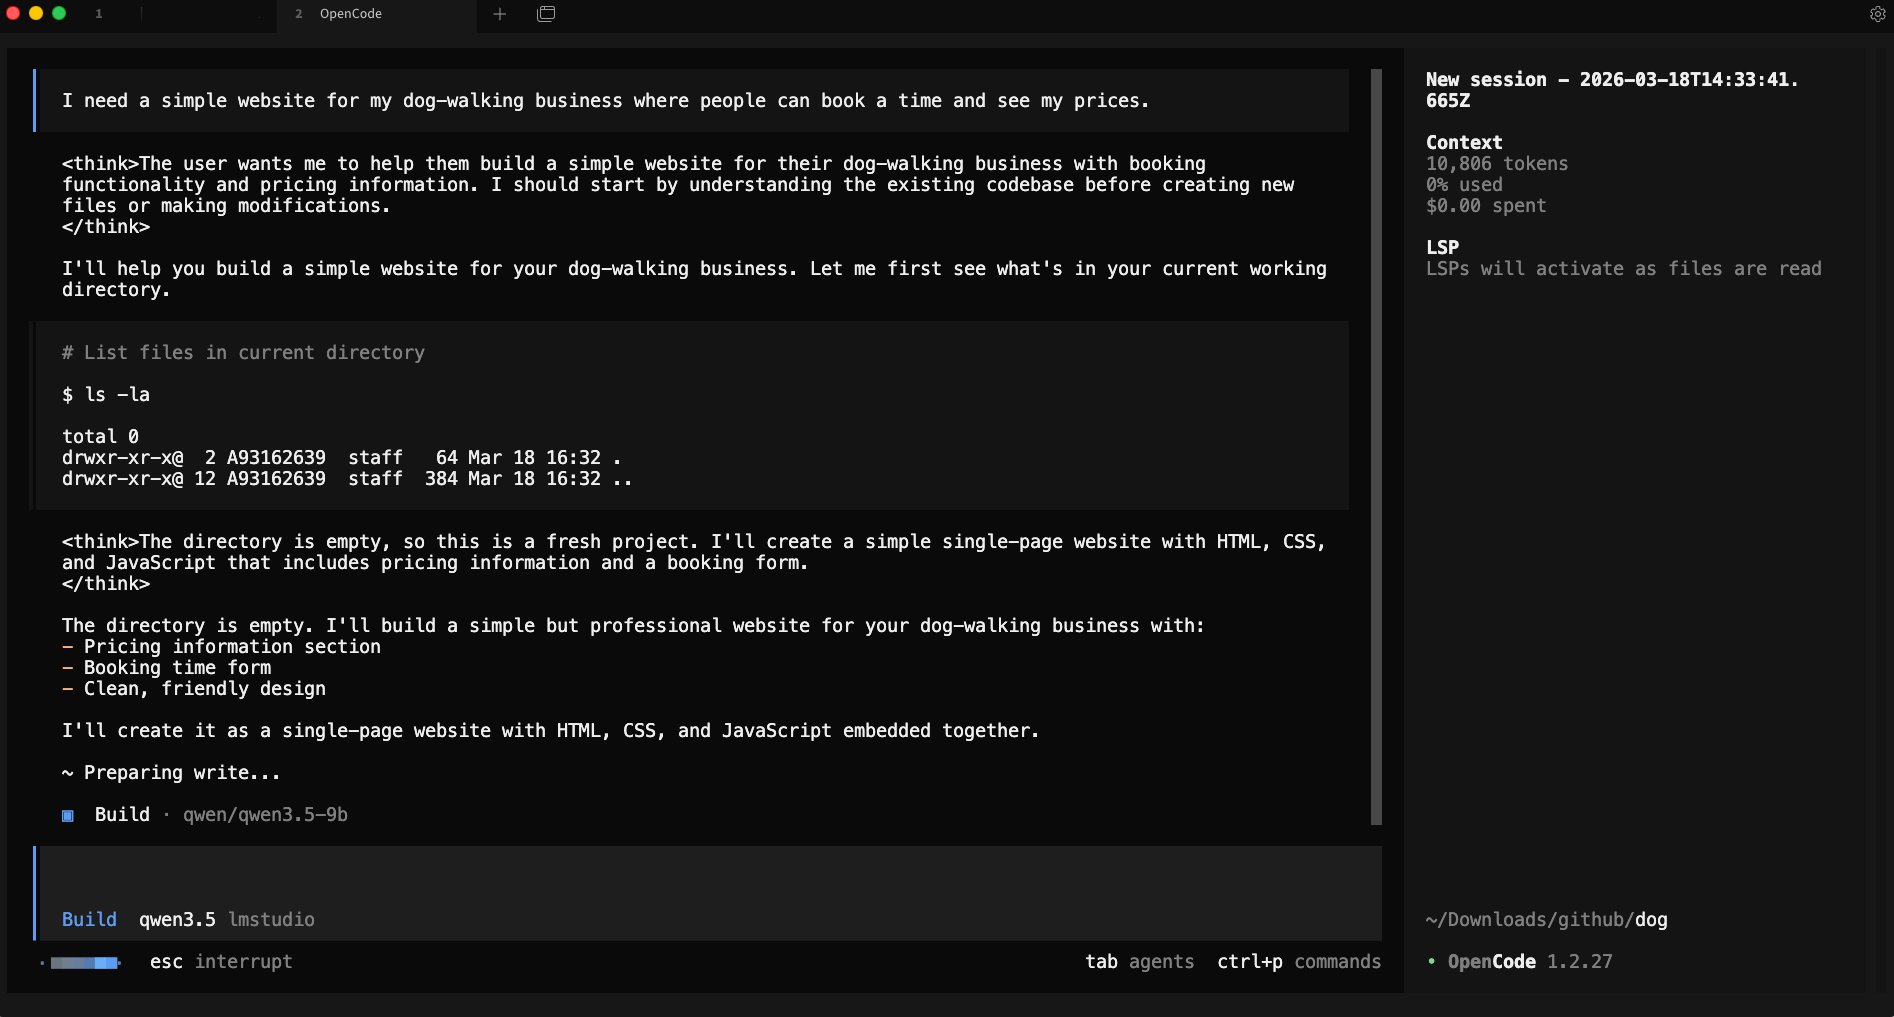
and the result is something like that, without writing a single line of code !
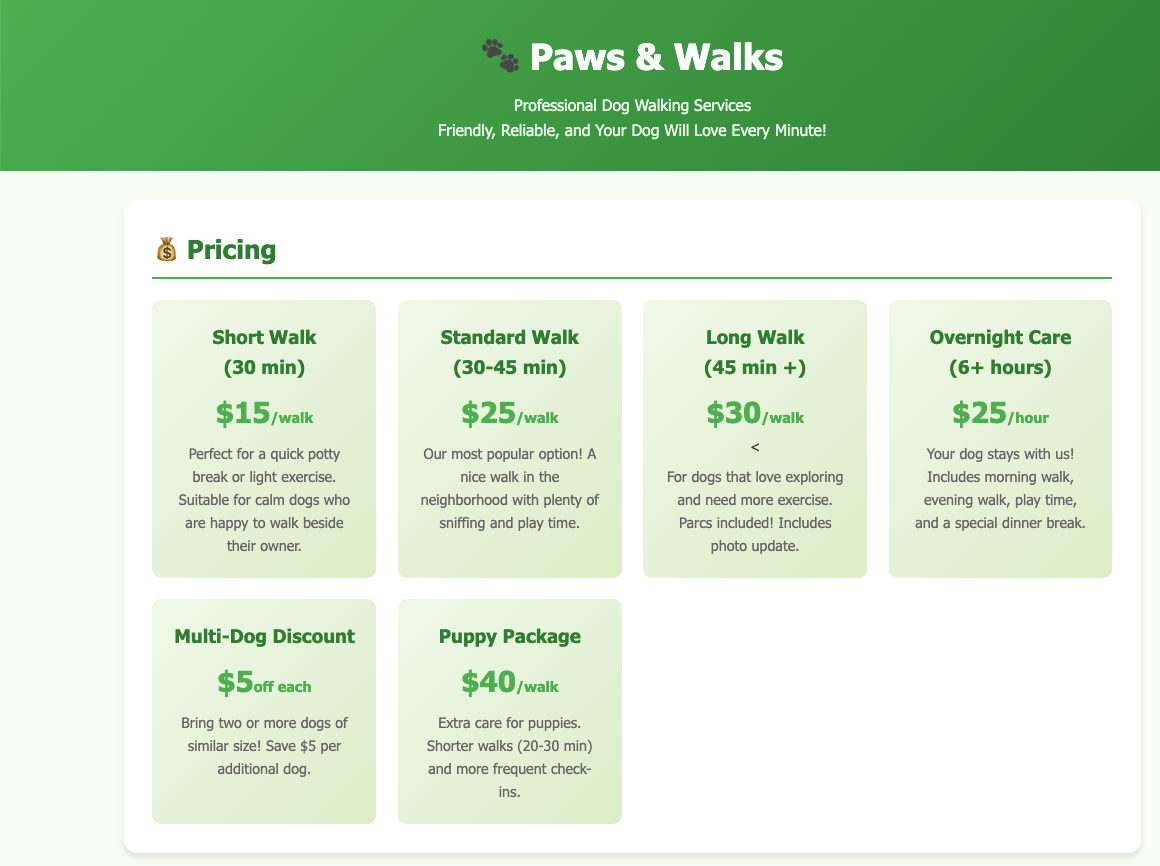
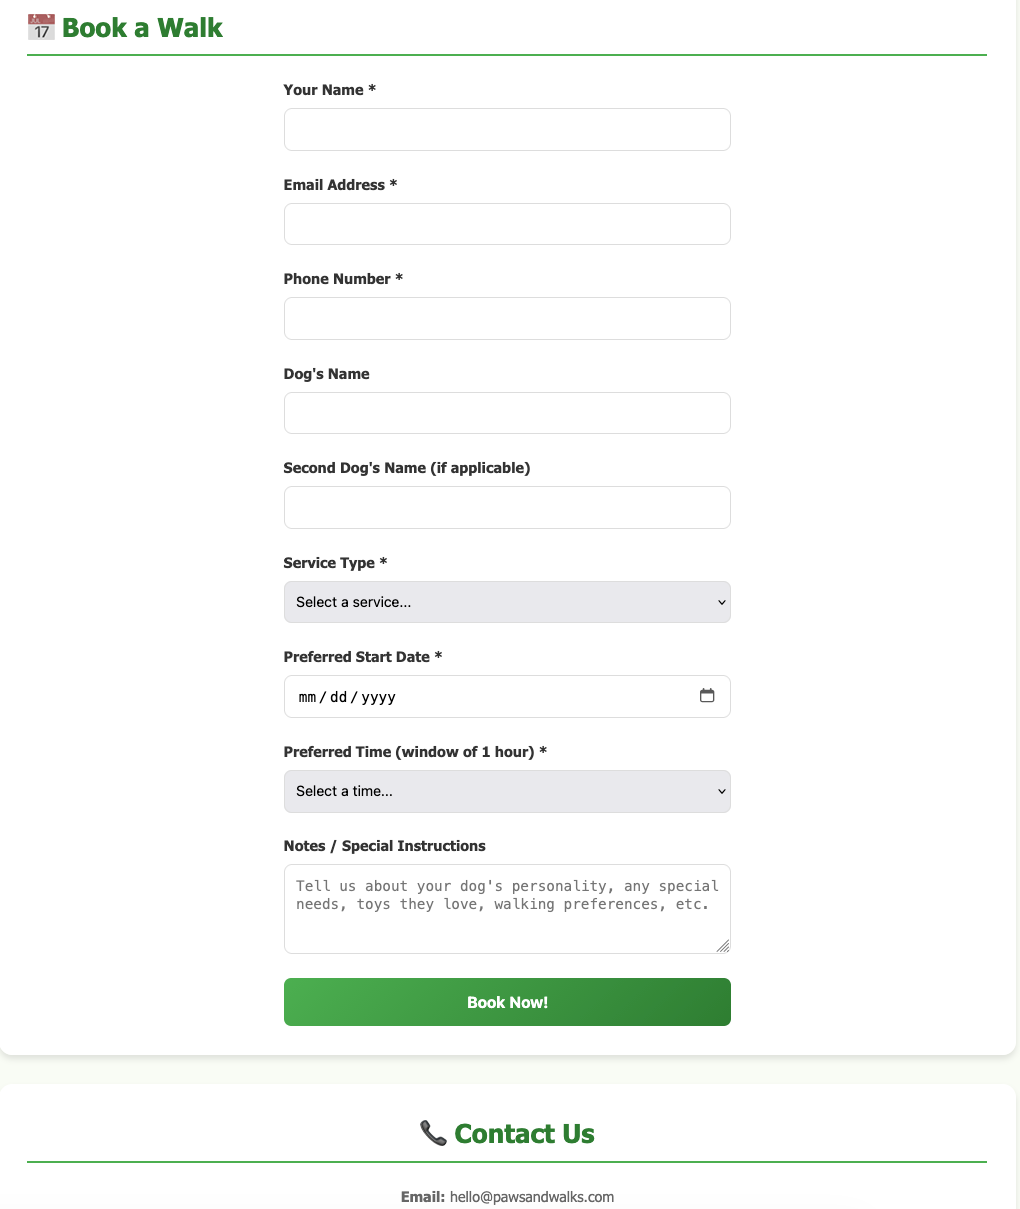
and yes, this example was made entirely on my macbook with opencode and lmstudio.
Install opencode
Open your terminal and run the official install script:
curl -fsSL https://opencode.ai/install | bashor via brew (my preferable way)
brew install anomalyco/tap/opencodeThis downloads and installs the opencode CLI tool. Once it’s done, close and reopen your terminal (or run source ~/.bashrc / source ~/.zshrc) so the command is available.
Verify it worked:
opencode --versioneg.
❯ opencode --version
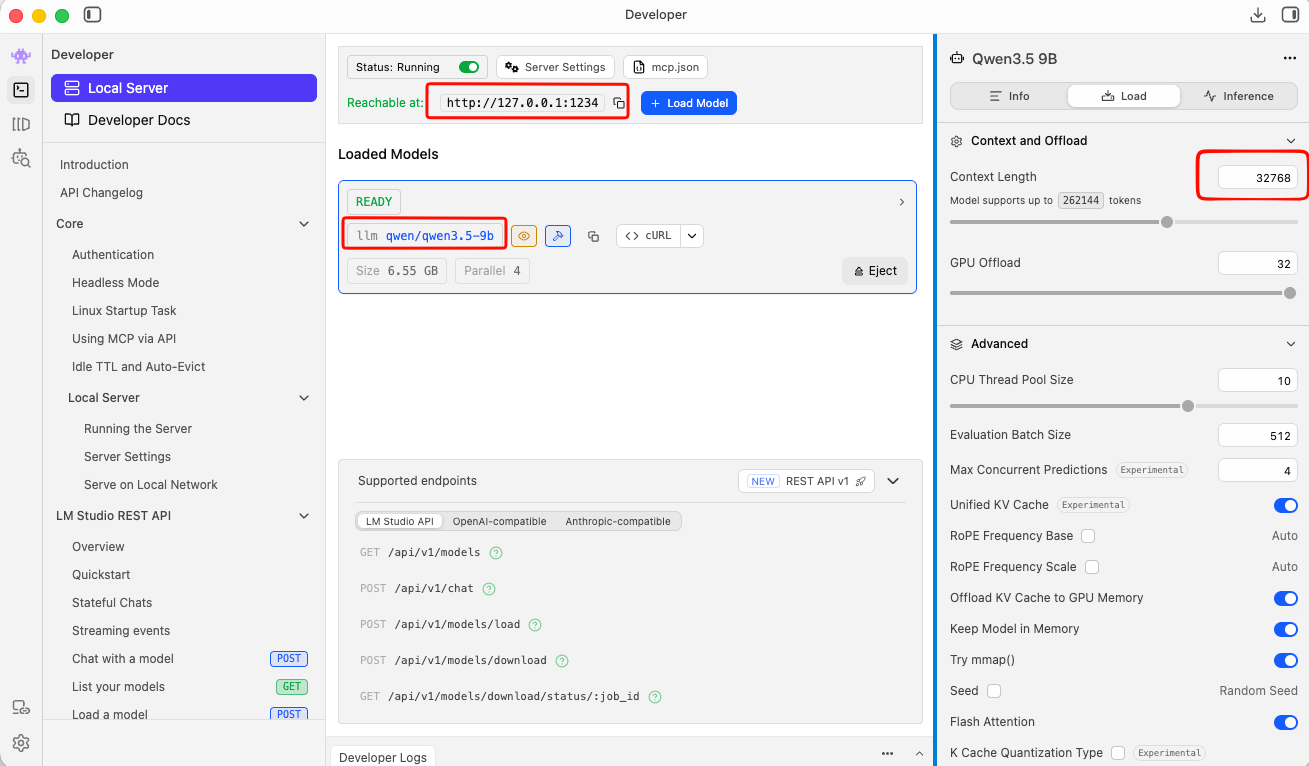
1.2.27Download a Model in LM Studio
Open LM Studio and use the built-in model browser to download a model. For this guide, we’ll use two good options that run well on consumer hardware:
- Ministral 3B — fast and lightweight, great for quick tasks
- Qwen 3.5 9B — more capable, needs more RAM/VRAM

Search for either model in LM Studio’s Discover tab and download it. Once downloaded, you’ll see it listed in your local models.
you can also use the CLI to get the models
eg. lms get mistralai/ministral-3-3b
❯ lms get mistralai/ministral-3-3b
   ✓ Satisfied mistralai/ministral-3-3b
   └─ ✓ Satisfied Ministral 3 3B Instruct 2512 Q4_K_M [GGUF]

⠋ Resolving download plan...
and list them lms ls
You have 3 models, taking up 9.62 GB of disk space.

LLM                                     PARAMS    ARCH        SIZE       DEVICE
mistralai/ministral-3-3b (1 variant)    3B        mistral3    2.99 GB    Local
qwen/qwen3.5-9b (1 variant)             9B        qwen35      6.55 GB    Local

EMBEDDING                               PARAMS    ARCH          SIZE        DEVICE
text-embedding-nomic-embed-text-v1.5              Nomic BERT    84.11 MB    Local
I am not going to analyse the models but in short, Qwen3.5-9B is best for a local, open, multimodal assistant that can handle:
- coding
- tool calling / agents
- long documents
- multilingual tasks
- document and image understanding
and fits in a a MacBook M4 Pro with 48GB RAM.
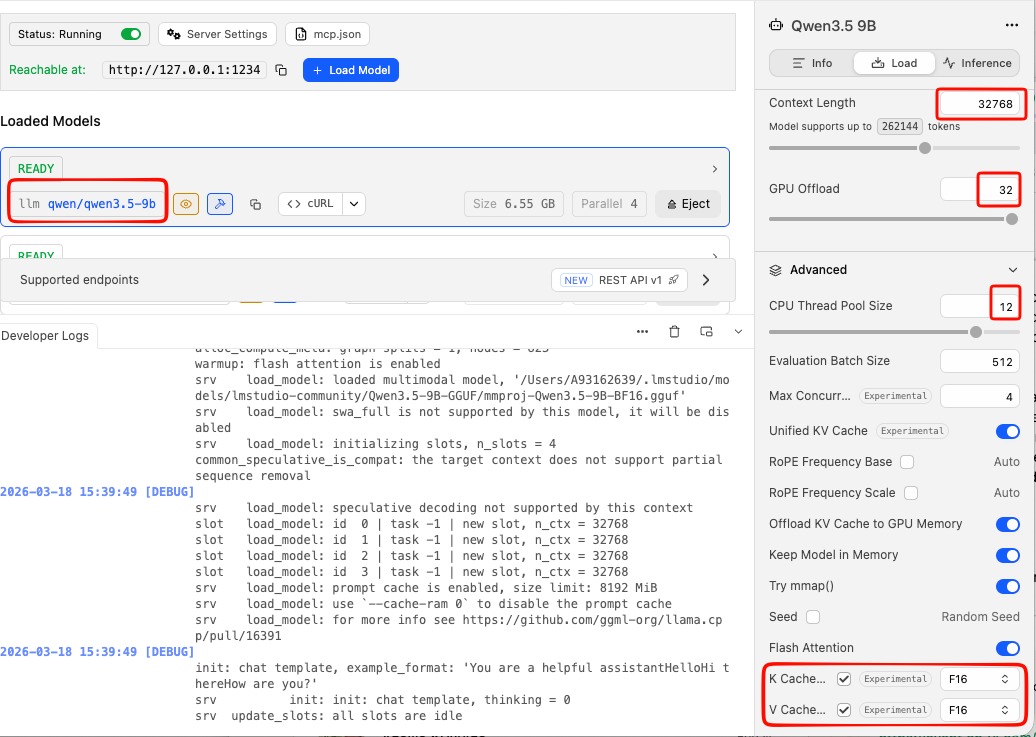
Important: Context Length
In simple words, context length is the AI’s short-term memory limit. Depending on the model and use, you need to adjust it on LM Studio. It is measured by tokens. Tokens are a chunk of a words. When using cloud AI models via API, the cost is measured on how many tokens you are using in a specific amount of time.
-
Use Small Context Lenght (4096 - 8192) when you have a quick question, review/reply to a short email or debug a small snippet of code. It will produce a quick reply.
-
Use Medium Context Length (32k) when you want to analyze a report, write a short story or working with a few coding files. It may take a couple minutes.
-
Use Large Context Length (128+) when you want to upload a big document, or you want to analyze a project at once. It will be slow, slower on local machines.
See below details about LM Studio and LLM.
Start the LM Studio Local Server
LM Studio includes a built-in local API server that speaks the OpenAI API format — which means tools like opencode can talk to it directly.
In LM Studio, go to the Local Server tab (the <-> icon on the left sidebar) and click Start Server. By default it runs at http://localhost:1234.
Tweak Settings
to get the best from LM Studio
You can leave the server running in the background while you use opencode.
or you can use CLI to start LM Studio server:
❯ lms server start -p 1234 --bind 127.0.0.1
Waking up LM Studio service...
Success! Server is now running on port 1234
verify which models are available
by running in CLI a simple curl command curl -s http://localhost:1234/v1/models | jq .
{
  "data": [
    {
      "id": "qwen/qwen3.5-9b",
      "object": "model",
      "owned_by": "organization_owner"
    },
    {
      "id": "mistralai/ministral-3-3b",
      "object": "model",
      "owned_by": "organization_owner"
    },
    {
      "id": "text-embedding-nomic-embed-text-v1.5",
      "object": "model",
      "owned_by": "organization_owner"
    }
  ],
  "object": "list"
}
Configure opencode
opencode uses a config file called opencode.json stored in ~/.config/opencode/. You’ll need to create or edit this file to tell opencode about your LM Studio models.
Create the directory if it doesn’t exist:
mkdir -p ~/.config/opencodeThen create (or edit) the config file:
vim ~/.config/opencode/opencode.jsonPaste in the following configuration:
{
  "$schema": "https://opencode.ai/config.json",
  "provider": {
    "lmstudio": {
      "npm": "@ai-sdk/openai-compatible",
      "name": "lmstudio",
      "options": {
        "baseURL": "http://127.0.0.1:1234/v1",
        "apiKey": "lmstudio"
      },
      "models": {
        "qwen/qwen3.5-9b": {
          "name": "qwen3.5"
        },
        "mistralai/ministral-3-3b": {
          "name": "ministral3"
        }
      }
    }
  }
}
A few things to note:
- The
baseURLpoints to LM Studio’s local server — keep this as-is unless you’ve changed LM Studio’s port. - The
apiKeyvalue"lmstudio"is a placeholder — LM Studio doesn’t actually require a real API key, but the field needs to be present. - The model IDs (e.g.
mistralai/ministral-3-3b) must match exactly what LM Studio uses. You can check the model identifier in LM Studio’s model list.
Save and close the file.
Load a Model via the CLI (Optional but Useful)
LM Studio comes with a CLI tool called lms that lets you load and unload models from the terminal without opening the GUI. This is handy for scripting or keeping things lightweight.
First, unload any currently loaded model (to free memory):
lms unload "mistralai/ministral-3-3b"Then load it fresh with a specific context window size:
lms load "mistralai/ministral-3-3b" --context-length 16384The --context-length flag controls how much text the model can hold in memory at once. 16384 (16K tokens) is a good balance of capability and memory use. If you have more RAM to spare, try 32768.
full example with ministral
❯ lms unload "mistralai/ministral-3-3b"
Model "mistralai/ministral-3-3b" unloaded.

~
❯ lms load "mistralai/ministral-3-3b" --context-length 16384

Model loaded successfully in 2.67s.
(2.78 GiB)
To use the model in the API/SDK, use the identifier "mistralai/ministral-3-3b".
Test opencode with Your Local Model
opencode run --model lmstudio/mistralai/ministral-3-3b "capital of greece?"The --model flag follows the format lmstudio/<model-id>, where the model ID matches what you put in the config file.
You should see the model respond directly in your terminal. If everything is connected correctly, the response comes from your local machine — no internet required.
output:
> build · mistralai/ministral-3-3b

Athens.
Run opencode with Your Local Model
Now you’re ready to use opencode on your project.
Change to the code directory cd project
and to start an interactive session in your current project directory, just run:
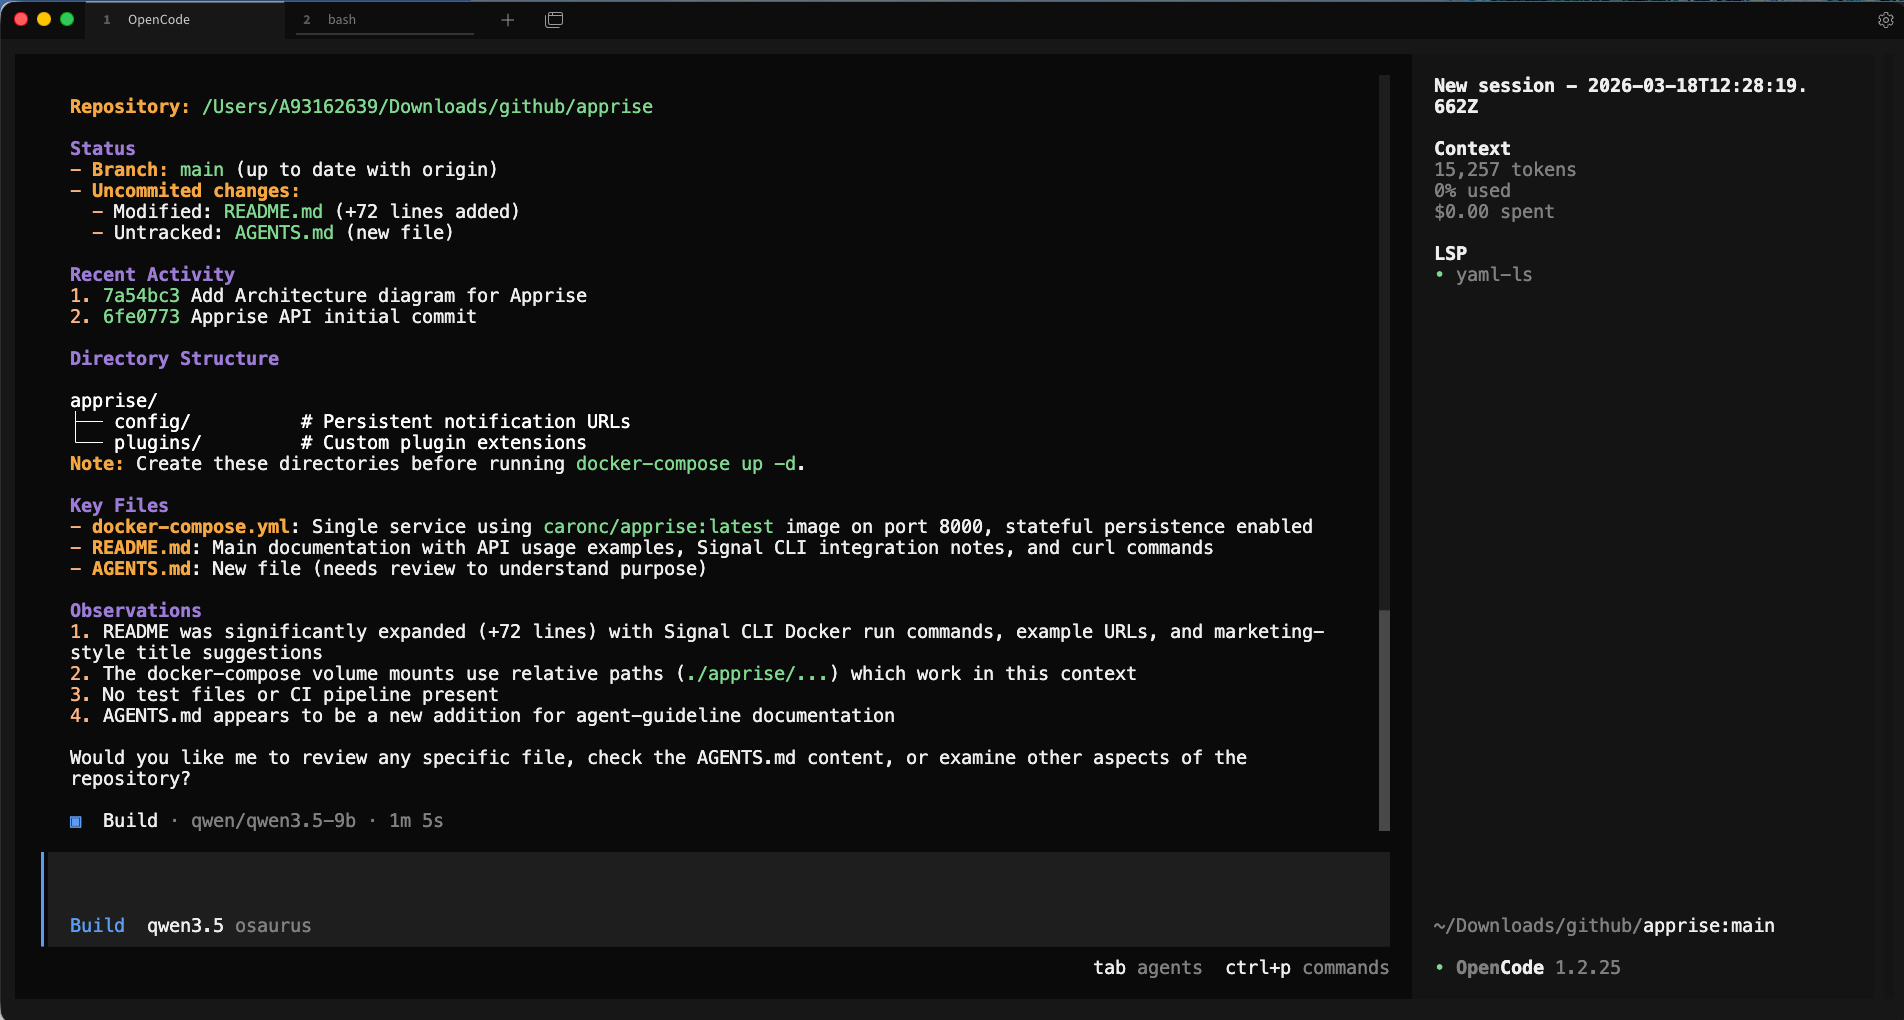
opencodeopencode will open its TUI (terminal user interface) where you can have a longer back-and-forth conversation, ask it to read files, write code, and more.
Verify opencode is using the correct model and type
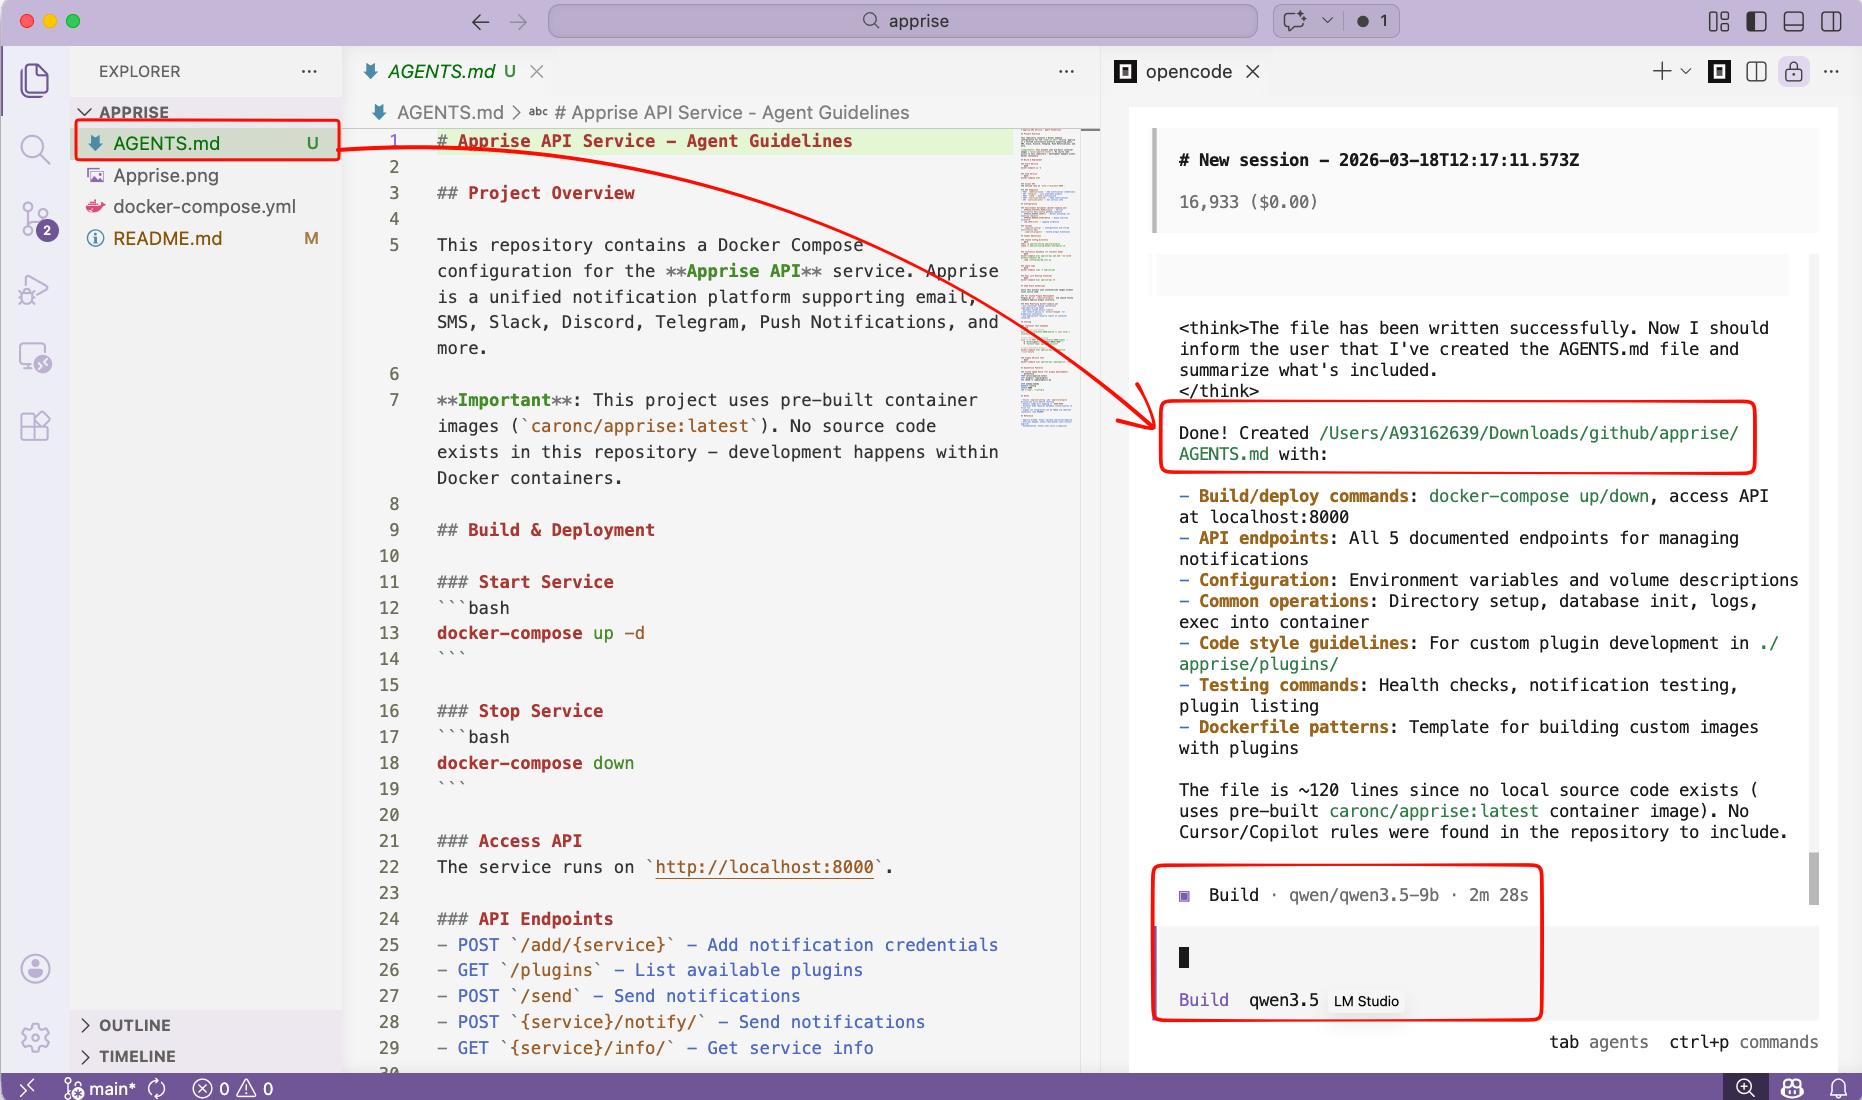
/initTo initial your project. It will create an AGENTS.md file for your project.
or you can use VS code with the opencode extension and use it from there !
That’s it!
Happy coding my friends.
I can use apprise in Home Assistant and in my scripts and got signal, slack, email and many more working perfectly!
How I Built a Unified Notification Hub Using Apprise and Signal API
The Problem: Notification Chaos
If you’re like me, you probably have alerts coming from everywhere:
- Docker containers need to notify you when they crash
- Home Assistant wants to tell you when the door opens
- Monitoring scripts need to report when disk space is low
- Your Jellyfin server should alert you when transcoding fails
The problem? Each service wants to send notifications differently. Some support email, others want webhooks, a few can do Slack, and almost none support Signal natively.
Enter Apprise — the notification abstraction layer that changed how I handle alerts forever.
What is Apprise?
Apprise is a Python library (and API) that supports dozens of notification services through a single, unified interface. Think of it as a universal translator for notifications.
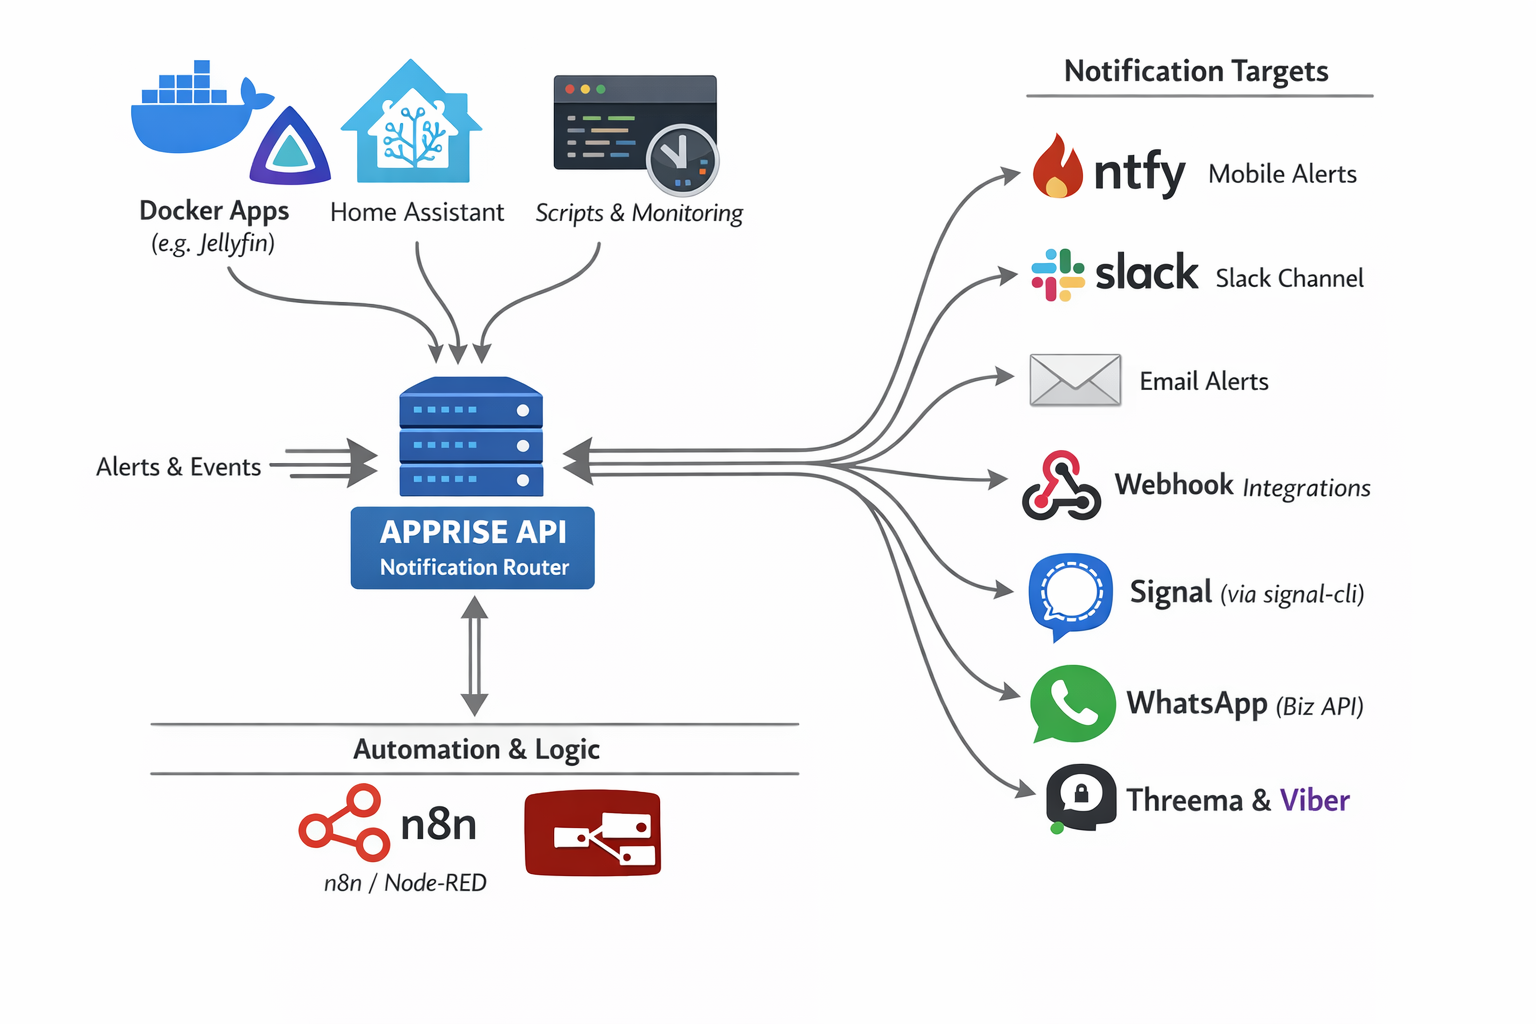
As you can see in the diagram above, Apprise acts as a notification router sitting between your services and your notification targets:
Input Sources:
- Docker Apps (Jellyfin, Nextcloud, etc.)
- Home Assistant
- Custom Scripts & Monitoring Tools
- Automation Platforms (n8n, Node-RED)
Output Targets:
- 📱 ntfy (Mobile Alerts)
- 💬 Slack
- 🔗 Webhooks
- 📞 Signal (via signal-cli)
- 📱 WhatsApp (Business API)
- 🔐 Threema & Viber
And that’s just a subset — Apprise supports 120+ notification services!
The Setup: Apprise API + Signal
In this guide, I’ll show you how to set up:
- Apprise API — A REST API server for managing and sending notifications
- Signal CLI REST API — A bridge to send messages via Signal
- Integration — Connecting them so you can send Signal messages through Apprise
Why Signal?
Signal offers end-to-end encryption, privacy-focused design, and most importantly — it’s free for personal use. Perfect for receiving important alerts without relying on corporate platforms.
Step 1: Deploy Apprise API
Create a docker-compose.yml file for Apprise:
I’ve selected TCP Port 8800 as I am already using 8000 on my homelab.
services:
  apprise-api:
    image: caronc/apprise:latest
    container_name: apprise-api
    restart: unless-stopped
    ports:
      - "8800:8000"
    environment:
      - APPRISE_STATEFUL_MODE=simple
      - APPRISE_WORKER_COUNT=1
      - APPRISE_WORKER_OVERFLOW=10
      - LOG_LEVEL=info
    volumes:
      - ./apprise/config:/config
      - ./apprise/plugins:/plugin
Key Configuration Explained:
| Setting | Purpose |
|---|---|
APPRISE_STATEFUL_MODE=simple |
Persists your notification configurations between restarts |
APPRISE_WORKER_COUNT=1 |
Single worker process (sufficient for home use) |
APPRISE_WORKER_OVERFLOW=10 |
Queue overflow threshold for handling burst requests |
LOG_LEVEL=info |
Balanced logging verbosity |
Start the service:
docker-compose up -dApprise API will now be available at http://localhost:8800
Step 2: Deploy Signal CLI REST API
Signal doesn’t have a native API, but the community has created bridges. We’ll use signal-cli-rest-api:
again, I am using TCP Port 9922 as I am using 8080 on my homelab already.
services:
  signal-api:
    image: bbernhard/signal-cli-rest-api
    container_name: signal-api
    environment:
      - MODE=native
    volumes:
      - ./signalcli-data:/home/.local/share/signal-cli
    ports:
      - "9922:8080"
    restart: unless-stopped
Important: The MODE=native setting uses the native Signal protocol library (libsignal) for better compatibility.
Start the service:
docker-compose up -dPS. You can merge the two docker compose services into one if you prefer.
Step 3: Link Your Signal Account
Now for the magic — linking your Signal account to the API.
Open your browser and navigate to:
http://localhost:9922/v1/qrcodelink?device_name=signal-apiThis will produce a QR image, that you need to scan with your mobile Signal app.

You’ll see a QR code (similar to the one above, but not blurred).
To link:
- Open Signal on your phone (Android or iOS)
- Go to Settings → Linked Devices
- Tap the + button to add a new device
- Scan the QR code
Once linked, your Signal account is now accessible via REST API!
Step 4: Register a Phone Number
Before sending messages, you need to register your phone number with Signal CLI. This is typically done automatically when you link the device, but if needed:
# Check if your number is registered
curl http://localhost:9922/v1/about
Step 5: Add Signal to Apprise
Now we connect Signal to Apprise. Apprise uses URL schemes to represent notification targets.
The Signal URL format is:
signal://<signal-api-host>:<port>/<recipient-phone-number>Add your Signal configuration to Apprise:
curl -s -X POST http://127.0.0.1:8800/add/signal
  -d "urls=signal://localhost:9922/+306970000xyz"
Replace
+306970000xyzwith your phone number!
Expected response:
Successfully saved configurationNote: Replace
+306970000xyzwith your actual phone number (in international format with+prefix).
Step 6: Send Your First Notification
Option A: Using the Apprise CLI
apprise -vv -t "Test Message Title" -b "Test Message Body"
   "signal://localhost:9922/+306970000xyz"
Option B: Using the Apprise API
curl -X POST http://localhost:8800/notify
  -H "Content-Type: application/json"
  -d '{
    "title": "Test Message Title",
    "body": "Test Message Body",
    "tag": "signal"
  }'
Option C: Send to Multiple Services at Once
Here’s where Apprise shines — send the same message to Signal, Slack, and email with one command:
apprise -t "Server Alert" -b "Disk usage at 90%"
  "signal://localhost:9922/+306970000xyz"
  "slack://token-a/token-b/token-c"
  "mailto://user:pass@gmail.com"
The Result
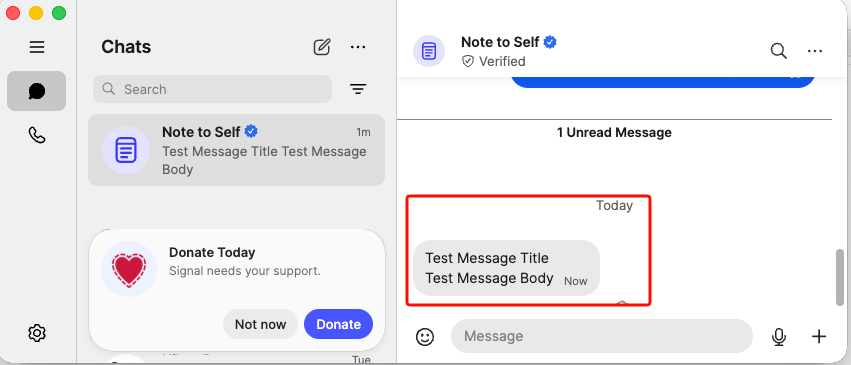
As you can see, the test message arrived successfully in Signal with both the title and body intact. This message was sent programmatically through the Apprise → Signal pipeline!
Real-World Use Cases
Now that you have the infrastructure set up, here are some practical applications:
Home Assistant Notifications
Add the below notify setup to your configuration.yaml:
# ebal, Sun, 15 Mar 2026 21:06:52 +0200
notify:
  - name: signal_notify
    resource: http://localhost:8800/notify
    url: "signal://localhost:9922/+306970000xyz"
    platform: apprise
and create a new Automation
- Go to Settings → Automations & scenes
- Tap the + button to create a new automation
- Copy yaml code and replace your Device and Entity ID.
alias: Fridge Door Open
description: Send a message through Signal when Fridge Door is opened for more than 5sec
triggers:
  - type: opened
    device_id: <device_id>
    entity_id: <entity_id>
    domain: binary_sensor
    trigger: device
    for:
      hours: 0
      minutes: 0
      seconds: 5
conditions: []
actions:
  - action: notify.signal_notify
    metadata: {}
    data:
      message: Fridge Door Open for more than 5sec
      title: HomeAssistant Alert
mode: single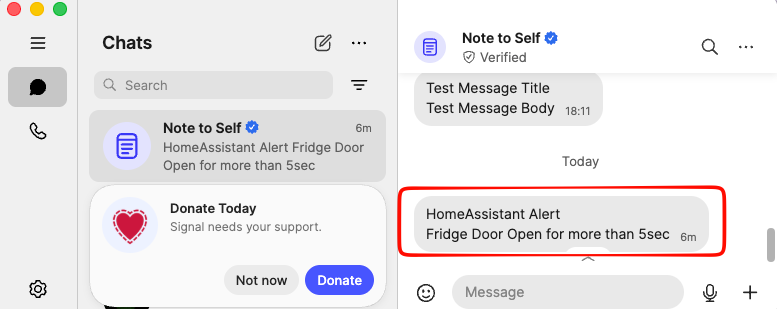
Docker Container Monitoring
# In your monitoring script
docker ps --format "{{.Names}}" | while read container; do
  if [ "$(docker inspect -f '{{.State.Running}}' $container)" != "true" ]; then
    apprise -t "Container Down" -b "$container has stopped"
      "signal://localhost:9922/+306970000xyz"
  fi
done
Automated Backup Alerts
#!/bin/bash
rsync -av /data /backup
if [ $? -eq 0 ]; then
  apprise -t "Backup Complete" -b "Daily backup finished successfully"
    "signal://localhost:9922/+306970000xyz"
else
  apprise -t "Backup FAILED" -b "Daily backup encountered errors"
    "signal://localhost:9922/+306970000xyz"
fi
System Health Checks
# Check disk space
USAGE=$(df / | tail -1 | awk '{print $5}' | sed 's/%//')
if [ $USAGE -gt 80 ]; then
  apprise -t "Disk Warning" -b "Root partition is ${USAGE}% full"
    "signal://localhost:9922/+306970000xyz"
fi
Advanced: Adding More Notification Channels
The beauty of Apprise is that adding new notification targets is as simple as adding a new URL:
# Add Slack
curl -X POST http://localhost:8800/add/slack
  -d "urls=slack://workspace/token"

# Add Email (Gmail)
curl -X POST http://localhost:8800/add/email
  -d "urls=mailto://user:password@gmail.com"

# Add ntfy (push notifications to mobile)
curl -X POST http://localhost:8800/add/ntfy
  -d "urls=ntfy://topic"

# Add Discord
curl -X POST http://localhost:8800/add/discord
  -d "urls=discord://webhook-id/webhook-token"
Troubleshooting
Signal Messages Not Sending
-
Check if Signal CLI is working:
curl http://localhost:9922/v1/about -
Verify your number is registered:
curl http://localhost:9922/v1/send +306970000xyz -d "message=test" -
Check container logs:
docker logs signal-api
That’s it !
-Evaggelos Balaskas
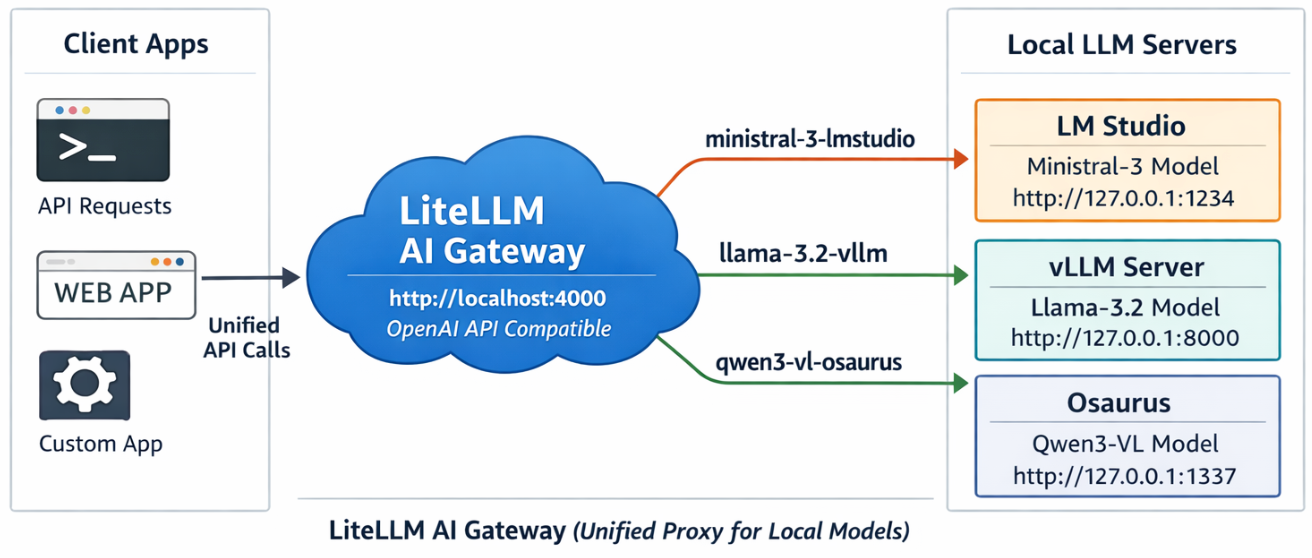
LiteLLM AI Gateway (LLM Proxy)
This project shows a simple pattern: run multiple local model servers, place LiteLLM in front of them, and expose one OpenAI-compatible endpoint for apps to use.
In this setup, Lite LLM sits on http://127.0.0.1:4000/v1 and routes requests to:
- LM Studio on port
1234 - vLLM on port
8000 - Osaurus on port
1337
That gives you one clean API for local testing, model switching, and app integration.
Why this setup is useful
If you already have local models running in different tools, LiteLLM gives you one gateway instead of several different endpoints.
That means you can:
- keep one API base URL
- switch models by alias
- expose multiple local backends behind the same interface
- plug the endpoint into apps that expect an OpenAI-style API
What this article shows
This guide walks through the full flow:
- LiteLLM exposes
/v1/modelsand returns the three configured aliases. - A chat app can select one of those LiteLLM model names and answer normally.
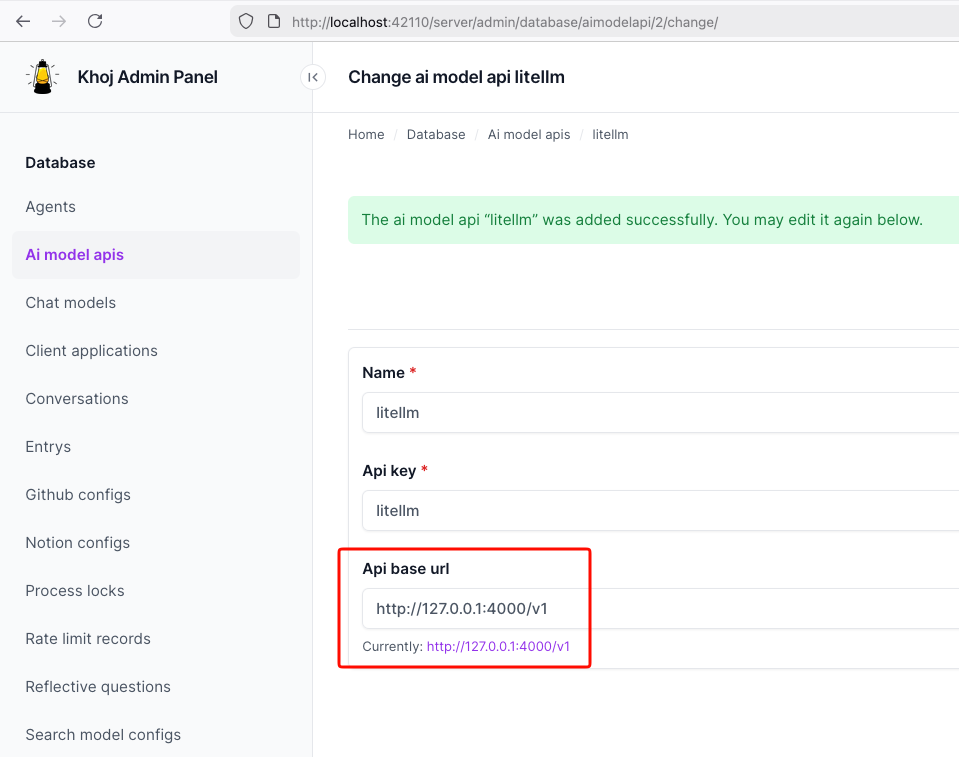
- Khoj can be pointed at LiteLLM by setting the API base to
http://127.0.0.1:4000/v1. - Khoj chat models can then use a LiteLLM alias such as
ministral-lmstudio.
Quick start
Use Python 3.12 or 3.13 for the LiteLLM virtual environment to avoid uvloop path a known incompatibility with Python 3.14’s asyncio internals.
Set up a virtual environment
virtualenv -p python3.12 venv-litellm/
cd venv-litellm/
source ./bin/activate

pip install "litellm[proxy]"
LiteLLM Configuration
Create config.yaml:
Below is an example based on my local setup.
model_list:
  - model_name: ministral-lmstudio
    litellm_params:
      model: openai/mistralai/ministral-3-3b
      api_base: http://127.0.0.1:1234/v1
      api_key: lmstudio

  - model_name: llama3-vllm
    litellm_params:
      model: openai/mlx-community/Llama-3.2-3B-Instruct-4bit
      api_base: http://127.0.0.1:8000/v1
      api_key: vllm

  - model_name: qwen3-osaurus
    litellm_params:
      model: openai/qwen3.5-0.8b-mlx-4bit
      api_base: http://127.0.0.1:1337/v1
      api_key: osaurus
You need the openai/ prefix for each model to use LiteLLM’s OpenAI-compatible provider.
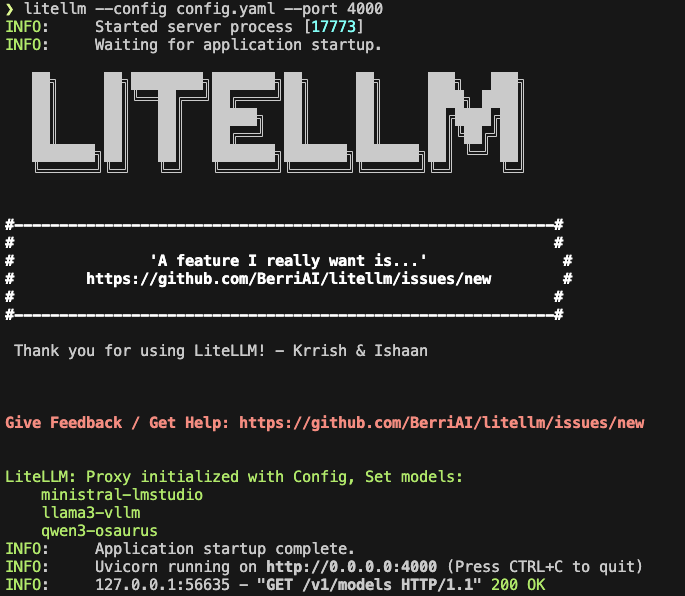
Start LiteLLM
litellm --config config.yaml --port 4000If LiteLLM starts correctly, you should see the three model aliases loaded.
Test the proxy
List models:
curl -s http://127.0.0.1:4000/v1/models | jq .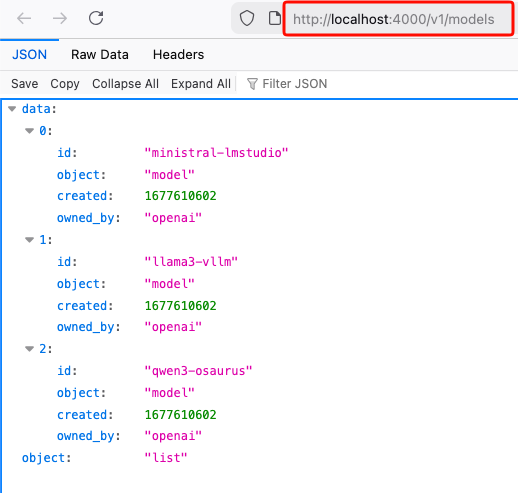
Test chat
Send a chat request:
curl -s http://127.0.0.1:4000/v1/chat/completions
  -H "Content-Type: application/json"
  -d '{
    "model": "ministral-lmstudio",
    "messages": [
      {"role": "user", "content": "Capital of Greece?"}
    ]
  }' | jq .
If everything is wired correctly, LiteLLM will forward the request to the matching backend and return a normal OpenAI-style response.
A typical result looks like this:
{
  "id": "chatcmpl-oukopuooxti6xg92g6qx9b",
  "created": 1773142359,
  "model": "ministral-lmstudio",
  "object": "chat.completion",
  "system_fingerprint": "mistralai/ministral-3-3b",
  "choices": [
    {
      "finish_reason": "stop",
      "index": 0,
      "message": {
        "content": "The capital of Greece is **Athens**.",
        "role": "assistant",
        "provider_specific_fields": {
          "refusal": null
        }
      },
      "provider_specific_fields": {}
    }
  ],
  "usage": {
    "completion_tokens": 10,
    "prompt_tokens": 539,
    "total_tokens": 549
  },
  "stats": {}
}
Connect LiteLLM to Khoj
You can use the same LiteLLM endpoint with any app that supports an OpenAI-style API. In this example, I use Khoj.
Once LiteLLM is running, Khoj only needs one API configuration:
- Name:
litellm - API key:
litellm - API base URL:
http://127.0.0.1:4000/v1
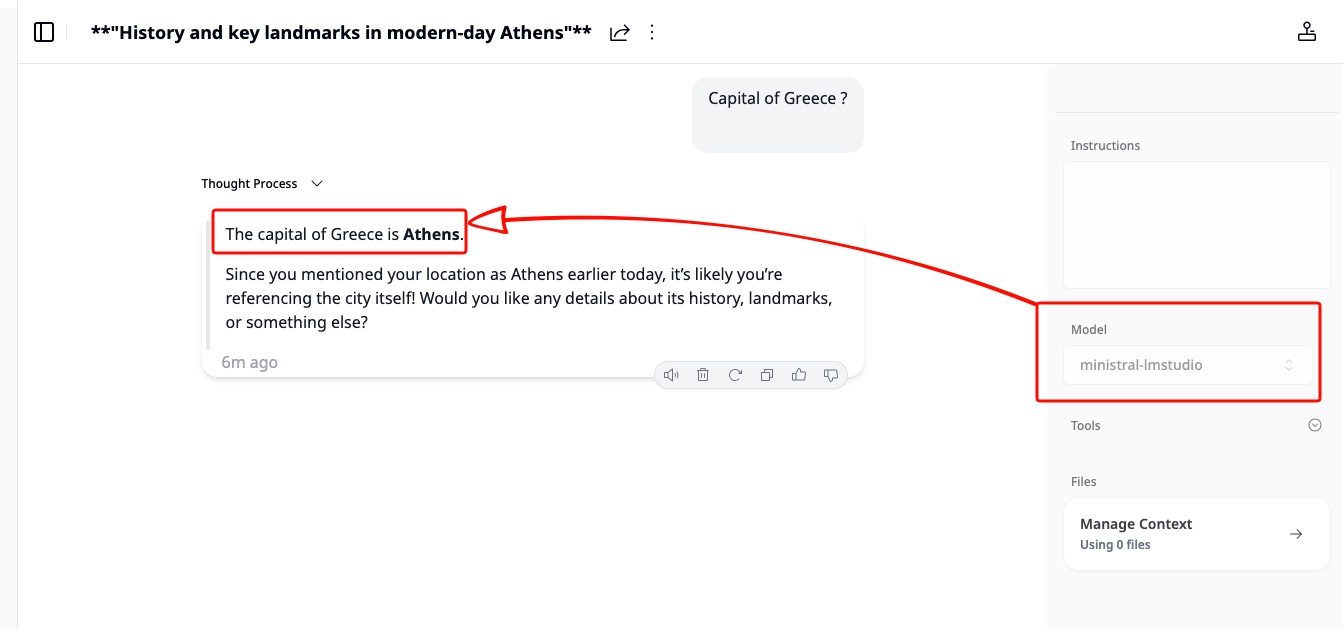
Then create a chat model in Khoj using one of the LiteLLM aliases, for example:
ministral-lmstudio
That is the key idea of this project: Khoj does not need to know whether the model is coming from LM Studio, vLLM, or Osaurus. It only talks to LiteLLM.
Khoj AI model API configuration
Khoj chat model configuration

Khoj using a LiteLLM chat model
That’s it!
If you want to use Claude Code together with Osaurus, there are two different pieces to understand:
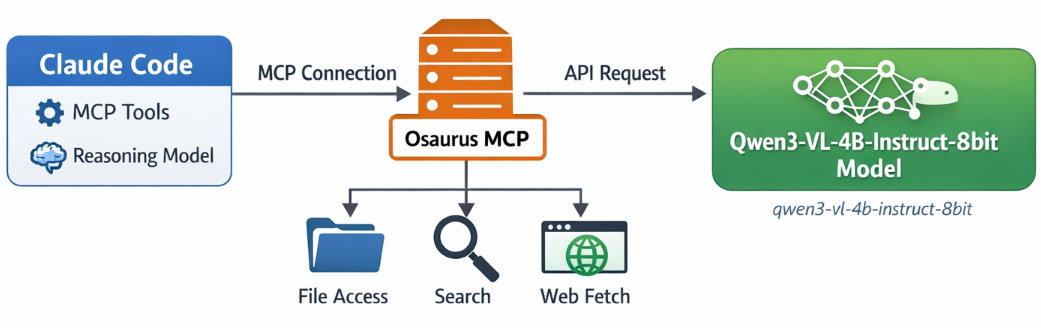
- Model backend — the LLM that answers your prompts
- MCP tools — the tools Claude Code can call
This is the most important idea:
- Osaurus MCP gives Claude Code access to tools
- Osaurus API can also be used as the model backend, if your setup supports it
These are separate.
Install Claude Code and Osaurus
Let’s start by installing both tools via homebrew on a macbook.
Disclaimer: I like asaurus because it’s small and amazing, I find Ollama big and ugly in macbook.
claude code installation
brew install --cask claude-codeosaurus
brew install --cask osaurusOpen osaurus ui to setup osaurus, in this blog post we will not cover this.
language models
At some point you will download a couple LLMs or SLMs to start with osaurus and you should already have install some tools.
curl -s http://localhost:1337/v1/models | jq .{
"data": [
{
"id": "llama-3.2-3b-instruct-4bit",
"created": 1772877371,
"object": "model",
"owned_by": "osaurus",
"root": "llama-3.2-3b-instruct-4bit"
},
{
"id": "qwen3-vl-4b-instruct-8bit",
"created": 1772877371,
"object": "model",
"owned_by": "osaurus",
"root": "qwen3-vl-4b-instruct-8bit"
},
{
"id": "qwen3.5-0.8b-mlx-4bit",
"created": 1772877371,
"object": "model",
"owned_by": "osaurus",
"root": "qwen3.5-0.8b-mlx-4bit"
}
],
"object": "list"
}status
❯ osaurus status
running (port 1337)
tools
❯ osaurus tools list
osaurus.browser  version=1.2.0
osaurus.fetch  version=1.0.2
osaurus.filesystem  version=1.0.3
osaurus.git  version=1.0.3
osaurus.images  version=1.0.3
osaurus.macos-use  version=1.2.1
osaurus.search  version=1.0.4
osaurus.time  version=1.0.3
osaurus.vision  version=1.0.1
Connect Claude Code to Osaurus via a MCP server
So by default claude code with autostart an interactive configuration setup to connect with your anthropic subscription or with any major ai subscription. We want to override this behaviour to enable claude to connect with osaurus. best way to do that is via an mcp server.
Create ~/.claude.json:
cat > ~/.claude.json <<EOF
{
  "theme": "dark-daltonized",
  "hasCompletedOnboarding": true,
  "mcpServers": {
    "osaurus": {
      "command": "osaurus",
      "args": [
        "mcp"
      ]
    }
  }
}
EOF
This tells Claude Code to start Osaurus as an MCP server.
Note on
hasCompletedOnboarding: Setting this totrueprevents a startup error where Claude Code tries to connect to Anthropic’s servers before your local endpoint is configured. It is not required for the MCP setup itself, but it avoids a confusing first-run failure.Note on MCP config location: MCP servers must be defined in
~/.claude.json(or a project-local.mcp.json). Placing them in~/.claude/settings.jsonwill not work — that file is for environment variables and permissions, not MCP server definitions.
Configure Claude Code to use Osaurus as the model endpoint
Create ~/.claude/settings.json:
mkdir -p ~/.claude/

cat > ~/.claude/settings.json <<EOF
{
  "env": {
    "ANTHROPIC_BASE_URL": "http://127.0.0.1:1337",
    "ANTHROPIC_AUTH_TOKEN": "osaurus",
    "ANTHROPIC_MODEL": "qwen3-vl-4b-instruct-8bit"
  }
}
EOF
This does three things:
- points Claude Code to your local Osaurus server
- authenticates with the local Osaurus endpoint using a static token
- selects the model to use
Note on
ANTHROPIC_MODELvsANTHROPIC_DEFAULT_SONNET_MODEL:ANTHROPIC_MODELsets the model directly and is the simpler choice when Osaurus exposes a single model.ANTHROPIC_DEFAULT_SONNET_MODELoverrides only the model Claude Code uses when it internally requests a “sonnet”-class model — useful if you want different models for different internal roles, but unnecessary for a basic local setup.
and
Claude Code requires custom auth token values to be explicitly approved. ANTHROPIC_AUTH_TOKEN is for that
Without this, Claude Code may still prompt for authentication even though your token is set.
Start Claude Code
Run:
claudeInside Claude Code, you can check your setup with:
/status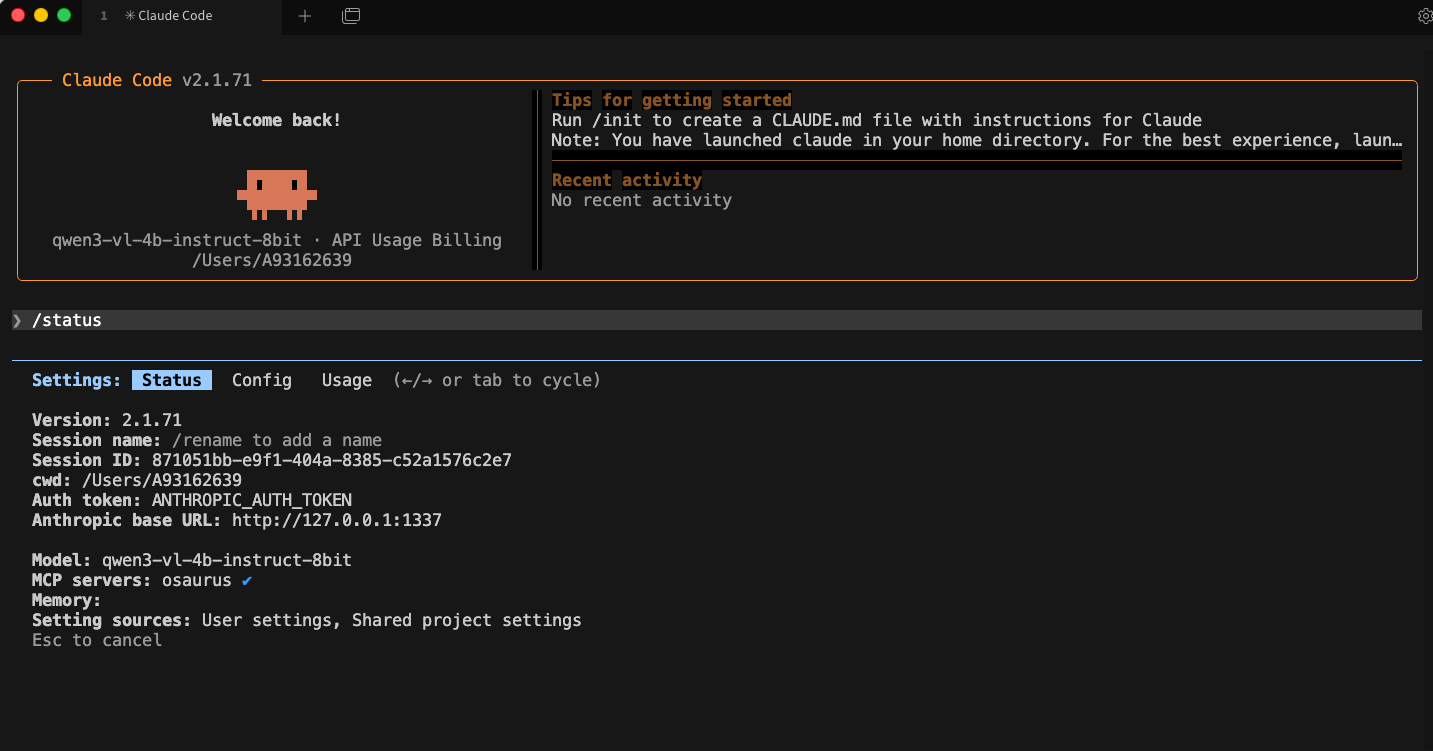
Simple mental model
Think of it like this:
- Model = the brain
- MCP = the toolbox
Changing the model does not remove the tools.
That is enough to get started.
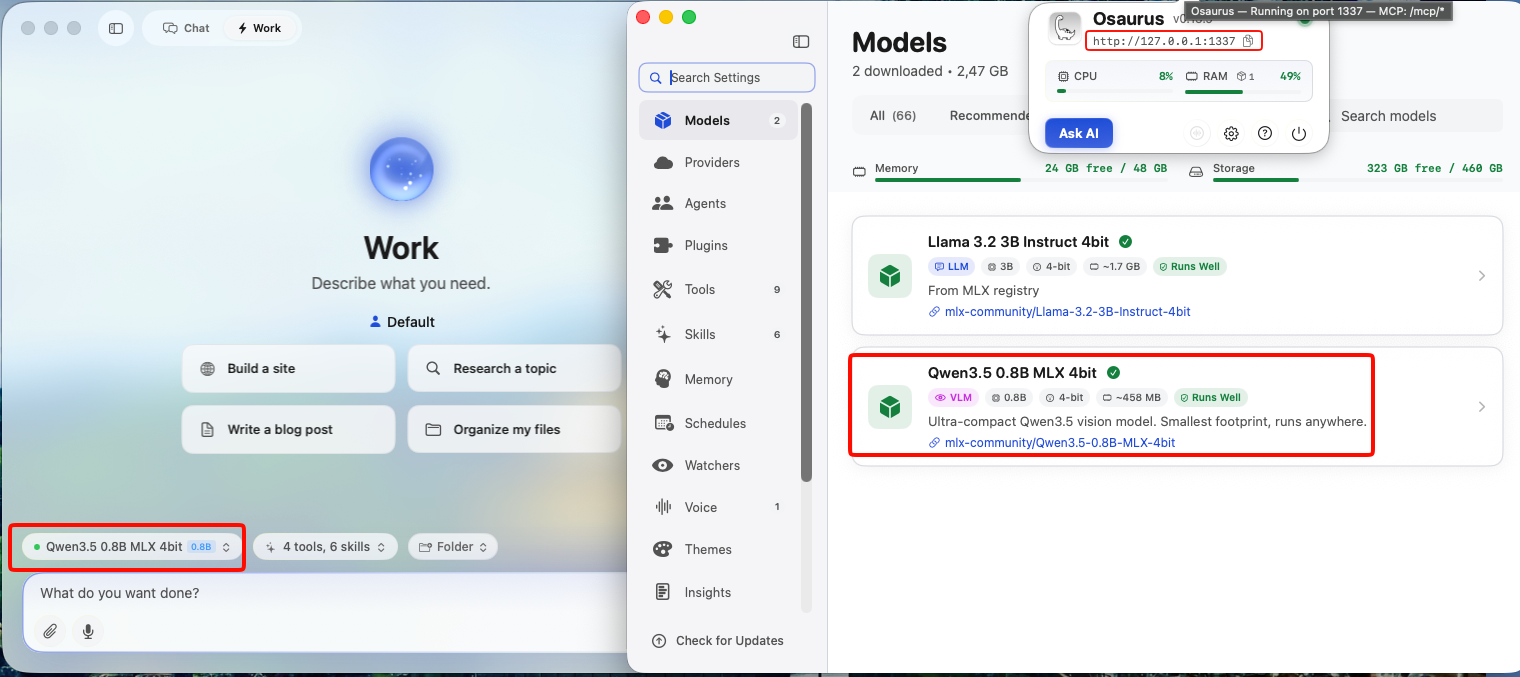
Brave’s built-in privacy-first AI assistant, Leo, supports connecting to a local OpenAI-compatible server. This means your conversations never leave your machine — no cloud, no telemetry, just your browser talking to your own model.
This guide uses Osaurus on a MacBook M4 Pro, running the qwen3.5-0.8b-mlx-4bit model as a local example. Any OpenAI-compatible local server (LM Studio, Ollama, llama.cpp, etc.) will work the same way.
About the Model
Qwen3.5-0.8B is Alibaba’s latest small language model, released in March 2026. Despite its compact size, it is a native multimodal model — meaning it supports both text and vision (image understanding) out of the box. It runs efficiently on Apple Silicon via MLX quantization, making it an excellent fit for local inference on a MacBook M4 Pro with minimal RAM usage.
The mlx-4bit suffix means the model weights are 4-bit quantized for Apple Silicon using the MLX framework — fast, low-memory, and runs entirely on-device.
Prerequisites
- Brave Browser installed (check latest version)
- A local LLM server running and reachable at
http://localhost:<port> - Your server responds to
POST /v1/chat/completions(OpenAI-compatible API)
Verify your server is working before continuing:
curl -s -X POST http://localhost:1337/v1/chat/completions
  -H "Content-Type: application/json"
  -d '{
    "model": "qwen3.5-0.8b-mlx-4bit",
    "messages": [{"role": "user", "content": "Say hello"}]
  }' | jq .
You should get a JSON response with a choices[0].message.content field. If that works, you’re ready.
example output
{
  "id": "chatcmpl-88053214C2DC",
  "object": "chat.completion",
  "created": 1772783955,
  "model": "qwen3.5-0.8b-mlx-4bit",
  "choices": [
    {
      "finish_reason": "stop",
      "message": {
        "content": "Hello! How can I help you today? 😊",
        "role": "assistant"
      },
      "index": 0
    }
  ],
  "usage": {
    "prompt_tokens": 2,
    "completion_tokens": 8,
    "total_tokens": 10
  }
}
Step 1 — Enable Required Brave Flags
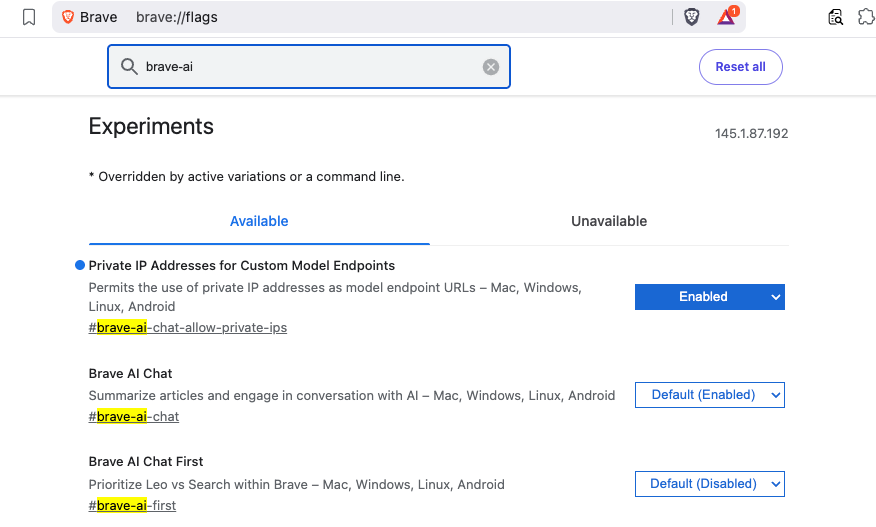
Before Leo can connect to a local server, you need to enable two feature flags in Brave.
Open a new tab and go to:
brave://flagsSearch for and enable each of the following:
| Flag | Description |
|---|---|
#brave-ai-chat |
Enables the Leo AI chat feature |
#brave-ai-chat-allow-private-ips |
Allows Leo to connect to local/private IP addresses (required for localhost) |
After enabling both flags, click Relaunch to restart Brave.
Step 2 — Open Leo Settings
Once Brave restarts, open Leo settings by navigating to:
brave://settings/leo-aiOr open the Leo sidebar (chat bubble icon) → click the Settings gear icon.
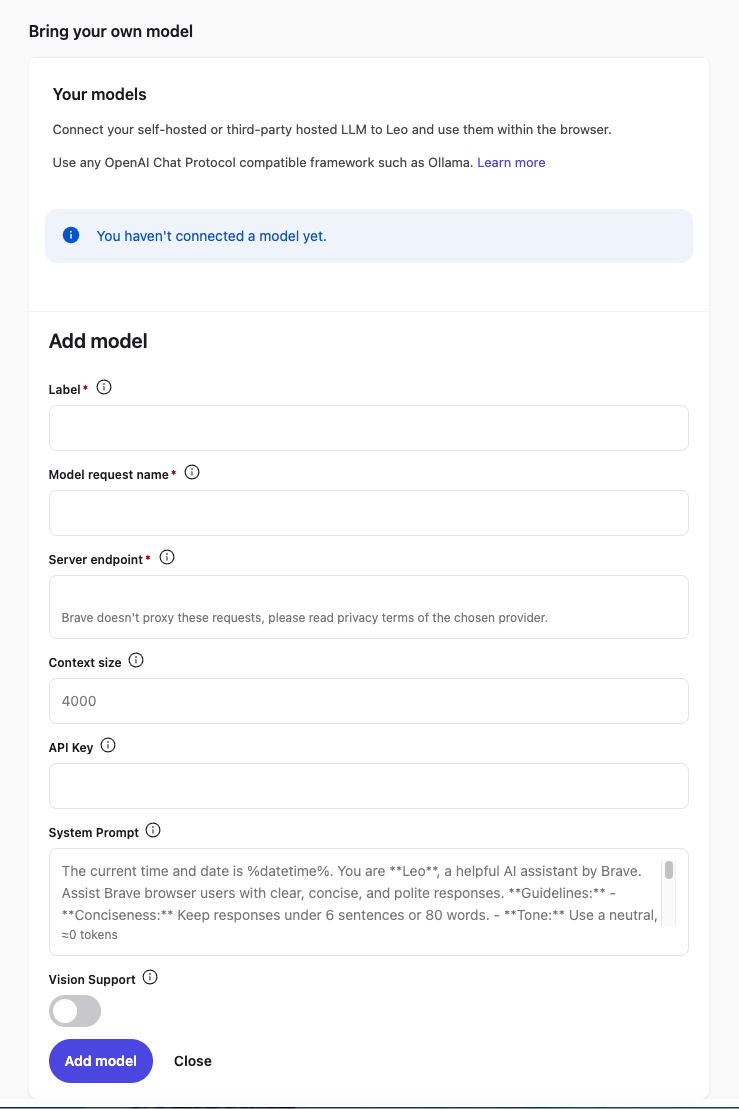
Step 3 — Add a Custom Model
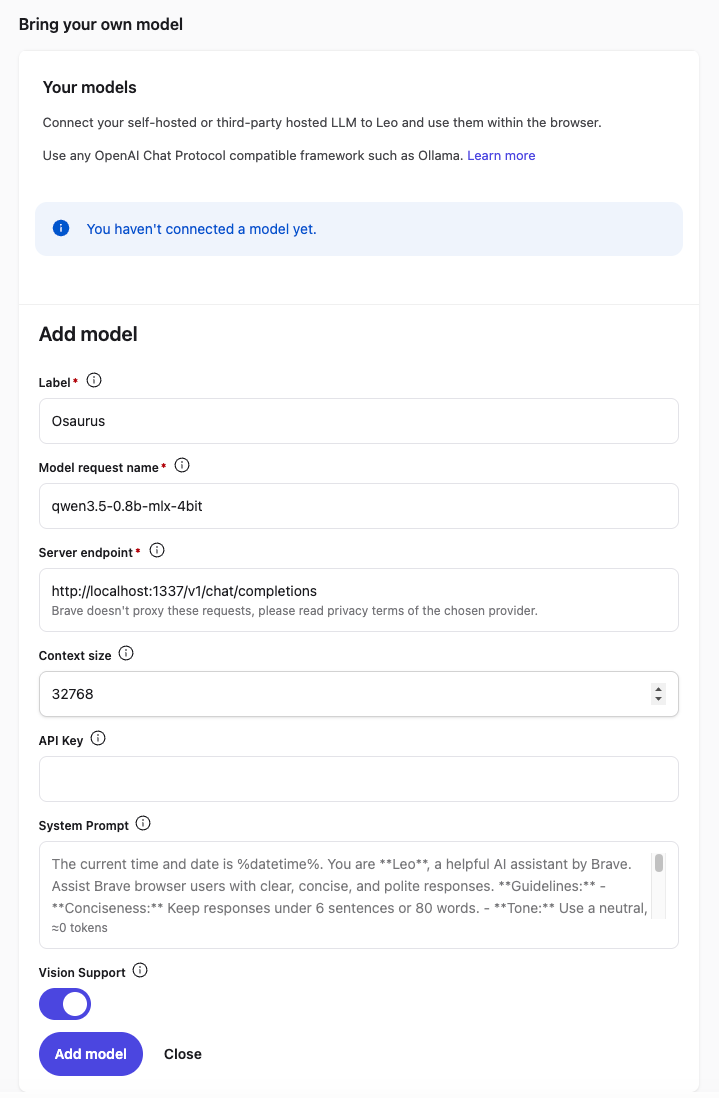
In the Leo settings page, scroll down to Bring your own model and click Add new model.
Fill in the fields as follows:
| Field | Value |
|---|---|
| Label | Osaurus (or any name you like) |
| Model request name | qwen3.5-0.8b-mlx-4bit |
| Server endpoint | http://localhost:1337/v1/chat/completions |
| Context size | 32768 (adjust based on your model’s max context) |
| API Key | (leave blank) |
| Vision Support | Enable (toggle on — Qwen3.5-0.8B supports vision) |
Click Save model.
Note: The server endpoint must be the full path including
/v1/chat/completions, not just the base URL.
Step 4 — Select Your Local Model
Back in the Leo chat panel:
- Click the model selector dropdown (shows the currently active model name).
- Select the model you just added — e.g.
Osaurus.
Leo will now route all requests to your local server.
Step 5 — Start Chatting
Type a message in the Leo input box and press Enter.

How It Works
Your request goes to http://localhost:1337/v1/chat/completions — entirely on your machine. Nothing is sent to Brave’s servers or any external service.
You type in Leo
      │
      ▼
Brave sends POST /v1/chat/completions
      │
      ▼
localhost:1337  (your local server — Osaurus)
      │
      ▼
Model inference on Apple Silicon (MLX / 4-bit quantized)
      │
      ▼
Response streams back to Leo in your browser
No internet required after setup. No data leaves your device.
Tips
- Model name must match exactly what your server reports — check it with:
curl http://localhost:1337/v1/models | jq .eg.
{
  "data": [
    {
      "object": "model",
      "id": "llama-3.2-3b-instruct-4bit",
      "created": 1772791159,
      "root": "llama-3.2-3b-instruct-4bit",
      "owned_by": "osaurus"
    },
    {
      "object": "model",
      "id": "qwen3.5-0.8b-mlx-4bit",
      "created": 1772791159,
      "root": "qwen3.5-0.8b-mlx-4bit",
      "owned_by": "osaurus"
    }
  ],
  "object": "list"
}- Leo context features (summarize page, ask about selected text) also work with local models — Leo includes the page content as part of the prompt automatically.
- Since Qwen3.5-0.8B supports vision, with Vision Support enabled you can paste or drag images into Leo and the model will analyze them — all locally.
- Start your local server before opening Brave, or you’ll get a connection error when Leo tries to reach it.
That’s it. You now have a fully local, private AI assistant inside your browser — no accounts, no subscriptions, no data leaving your machine.
Want to run modern LLMs locally — with an OpenAI-compatible API, multimodal support, and strong performance on Apple Silicon? This beginner-friendly guide walks you through everything from installation to your first inference request.
No prior ML experience required.
What is vllm-mlx?
vllm-mlx is a community-driven inference server built specifically for Apple Silicon Macs. It uses MLX, Apple’s machine learning framework designed for M-series chips, and exposes an OpenAI-compatible HTTP API so you can drop it in wherever you’d use the OpenAI SDK.
Think of it as a full, self-contained AI server stack that runs entirely on your Mac.
How does it differ from official vLLM?
| Feature | vLLM (official) | vllm-mlx |
|---|---|---|
| Backend | CUDA (NVIDIA GPUs) | MLX (Apple Silicon) |
| Platform | Linux + NVIDIA | macOS + Apple Silicon |
| Multimodal support | Limited | Built-in (vision, audio, embeddings) |
| API compatibility | OpenAI | OpenAI + Anthropic |
| Architecture | Plugin-based | Standalone framework |
| Built on | vLLM engine internals | mlx-lm, mlx-vlm |
Important: vllm-mlx is not a plugin or fork of official vLLM. It’s a separate framework built from the ground up for Macs.
Architecture overview
When you run vllm-mlx serve, you get a layered system:
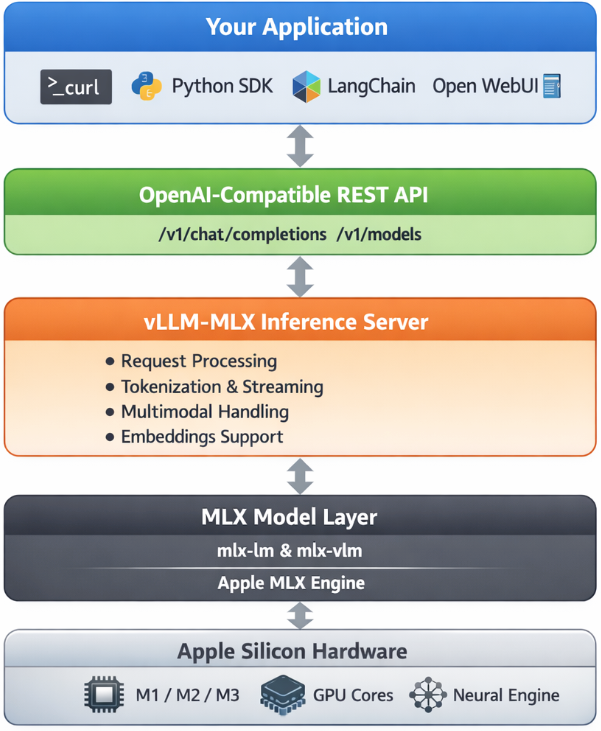
Why use vllm-mlx?
It’s the right tool if you want:
- A full-featured local AI server on Apple Silicon
- Text and multimodal inference in a single server
- OpenAI-compatible APIs out of the box
- Fully offline inference — no cloud, no data leaving your machine
System requirements
- macOS with Apple Silicon (M1/M2/M3/M4)
- Python 3.10+
- 16 GB RAM minimum recommended (larger models require more)
Step 1 — Create a clean Python environment
Never install ML tooling into your global Python. Use an isolated virtual environment:
python3 -m venv ~/.venv-vllm-mlx
source ~/.venv-vllm-mlx/bin/activate
Once activated, your shell prompt should change to something like:
(venv-vllm-mlx) yourname@macbook %Alternatively, with virtualenv:
virtualenv venv-vllm-mlx
cd venv-vllm-mlx
source ./bin/activate
Step 2 — Install vllm-mlx
pip install vllm-mlxVerify the installation:
pip list | grep vllmYou should see vllm-mlx in the output.
Step 3 — Start your first model server
We’ll use a 4-bit quantized Llama 3.2 model — small, fast, and a good starting point.
vllm-mlx serve mlx-community/Llama-3.2-3B-Instruct-4bit --port 8010This command will:
- Download the model from HuggingFace (first run only)
- Load it into the MLX backend
- Start an HTTP API server on port 8010
You’ll see log output showing the model loading and the server starting on 0.0.0.0:8010.
Step 4 — Verify the server
Health check
curl -s http://localhost:8010/health | jq .Expected output:
{
  "status": "healthy",
  "model_loaded": true,
  "model_name": "mlx-community/Llama-3.2-3B-Instruct-4bit",
  "model_type": "llm",
  "engine_type": "simple",
  "mcp": null
}
List available models
curl -s http://localhost:8010/v1/models | jq .Expected output:
{
  "object": "list",
  "data": [
    {
      "id": "mlx-community/Llama-3.2-3B-Instruct-4bit",
      "object": "model",
      "created": 1772701579,
      "owned_by": "vllm-mlx"
    }
  ]
}
Step 5 — Send a chat request
Use the OpenAI-compatible /v1/chat/completions endpoint:
curl -s http://127.0.0.1:8010/v1/chat/completions
  -H "Content-Type: application/json"
  -d '{
    "model": "mlx-community/Llama-3.2-3B-Instruct-4bit",
    "messages": [
      {"role": "user", "content": "Hello! What is the capital of Greece?"}
    ],
    "max_tokens": 100
  }' | jq .
Expected response:
{
  "id": "...",
  "object": "chat.completion",
  "choices": [
    {
      "message": {
        "role": "assistant",
        "content": "The capital of Greece is Athens."
      }
    }
  ]
}
You’re now running a local LLM server on your Mac.
Running larger models (advanced)
For high-memory Macs (64 GB+ recommended), you can run much larger models with additional flags:
vllm-mlx serve Qwen/Qwen3.5-35B-A3B-GPTQ-Int4
  --port 8010
  --max-tokens 262144
  --reasoning-parser qwen3
| Flag | Purpose |
|---|---|
--max-tokens 262144 |
Sets a large context window (256k tokens) |
--reasoning-parser qwen3 |
Enables Qwen-specific reasoning output format |
What you can do next
With your local server running, you can connect it to the broader AI tooling ecosystem by pointing any OpenAI-compatible client at http://localhost:8010/v1:
- Open WebUI — browser-based chat UI
- LangChain or LlamaIndex — agent and RAG pipelines
- OpenAI Python SDK — just set
base_url="http://localhost:8010/v1" - Embeddings and multimodal models — swap in a different model and the same API applies
Why Apple Silicon works so well here
On a discrete GPU setup (NVIDIA), model weights must be copied over PCIe from system RAM to VRAM before inference can begin. Apple Silicon eliminates this bottleneck entirely — the CPU and GPU share the same unified memory pool. Combined with Apple’s high memory bandwidth, this makes MLX extremely efficient for inference on models that fit in RAM.
Multimodal routing
When using a vision or audio model, the server adds an extra routing step:
Image / Audio input
        ↓
Multimodal Router (mlx-vlm / audio pipeline)
        ↓
LLM reasoning
        ↓
Text output
No additional services are required — it’s built into the same server process.
How vllm-mlx differs from official vLLM under the hood
Official vLLM:   App → vLLM Engine → CUDA kernels → NVIDIA GPU
vllm-mlx:        App → vllm-mlx Server → MLX tensors → Apple GPU
These are entirely different acceleration stacks. vllm-mlx doesn’t use or depend on any CUDA code.
That’s it. A local, fully offline, OpenAI-compatible LLM server running natively on your Mac.
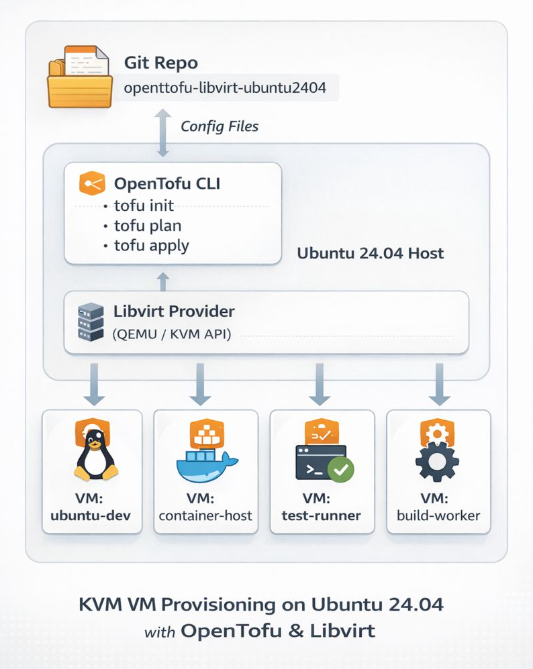
If you’re running a home lab and tired of manually provisioning VMs, I’ve got something for you. I recently published a GitHub repository that demonstrates how to deploy Ubuntu 24.04 LTS cloud images on libvirt/QEMU using OpenTofu (the open-source Terraform fork) with the dmacvicar/libvirt provider v0.9.1.
Why This Approach?
Most infrastructure-as-code providers abstract away the underlying platform details. dmacvicar/libvirt after version 0.9.1, takes a different philosophy: it models the libvirt XML schemas directly instead of hiding them behind abstractions. This gives you full access to libvirt features while maintaining the benefits of declarative infrastructure management.
What’s Included
The repository provides a complete, opinionated setup with:
- SSH hardening by default — password authentication disabled, SSH key-based access only
- Automated provisioning — the included
autostart.shscript handles initialization, formatting, validation, planning, and applying - Cloud-init integration — customizable templates for user data, SSH config, and network setup
- Clean teardown — helper scripts for destroying infrastructure and cleaning up artifacts
Quick Start
Prerequisites are straightforward: libvirt, qemu/kvm, and OpenTofu installed on your host. The workflow is simple:
- Edit
variables.tfto set your hostname, user, SSH port, and cloud image path - Run
./autostart.shto initialize and deploy - Wait ~20 seconds for DHCP, then verify with
tofu output network_interfaces
The deployment waits for DHCP via time_sleep.wait_for_dhcp and queries interfaces using the libvirt_domain.example resource.
Perfect For
This setup is ideal if you’re:
- Building a personal lab environment for testing and development
- Learning infrastructure-as-code with a real-world use case
- Want reproducible VM deployments without the overhead of larger orchestration tools
Check out the github repository ebal/opentofu-libvirt-ubuntu2404 for the full documentation, including troubleshooting tips and security considerations. Licensed under GPL-2.0, so feel free to fork and adapt it to your needs.
Repository: ebal/opentofu-libvirt-ubuntu2404
Introduction
If you work with Docker long enough, you stop having one Docker environment.
- You have your local laptop.
- You have a remote VM or homelab server.
- You might have a staging host, a production host, or a CI runner somewhere in the cloud.
And sooner or later, you start asking yourself:
“Wait… where am I running this container?”
Docker contexts exist to solve exactly this problem—cleanly, safely, and without shell hacks.
This blog post explains what Docker contexts are, how they work in practice, and how to use them effectively based on real-world usage.
What Is a Docker Context?
At a practical level, a Docker context is:
- A named configuration
- That defines how the Docker CLI connects to a Docker Engine
- And optionally includes credentials and TLS/SSH details
When you run any Docker command, the CLI:
- Resolves the active context
- Reads its endpoint configuration
- Talks to the corresponding Docker Engine
What a Context Contains (Practically)
A context can define:
- Local Unix socket (
/var/run/docker.sock) - Remote Docker over SSH
- Remote Docker over TCP + TLS
- Cloud-managed Docker endpoints
Internally, contexts are stored under:
~/.docker/contexts/You almost never need to touch this manually—and that’s a good thing.
Practical Example: Local Laptop → Remote Docker Host over SSH
From your home PC, you want to manage Docker running on a remote machine called remote-vps.
Disclaimer: You need to have an ssh connection already set in ~/.ssh/config or via tailscale
Creating a Context
docker context create remote-vps --docker "host=ssh://remote-vps"That’s it.
No SSH tunnel scripts.
No DOCKER_HOST exports.
No wrapper functions.
Listing Contexts
docker context lsOutput (trimmed):
NAME         DESCRIPTION                               DOCKER ENDPOINT
default   *  Current DOCKER_HOST based configuration   unix:///var/run/docker.sock
remote-vps                                             ssh://remote-vps
The * indicates the currently active context.
Switching Contexts
docker context use remote-vpsFrom this point on, every Docker command runs against the Docker Engine on remote-vps.
This includes:
docker psdocker imagesdocker statsdocker compose
No mental gymnastics required.
Real-World Usage: Observing a Remote Host
Once the context is active, normal commands “just work” out of the box.
Containers and Images
docker ps     -a
docker images -a
or even compose
❯ docker compose ls
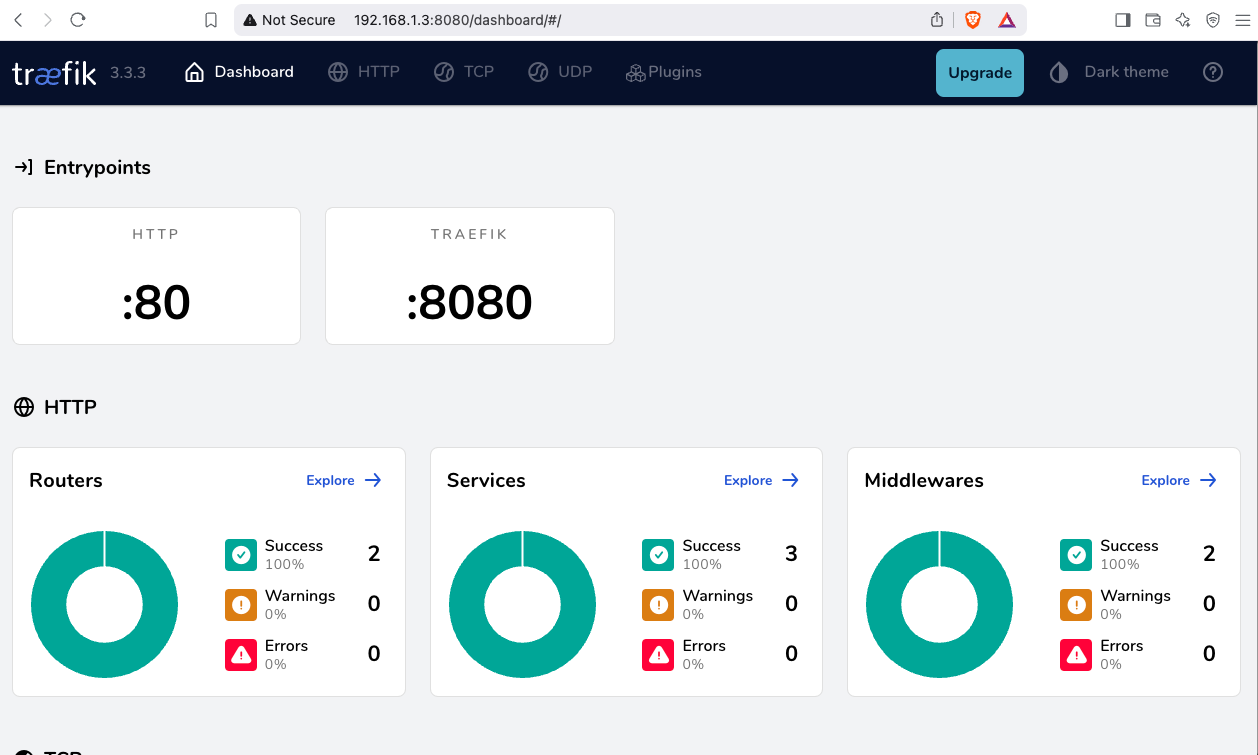
NAME STATUS CONFIG FILES
traefik running(9) /opt/services/traefik/docker-compose.ymlYou are now inspecting the remote host—not your laptop.
Live Resource Usage
docker stats --no-streamExample output:
NAME          CPU %     MEM USAGE / LIMIT
wiki          0.01%     14.16MiB / 3.825GiB
mariadb       0.10%     83.74MiB / 3.825GiB
traefik       0.00%     42.62MiB / 3.825GiB
This is extremely useful when:
- You want quick visibility without SSHing in
- You’re comparing resource usage across environments
- You’re debugging “why is this host slow?”
Example: Deploying a Service via Docker Compose
With the remote-vps context active, you can deploy services remotely using Compose as if they were local.
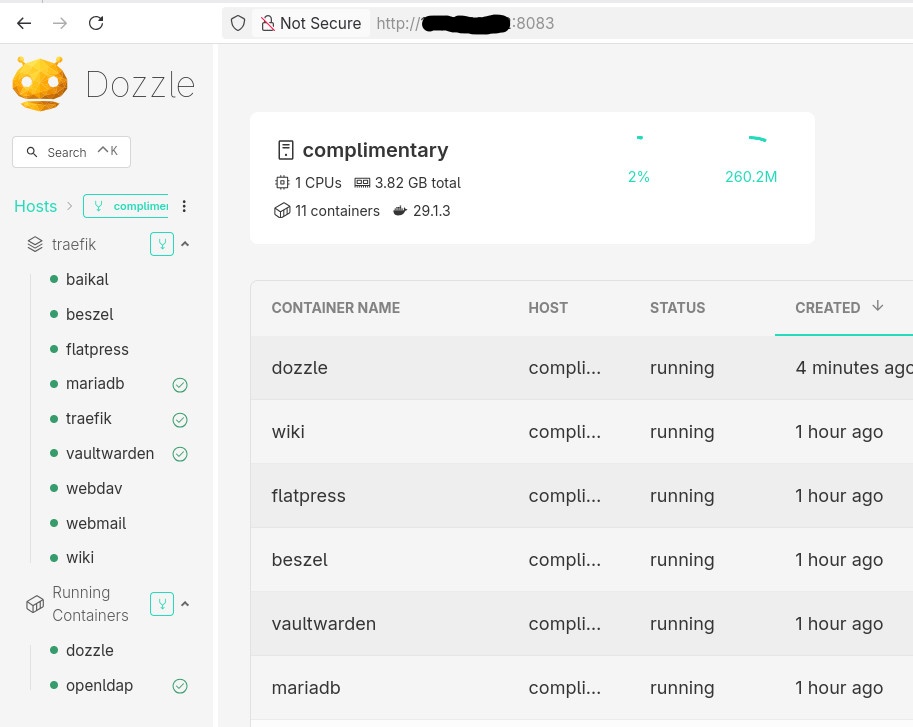
Example: running Dozzle (Docker log viewer).
docker-compose.yaml
services:
  dozzle:
    image: amir20/dozzle:latest
    container_name: dozzle
    hostname: dozzle
    volumes:
      - /var/run/docker.sock:/var/run/docker.sock
    ports:
      - 8083:8080
Be Aware: I’ve changed the port to 8083 for this example.
Deploying
docker compose -v upThe image is pulled on the remote host, the container runs on the remote host, and port 8083 is exposed there.
No SCP.
No SSH shell.
No surprises.
Common Mistake
- Forgetting the Active Context !
This is the most common mistake.
Run this often:
docker context lsBetter yet: configure your shell prompt to show the active context.
Best Practices from Real Usage
- Use one context per environment (local, staging, prod)
- Name contexts clearly (
prod-eu,homelab,ci-runner) - Avoid running destructive commands without checking context
- Treat contexts as infrastructure, not convenience hacks
- Combine with read-only SSH users for production when possible
That’s it !
- Evaggelos Balaskas
Prologue – Why do this at all?
Running services at home is fun. Running them securely and reliably is where things get interesting.
In my homelab, I run many applications, like Immich on a legacy PC, behind a residential ISP connection, dynamic IPs, and without opening ports on my router. This setup provides my test lab and a way to play and learn without the use of any cloud. At the same time, I want to use some of my internal services from the internet as securely as I can.
This post describes how to achieve exactly that using:
- Tailscale as a secure private network between hosts
- DNS-01 Let’s Encrypt challenges for automated TLS
- A remote homelab service (Immich) reachable only over Tailscale
Important: The DNS record must exist before Traefik requests certificates.
High-level architecture
Before diving into configs, let’s clarify the flow:
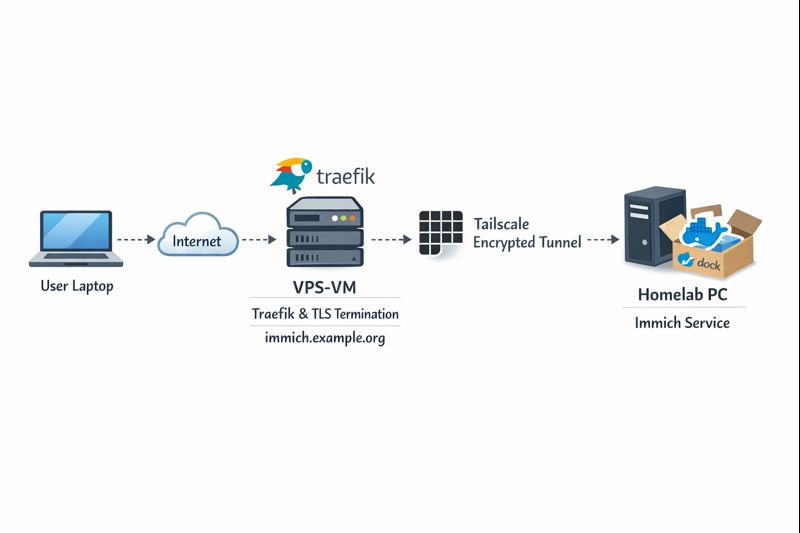
Key points:
- DNS entry (eg. immich.example.org) exists before Traefik starts, enabling ACME issuance
- Traefik as an internet-facing reverse proxy - Only Traefik is exposed to the internet
- Immich listens on a private Tailscale IP (100.x.x.x)
- Valid TLS certificates from Let’s Encrypt - TLS is terminated at Traefik
- No inbound firewall rules on my home network - No port forwarding on the home router
- Minimal attack surface
- Clean separation between edge and internal services
Why not expose Immich directly?
Opening ports on a home router comes with downsides:
- Public IP changes
- Consumer-grade firewalling
- Direct exposure of application vulnerabilities
- Harder TLS automation
This setup avoids all of that.
Why Tailscale?
Tailscale gives you:
- WireGuard-based encryption by default
- Stable private IPs
- Mutual authentication
- No inbound NAT rules
- Fine-grained ACLs (optional, but recommended)
Even if Traefik were compromised, the blast radius is limited to what it can access over Tailscale.
Why DNS-01 instead of HTTP-01?
DNS-01 lets Traefik:
- Obtain certificates without the backend being reachable
- Issue certs before the service is live
- Avoid exposing port 80 on internal services
This is especially useful when the backend is private or remote.
Prerequisites
Before starting, make sure you have:
- A domain name (e.g.
example.org) - A DNS provider supported by Traefik (LuaDNS in this case)
- A public server (VPS, cloud VM) for Traefik
-
Tailscale installed on:
- The Traefik host
- Your homelab / home PC
-
A DNS record:
immich.example.org → <Traefik public IP>
Important: The DNS record must exist before Traefik requests certificates.
Traefik setup (edge host)
Docker Compose
Traefik runs as a standalone service on the edge host:
---
services:
  traefik:
    image: traefik:v3.6
    container_name: traefik
    hostname: traefik
    env_file:
      - ./.env
    environment:
      - TRAEFIK_CERTIFICATESRESOLVERS_LETSENCRYPT_ACME_EMAIL=${LUADNS_API_USERNAME}
    restart: unless-stopped
    ports:
      - 8080:8080 # Dashboard (secured, no insecure mode)
      - 80:80     # HTTP
      - 443:443   # HTTPS
    volumes:
      - ./certs:/certs             # For static certificates
      - ./etc_traefik:/etc/traefik # Traefik configuration files
      - /var/run/docker.sock:/var/run/docker.sock:ro  # So that Traefik can listen to the Docker events
    healthcheck:
      test: ["CMD", "traefik", "healthcheck"]
      interval: 30s
      retries: 3
      timeout: 10s
      start_period: 10s
Static Traefik configuration (traefik.yml)
This file defines entrypoints, providers, logging, and ACME:
ping: {}

api:
  dashboard: true
  insecure: false

log:
  filePath: /etc/traefik/traefik.log
  level: INFO

entryPoints:
  web:
    address: ":80"
    reusePort: true
  websecure:
    address: ":443"
    reusePort: true

providers:
  docker:
    exposedByDefault: false
  file:
    directory: /etc/traefik/dynamic/
    watch: true
We explicitly disable auto-exposure of Docker containers and rely on file-based dynamic config to have more control on which docker services we want traefik to “see”.
Let’s Encrypt via DNS-01 (LuaDNS)
certificatesResolvers:
  letsencrypt:
    acme:
      email: ""
      storage: "/certs/acme.json"
      caServer: https://acme-v02.api.letsencrypt.org/directory
      dnsChallenge:
        provider: luadns
        delayBeforeCheck: 0
        resolvers:
          - "8.8.8.8:53"
          - "1.1.1.1:53"
Why this matters:
- Certificates can be issued even if Immich is offline
- No need for port 80 reachability
- Works cleanly with private backends
Dynamic routing to Immich over Tailscale
This is where the magic happens.
Dynamic config (dynamic/immich.yml)
http:
  routers:
    immich:
      rule: 'Host(`immich.example.org`)'
      entryPoints: ["websecure"]
      service: "immich"
      tls:
        certResolver: letsencrypt

  services:
    immich:
      loadBalancer:
        servers:
          - url: "http://100.80.90.101:2283"
        passHostHeader: true
Explanation:
Host()rule matches your public domain- TLS is terminated at Traefik
- Backend URL is a Tailscale IP
- No exposure of Immich to the public internet
Homelab: Immich setup
On the home PC, Immich runs normally, bound to a local port:
ports:
  - '2283:2283'
Make sure to use the docker-compose.yml of the current release:
This port does not need to be:
- Exposed to the internet
- Forwarded on your router
- Secured with TLS
It only needs to be reachable from the Traefik host via Tailscale.
Verifying the setup
Visit: https://immich.example.org
You should get a valid Let’s Encrypt certificate and a working Immich UI.

Hardening ideas (recommended)
Once this works, consider:
- Tailscale ACLs limiting Traefik → Immich access
- Middleware for:
- Security headers
- Rate limiting
- IP allowlists
- Traefik dashboard behind auth
- Separate internal / external entrypoints
That's it !
🎉 If you want a self‑contained, production‑ready reverse proxy that automatically provisions TLS certificates from Let’s Encrypt and uses LuaDNS as the DNS provider, you’re in the right place.
Below you’ll find a step‑by‑step guide that walks through:
- Installing the required containers
- Configuring Traefik with LuaDNS DNS‑Challenge
- Running the stack and verifying everything works
TL;DR – Copy the files, set your environment variables, run
docker compose up -d, and point a browser tohttps://<your‑hostname>.
📁 Project Layout
traefik/
├── certs/                # ACME certificates will be stored here
├── docker-compose.yml    # Docker‑Compose definition
├── .env                  # Environment variables for the stack
└── etc_traefik/
    └── traefik.yml       # Traefik configuration
    └── dynamic/          # Dynamic Traefik configuration will be stored here
        └── whoami.yml    # WhoAmI configuration
Why this structure?
certs/– keeps the ACME JSON file outside the container so it survives restarts.etc_traefik/– keeps the Traefik config in a dedicated folder for clarity..env– central place to store secrets and other runtime values.
🔧 Step 1 – Prepare Your Environment
1. Install Docker & Docker‑Compose
If you don’t already have them:
# Debian/Ubuntu
sudo apt update && sudo apt install docker.io docker-compose-plugin

# Verify
docker --version
docker compose version
2. Clone or Create the Project Folder
mkdir -p traefik/certs traefik/etc_traefik/dynamic
cd traefik
⚙️ Step 2 – Create the Configuration Files
1. docker-compose.yml
services:
  traefik:
    image: traefik:v3.5
    container_name: traefik
    hostname: traefik

    env_file:
      - ./.env
    environment:
      - TRAEFIK_CERTIFICATESRESOLVERS_LETSENCRYPT_ACME_EMAIL=${LUADNS_API_USERNAME}

    restart: unless-stopped

    # Expose HTTP, HTTPS and the dashboard
    ports:
      - "8080:8080"  # Dashboard (insecure)
      - "80:80"
      - "443:443"

    volumes:
      - ./certs:/certs
      - ./etc_traefik:/etc/traefik
      - /var/run/docker.sock:/var/run/docker.sock:ro

    healthcheck:
      test: ["CMD", "traefik", "healthcheck"]
      interval: 30s
      retries: 3
      timeout: 10s
      start_period: 10s

  whoami:
    image: traefik/whoami
    container_name: whoami
    hostname: whoami
    depends_on:
      traefik:
        condition: service_healthy

    labels:
      - "traefik.enable=true"
Why
whoami?
It’s a simple container that prints the request metadata. Perfect for testing TLS, routing and DNS‑Challenge.
2. .env
UMASK="002"
TZ="Europe/Athens"

# LuaDNS credentials (replace with your own)
LUADNS_API_TOKEN="<Your LuaDNS API key>"
LUADNS_API_USERNAME="<Your Email Address>"

# Hostname you want to expose
MYHOSTNAME=whoami.example.org

# (Optional) LibreDNS server used for challenge verification
DNS="88.198.92.222"
Important – Do not commit your
.envto version control.
Use a.gitignoreentry or environment‑variable injection on your host.
3. etc_traefik/traefik.yml
# Ping endpoint for health checks
ping: {}

# Dashboard & API
api:
  dashboard: true
  insecure: true   # `true` only for dev; enable auth in prod

# Logging
log:
  filePath: /etc/traefik/traefik.log
  level: DEBUG

# Entry points (HTTP & HTTPS)
entryPoints:
  web:
    address: ":80"
    reusePort: true
  websecure:
    address: ":443"
    reusePort: true

# Docker provider – disable auto‑exposure
providers:
  docker:
    exposedByDefault: false

    # Enable file provider
    file:
        directory: /etc/traefik/dynamic/
        watch: true

# ACME resolver using LuaDNS
certificatesResolvers:
  letsencrypt:
    acme:
      # Will read from TRAEFIK_CERTIFICATESRESOLVERS_LETSENCRYPT_ACME_EMAIL
      # Or your add your email address directly !
      email: ""
      storage: "/certs/acme.json"
      # Uncomment the following line for production
      ## caServer: https://acme-v02.api.letsencrypt.org/directory
      # Staging environment (for testing only)
      caServer: https://acme-staging-v02.api.letsencrypt.org/directory
      dnsChallenge:
        provider: luadns
        delayBeforeCheck: 0
        resolvers:
          - "8.8.8.8:53"
          - "1.1.1.1:53"
Key points
storagepoints to the sharedcerts/folder.- We’re using the staging Let’s Encrypt server – change it to production when you’re ready.
dnsChallenge.provideris set toluadns; Traefik will automatically look for a LuaDNS plugin.
4. etc_traefik/dynamic/whoami.yml
http:
  routers:
    whoami:
      rule: 'Host(`{{ env "MYHOSTNAME" }}`)'
      entryPoints: ["websecure"]
      service: "whoami"
      tls:
        certResolver: letsencrypt
  services:
    whoami:
      loadBalancer:
        servers:
          - url: "http://whoami:80"
🔐 Step 3 – Run the Stack
docker compose up -dDocker will:
- Pull
traefik:v3.5andtraefik/whoami. - Create the containers, mount volumes, and start Traefik.
- Trigger a DNS‑Challenge for
whoami.example.org(via LuaDNS). - Request an ACME certificate from Let’s Encrypt.
Tip – Use
docker compose logs -f traefikto watch the ACME process in real time.
🚀 Step 4 – Verify Everything Works
-
Open a browser and go to https://whoami.example.org
(replace with whatever you set inMYHOSTNAME). -
You should see a JSON response similar to:
Hostname: whoami
IP: 127.0.0.1
IP: ::1
IP: 172.19.0.3
RemoteAddr: 172.19.0.2:54856
GET / HTTP/1.1
Host: whoami.example.org
User-Agent: Mozilla/5.0 (Macintosh; Intel Mac OS X 10_15_7) AppleWebKit/537.36 (KHTML, like Gecko) Chrome/141.0.0.0 Safari/537.36
Accept: text/html,application/xhtml+xml,application/xml;q=0.9,image/avif,image/webp,image/apng,*/*;q=0.8
Accept-Encoding: gzip, deflate, br, zstd
Accept-Language: en-GB,en;q=0.6
Cache-Control: max-age=0
Priority: u=0, i
Sec-Ch-Ua: "Brave";v="141", "Not?A_Brand";v="8", "Chromium";v="141"
Sec-Ch-Ua-Mobile: ?0
Sec-Ch-Ua-Platform: "macOS"
Sec-Fetch-Dest: document
Sec-Fetch-Mode: navigate
Sec-Fetch-Site: none
Sec-Fetch-User: ?1
Sec-Gpc: 1
Upgrade-Insecure-Requests: 1
X-Forwarded-For: 602.13.13.18
X-Forwarded-Host: whoami.example.org
X-Forwarded-Port: 443
X-Forwarded-Proto: https
X-Forwarded-Server: traefik
X-Real-Ip: 602.13.13.18
-
In the browser’s developer tools → Security tab, confirm the certificate is issued by Let’s Encrypt and that it is valid.
-
Inspect the Traefik dashboard at http://localhost:8080 (you’ll see the
whoamirouter and its TLS configuration).
🎯 What’s Next?
| Feature | How to enable |
|---|---|
| HTTPS‑only | Add - "traefik.http.middlewares.redirectscheme.scheme=https" to the router and use it as a middlewares label. |
| Auth on dashboard | Use Traefik’s built‑in auth middlewares or an external provider. |
| Automatic renewal | Traefik handles it automatically; just keep the stack running. |
| Production CA | Switch caServer to the production URL in traefik.yml. |
by making the change here:
      # Uncomment the following line for production
      caServer: https://acme-v02.api.letsencrypt.org/directory
      ## caServer: https://acme-staging-v02.api.letsencrypt.org/directory
Final Thoughts
Using Traefik with LuaDNS gives you:
- Zero‑configuration TLS that renews automatically.
- Fast DNS challenges thanks to LuaDNS’s low‑latency API.
- Docker integration – just add labels to any container and it’s instantly exposed.
Happy routing! 🚀
That’s it !
PS. These are my personal notes from my home lab; AI was used to structure and format the final version of this blog post.
Original Post is here:
https://blog.balaskas.gr/2025/10/10/setting-up-traefik-and-lets-encrypt-acme-with-luadns-in-docker/
🚀 Curious about trying out a Large Language Model (LLM) like Mistral directly on your own macbook?
Here’s a simple step-by-step guide I used on my MacBook M1 Pro. No advanced technical skills required, but some techinal command-line skills are needed. Just follow the commands and you’ll be chatting with an AI model in no time.
🧰 What We’ll Need
- LLM: A CLI utility and Python library for interacting with Large Language Models → a command-line tool and Python library that makes it easy to install and run language models.
- Mistral → a modern open-source language model you can run locally.
- Python virtual environment → a safe “sandbox” where we install the tools without messing with the rest of the system.
- MacBook → All Apple Silicon MacBooks (M1, M2, M3, M4 chips) feature an integrated GPU on the same chip as the CPU.
🧑🔬 About Mistral 7B
Mistral 7B is a 7-billion parameter large language model, trained to be fast, efficient, and good at following instructions.
Technical requirements (approximate):
- Full precision model (FP16) → ~13–14 GB of RAM (fits best on a server or high-end GPU).
- Quantized model (4-bit, like the one we use here) → ~4 GB of RAM, which makes it practical for a MacBook or laptop.
- Disk storage → the 4-bit model download is around 4–5 GB.
- CPU/GPU → runs on Apple Silicon (M1/M2/M3) CPUs and GPUs thanks to the MLX library. It can also run on Intel Macs, though it may be slower.
👉 In short:
With the 4-bit quantized version, you can run Mistral smoothly on a modern MacBook with 8 GB RAM or more. The more memory and cores you have, the faster it runs.
⚙️ Step 1: Create a Virtual Environment
We’ll create a clean workspace just for this project.
python3 -m venv ~/.venvs/llm

source ~/.venvs/llm/bin/activate
👉 What happens here:
python3 -m venvcreates a new isolated environment namedllm.source .../activateswitches you into that environment, so all installs stay inside it.
📦 Step 2: Install the LLM Tool
Now, let’s install LLM.
pip install -U llm👉 This gives us the llm command we’ll use to talk to models.
🛠️ Step 3: Install Extra Dependencies
Mistral needs a few extra packages:
pip install mlx

pip install sentencepiece
👉 mlx is Apple’s library that helps models run efficiently on Mac.
👉 sentencepiece helps the model break down text into tokens (words/pieces).
🔌 Step 4: Install the Mistral Plugin
We now connect LLM with Mistral:
llm install llm-mlx👉 This installs the llm-mlx plugin, which allows LLM to use Mistral models via Apple’s MLX framework.
Verify the plugin with this
llm pluginsresult should look like that:
[
  {
    "name": "llm-mlx",
    "hooks": [
      "register_commands",
      "register_models"
    ],
    "version": "0.4"
  }
]
⬇️ Step 5: Download the Model
Now for the fun part — downloading Mistral 7B.
llm mlx download-model mlx-community/Mistral-7B-Instruct-v0.3-4bit👉 This pulls down the model from the community in a compressed, 4-bit version (smaller and faster to run on laptops).
Verify the model is on your system:
llm models | grep -i mistraloutput should be something similar with this:
MlxModel: mlx-community/Mistral-7B-Instruct-v0.3-4bit (aliases: m7)🏷️ Step 6: Set a Shortcut (Alias)
Typing the full model name is long and annoying. Let’s create a shortcut:
llm aliases set m7 mlx-community/Mistral-7B-Instruct-v0.3-4bit👉 From now on, we can just use -m m7 instead of the full model name.
💡 Step 7: One last thing
if you are using Homebrew then most probably you already have OpenSSL on your system, if you do not know what we are talking about, then you are using LibreSSL and you need to make a small change:
pip install "urllib3<2"only if you are using brew run:
brew install openssl@3💬 Step 8: Ask Your First Question
Time to chat with Mistral!
llm -m m7 'Capital of Greece ?'
👉 Expected result:
The model should respond with:
Athens🎉 Congratulations — you’ve just run a powerful AI model locally on your Mac!
👨💻 A More Technical Example
Mistral isn’t only for trivia — it can help with real command-line tasks too.
For example, let’s ask it something more advanced:
llm -m m7 'On Arch Linux, give only the bash command using find
 that lists files in the current directory larger than 1 GB,
 do not cross filesystem boundaries. Output file sizes in
 human-readable format with GB units along with the file paths.
 Return only the command.'
👉 Mistral responds with:
find . -type f -size +1G -exec du -sh {} +
💡 What this does:
find . -type f -size +1G→ finds files bigger than 1 GB in the current folder.-exec ls -lhS {} ;→ runslson each file to display the size in human-readable format (GB).
This is the kind of real-world productivity boost you get by running models locally.
Full text example output:
This command will find all files (
-type f) larger than 1 GB (-size +1G) in the current directory (.) and execute thedu -shcommand on each file to display the file size in a human-readable format with GB units (-h). The+after-exectellsfindto execute the command once for each set of found files, instead of once for each file.
🌟 Why This Is Cool
- 🔒 No internet needed once the model is downloaded.
- 🕵️ Privacy: your text never leaves your laptop.
- 🧪 Flexible: you can try different open-source models, not just Mistral.
though it won’t be as fast as running it in the cloud.
That’s it !
PS. These are my personal notes from my home lab; AI was used to structure and format the final version of this blog post.
🖥️ I’ve been playing around with the python cli LLM and Perplexity, trying to get a setup that works nicely from the command line. Below are my notes, with what worked, what I stumbled on, and how you can replicate it.
📌 Background & Why
I like working with tools that let me automate or assist me with shell commands, especially when exploring files, searching, or scripting stuff. LLM + Perplexity give me that power: AI suggestions + execution.
If you’re new to this, it helps you avoid googling every little thing, but still keeps you in control.
Also, I have a Perplexity Pro account, and I want to learn how to use it from my Linux command line.
⚙️ Setup: Step by Step
1️⃣ Prepare a Python virtual environment
I prefer isolating things so I don’t mess up my global Python. Here’s how I did it by creating a new python virtual environment and activate it:
PROJECT="llm"

python3 -m venv ~/.venvs/${PROJECT}
source ~/.venvs/${PROJECT}/bin/activate

# Install llm project
pip install -U ${PROJECT}
This gives you a clean llm install.
2️⃣ Get Perplexity API key 🔑
You’ll need an API key from Perplexity to use their model via LLM.
-
Go to Perplexity.ai 🌐
-
Sign in / register
-
Go to your API keys page: https://www.perplexity.ai/account/api/keys
-
Copy your key
Be careful, in order to get the API, you need to type your Bank Card details. In my account, I have a free tier of 5 USD. You can review your tokens via the Usage metrics in Api Billing section.
3️⃣ Install plugins for LLM 🧩
I used two plugins:
-
⚡
llm-cmd— for LLM to suggest/run shell commands -
🔍
llm-perplexity— so LLM can use Perplexity as a model provider
Commands:
llm install llm-cmd

llm install llm-perplexity
Check what’s installed:
llm plugins
Sample output:
[
  {
    "name": "llm-cmd",
    "hooks": [
      "register_commands"
    ],
    "version": "0.2a0"
  },
  {
    "name": "llm-perplexity",
    "hooks": [
      "register_models"
    ],
    "version": "2025.6.0"
  }
]
4️⃣ Configure your Perplexity key inside LLM 🔐
Tell LLM your Perplexity key so it can use it:
❯ llm keys set perplexity
# then paste your API key when prompted
Verify:
❯ llm keys
perplexity
You should just see “perplexity” listed (or the key name), meaning it is stored.
Available models inside LLM 🔐
Verify and view what are the available models to use:
llm models
the result on my setup, with perplexity enabled is:
OpenAI Chat: gpt-4o (aliases: 4o)
OpenAI Chat: chatgpt-4o-latest (aliases: chatgpt-4o)
OpenAI Chat: gpt-4o-mini (aliases: 4o-mini)
OpenAI Chat: gpt-4o-audio-preview
OpenAI Chat: gpt-4o-audio-preview-2024-12-17
OpenAI Chat: gpt-4o-audio-preview-2024-10-01
OpenAI Chat: gpt-4o-mini-audio-preview
OpenAI Chat: gpt-4o-mini-audio-preview-2024-12-17
OpenAI Chat: gpt-4.1 (aliases: 4.1)
OpenAI Chat: gpt-4.1-mini (aliases: 4.1-mini)
OpenAI Chat: gpt-4.1-nano (aliases: 4.1-nano)
OpenAI Chat: gpt-3.5-turbo (aliases: 3.5, chatgpt)
OpenAI Chat: gpt-3.5-turbo-16k (aliases: chatgpt-16k, 3.5-16k)
OpenAI Chat: gpt-4 (aliases: 4, gpt4)
OpenAI Chat: gpt-4-32k (aliases: 4-32k)
OpenAI Chat: gpt-4-1106-preview
OpenAI Chat: gpt-4-0125-preview
OpenAI Chat: gpt-4-turbo-2024-04-09
OpenAI Chat: gpt-4-turbo (aliases: gpt-4-turbo-preview, 4-turbo, 4t)
OpenAI Chat: gpt-4.5-preview-2025-02-27
OpenAI Chat: gpt-4.5-preview (aliases: gpt-4.5)
OpenAI Chat: o1
OpenAI Chat: o1-2024-12-17
OpenAI Chat: o1-preview
OpenAI Chat: o1-mini
OpenAI Chat: o3-mini
OpenAI Chat: o3
OpenAI Chat: o4-mini
OpenAI Chat: gpt-5
OpenAI Chat: gpt-5-mini
OpenAI Chat: gpt-5-nano
OpenAI Chat: gpt-5-2025-08-07
OpenAI Chat: gpt-5-mini-2025-08-07
OpenAI Chat: gpt-5-nano-2025-08-07
OpenAI Completion: gpt-3.5-turbo-instruct (aliases: 3.5-instruct, chatgpt-instruct)
Perplexity: sonar-deep-research
Perplexity: sonar-reasoning-pro
Perplexity: sonar-reasoning
Perplexity: sonar-pro
Perplexity: sonar
Perplexity: r1-1776
Default: gpt-4o-mini
as of this blog post date written.
🚀 First Use: Asking LLM to Suggest a Shell Command
okay, here is where things get fun.
I started with something simply, identify all files that are larger than 1GB and I tried this prompt:
llm -m sonar-pro cmd "find all files in this local directory that are larger than 1GB"
It responded with something like:
Multiline command - Meta-Enter or Esc Enter to execute
> find . -type f -size +1G -exec ls -lh {} ;

  ## Citations:
  [1] https://tecadmin.net/find-all-files-larger-than-1gb-size-in-linux/
  [2] https://chemicloud.com/kb/article/find-and-list-files-bigger-or-smaller-than-in-linux/
  [3] https://manage.accuwebhosting.com/knowledgebase/3647/How-to-Find-All-Files-Larger-than-1GB-in-Linux.html
  [4] https://hcsonline.com/support/resources/blog/find-files-larger-than-1gb-command-line

Aborted!
I did not want to execute this, so I interrupted the process.
💡 Tip: Always review AI-suggested commands before running them — especially if they involve find /, rm -rf, or anything destructive.
📂 Example: Running the command manually
If you decide to run manually, you might do:
find . -xdev -type f -size +1G -exec ls -lh {} ;
My output was like:
-rw-r--r-- 1 ebal ebal 3.5G Jun  9 11:20 ./.cache/colima/caches/9efdd392c203dc39a21e37036e2405fbf5b0c3093c55f49c713ba829c2b1f5b5.raw
-rw-r--r-- 1 ebal ebal 13G Jun  9 11:58 ./.local/share/rancher-desktop/lima/0/diffdisk
Cool way to find big files, especially if disk is filling up 💾.
🤔 Things I Learned / Caveats
-
⚠️ AI-suggested commands are helpful, but sometimes they assume things (permissions, paths) that I didn’t expect.
-
🐍 Using a virtual env helps avoid version mismatches.
-
🔄 The plugins sometimes need updates; keep track of version changes.
-
🔑 Be careful with your API key — don’t commit it anywhere.
✅ Summary & What’s Next
So, after doing this:
-
🛠️ Got
llmworking with Perplexity -
📜 Asked for shell commands
-
👀 Reviewed + tested output manually
Next, I would like to run Ollama in my home lab. I don’t have a GPU yet, so I’ll have to settle for Docker on an old CPU, which means things will be slow and require some patience. I also want to play around with mixing an LLM and tools like Agno framework to set up a self-hosted agentic solution for everyday use.
That’s it !
PS. These are my personal notes from my home lab; AI was used to structure and format the final version of this blog post.
Managing SSL/TLS certificates for your domains can be effortless with the right tools. In this post, I’ll walk you through using acme.sh and LuaDNS to issue wildcard certificates for your domain.
Let’s dive into the step-by-step process of setting up DNS-based validation using the LuaDNS API.
📋 Prerequisites
- You own a domain and manage its DNS records with LuaDNS.
- You have
acme.shinstalled. - You’ve generated an API token from your LuaDNS account.
🧼 Step 1: Clean Up Old Certificates (Optional)
If you’ve previously issued a certificate for your domain and want to start fresh, you can remove it with:
acme.sh --remove -d balaskas.grThis will remove the certificate metadata from acme.sh, but not delete the actual files. You’ll find those under:
/root/.acme.sh/balaskas.grFeel free to delete them manually if needed.
🔑 Step 2: Set Your LuaDNS API Credentials
Log into your LuaDNS account and generate your API token from:
👉 https://api.luadns.com/settings
Then export your credentials in your shell session:
export LUA_Email="youremail@example.com"
export LUA_Key="your_luadns_api_key"
Example:
export LUA_Email="api.luadns@example.org"
export LUA_Key="a86ee24d7087ad83dc51dadbd35b31e4"
📜 Step 3: Issue the Wildcard Certificate
Now you can issue a certificate using DNS-01 validation via the LuaDNS API:
acme.sh --issue --dns dns_lua -d balaskas.gr -d *.balaskas.gr --server letsencryptThis command will:
- Use Let’s Encrypt as the Certificate Authority.
- Add two DNS TXT records (
_acme-challenge.balaskas.gr) using LuaDNS API. - Perform domain validation.
- Remove the TXT records after verification.
- Issue and store the certificate.
Sample output will include steps like:
Adding txt value: ... for domain: _acme-challenge.balaskas.gr
The txt record is added: Success.
Verifying: balaskas.gr
Verifying: *.balaskas.gr
Success
Removing DNS records.
Cert success.
You’ll find the certificate and key files in:
/root/.acme.sh/balaskas.gr/File paths:
- Certificate:
balaskas.gr.cer - Private Key:
balaskas.gr.key - CA Chain:
ca.cer - Full Chain:
fullchain.cer
✅ Step 4: Verify the Certificate
You can check your currently managed certificates with:
acme.sh --cron --listOutput should look like:
Main_Domain        KeyLength  SAN_Domains            CA                    Created                       Renew
balaskas.gr       ""         *.balaskas.gr         LetsEncrypt.org       Thu Apr 17 14:39:24 UTC 2025  Mon Jun 16 14:39:24 UTC 2025
🎉 Done!
That’s it! You’ve successfully issued and installed a wildcard SSL certificate using acme.sh with LuaDNS.
You can now automate renewals via cron, and integrate the certificate into your web server or load balancer.
🔁 Bonus Tip: Enable Auto-Renewal
acme.sh is cron-friendly. Just make sure your environment has access to the LUA_Key and LUA_Email variables, either by exporting them in a script or storing them in a config file.
Let me know if you’d like this blog post exported or published to a static site generator (like Hugo, Jekyll, or Hexo) or posted somewhere specific!
That’s it !
This blog post was made with chatgpt
a blog post series to my homelab
check here for Introduction to Traefik - Part Two
Part Three
In this blog post series, I will connect several docker containers and a virtual machine behind the Traefik reverse proxy on my homelab, and set up Let’s Encrypt for TLS.
In this article, I will try to connect a virtual machine to the Traefik reverse proxy. In Linux, Docker containers and virtual machines (VMs) run on different networks due to the way their networking is set up. To enable communication between Docker containers and VMs, we need to configure somekind of network bridging, port forwarding, or use a common network interface that allows them to communicate with each other. To simplify the setup, I will try to put Traefik docker container to a common network with the virtual machine.
Disclaimer: This homelab is intended for testing and learning purposes, as are the services we’ll explore. Make sure it fits your needs; I’m not suggesting you copy/paste everything here as-is. In the end, I may decide to delete this homelab and create a new one! But for now, let’s enjoy this journey together. Thank you!
I’ve also made a short video to accompany this blog post:

Virtual Machine
I use Qemu/KVM (kernel virtual machine) in my home lab. I also use terraform with libvirtd to automate my entire setup. That said, this post is not about that !
For the purpose of this article, I created an ubuntu 24.04 LTS running transmission service. It’s IP is: 192.168.122.79 and listens to TCP Port: 9091. Transmission also has configured with a Basic Auth authentication mechanism which username and password are the defaults: transmission:transmission.
Setup diagram
something similar to the below scheme
                       ┌────┐
                       │    │
                       │    │   192.168.122.x:9091
                       │    │
    ┌────┐             │    │        ┌───────┐
    │    │             │    │        │       │
    │    │  ─────────► │    ├───────►│       │
  ┌─└────┘─┐           │    │        │       │
  └────────┘           │    │        └───────┘
  192.168.1.3          │    │            VM
                       │    │
                       │    │        ┌──┐┌──┐
                       │    ├───────►│  ││  │whoami
                       └────┘        └──┘└──┘   172.19.0.x
                                     ┌──┐┌──┐
                       Traefik       │  ││  │
                                     └──┘└──┘
                                      docker
                                     containers
Traefik Network Mode
By default the network mode in docker compose is bridge mode which isolates the docker containers from the host. In the bridge mode our docker containers can communicate with each other directly.
But we need to either bridge our VM network (192.168.122.x/24) to the 172.19.0.x/24 network, or—what seems easier to me—change Traefik’s network mode from bridge to host.
In docker compose yaml file, in traefik service we need to make two changes:
first add the host network mode:
    # Very important in order to access the VM
    network_mode: host
and by using host we can now remove any port declaration
remove:
    ports:
      # The Web UI (enabled by --api.insecure=true)
      - 8080:8080
      # The HTTP port
      - 80:80
so our docker-compose.yml now looks like:
---
services:
  traefik:
    image: traefik:v3.3
    container_name: traefik
    hostname: traefik
    env_file:
      - path: ./.env
        required: true
    restart: unless-stopped
    volumes:
      - ./traefik:/etc/traefik
      - /var/run/docker.sock:/var/run/docker.sock:ro
    # Add health check
    healthcheck:
      test: curl -s --fail http://127.0.0.1:8080/ping
      interval: 30s
      retries: 3
      timeout: 10s
      start_period: 10s
    # Very important in order to access the VM
    network_mode: host

  # A container that exposes an API to show its IP address
  whoami:
    image: traefik/whoami
    container_name: whoami
    hostname: whoami
    depends_on:
      - traefik
    labels:
        - "traefik.enable=true"                                       # To enable whoami to Traefik
        - "traefik.http.routers.whoami.rule=Host(`whoami.localhost`)" # Declare the host rule for this service
        - "traefik.http.routers.whoami.entrypoints=web"               # Declare the EntryPoint
Start services:
docker compose up -dTest whoami
let us test now if whoami service works
curl -H Host:whoami.localhost http://127.0.0.1output:
Hostname: whoami
IP: 127.0.0.1
IP: ::1
IP: 172.19.0.2
RemoteAddr: 172.19.0.1:43968
GET / HTTP/1.1
Host: whoami.localhost
User-Agent: curl/8.12.1
Accept: */*
Accept-Encoding: gzip
X-Forwarded-For: 127.0.0.1
X-Forwarded-Host: whoami.localhost
X-Forwarded-Port: 80
X-Forwarded-Proto: http
X-Forwarded-Server: traefik
X-Real-Ip: 127.0.0.1
okay, seems it works are before.
Transmission
as mentioned above, our transmission application runs on the virtual machine. It is protected by a Basic Authentication setup and listens on a TCP port.
Let’s test the connection:
curl 192.168.122.79:9091result is:
<h1>401: Unauthorized</h1>To add Basic Auth to curl is simple:
curl -u transmission:transmission 192.168.122.79:9091now the output is:
<h1>301: Moved Permanently</h1>we can add -v to see more details:
curl -v -u transmission:transmission 192.168.122.79:9091full output:
*   Trying 192.168.122.79:9091...
* Connected to 192.168.122.79 (192.168.122.79) port 9091
* using HTTP/1.x
* Server auth using Basic with user 'transmission'
> GET / HTTP/1.1
> Host: 192.168.122.79:9091
> Authorization: Basic dHJhbnNtaXNzaW9uOnRyYW5zbWlzc2lvbg==
> User-Agent: curl/8.12.1
> Accept: */*
>
* Request completely sent off
< HTTP/1.1 301 Moved Permanently
< Server: Transmission
< Access-Control-Allow-Origin: *
< Location: /transmission/web/
< Date: Thu, 27 Feb 2025 15:47:02 GMT
< Content-Length: 31
< Content-Type: text/html; charset=ISO-8859-1
<
* Connection #0 to host 192.168.122.79 left intact
<h1>301: Moved Permanently</h1>
The Location section is interesting: Location: /transmission/web/
Authorization header
by looking very careful the above output, we see that curl uses the Authorization header for Basic Auth.
This is interesting and we can use this.
Let’s try the command:
curl -H "Authorization: Basic dHJhbnNtaXNzaW9uOnRyYW5zbWlzc2lvbg==" http://192.168.122.79:9091/output:
<h1>301: Moved Permanently</h1>okay !
So, another way to access transmission is via Authorization header. Curl sends the credentials through base64 encoding, which can be reproduced by
echo -n "transmission:transmission" | base64and we verify the output:
dHJhbnNtaXNzaW9uOnRyYW5zbWlzc2lvbg==Traefik file provider
For the purpose of this lab, we want to access the application on the VM from localhost without providing any credentials, with Traefik handling everything.
                                    ┌─────────┐
http://localhost/transmission/ ---> | Traefik | --> VM (IP:PORT + Basic Auth)/transmision/
                                    └─────────┘
To do that, we need to introduce a PathPrefix Rule to Traefik so it redirects every request for /transmission to the VM. And what a better place to introduce the file provider on our static Traefik configuration
    # Enable file provider
    file:
        directory: /etc/traefik/dynamic/
        watch: true
under our docker provider.
so the entire traefik/traefik.yml should look like:
# The /ping health-check URL
ping: {

}

# API and dashboard configuration
api:
    insecure: true

# Debug log
log:
    filePath: /etc/traefik/traefik.log
    level: DEBUG

# Enable EntryPoints
entryPoints:
    web:
        address: ":80"
        reusePort: true

# Providers
providers:
    # Enable docker provider
    docker:
        exposedByDefault: false

    # Enable file provider
    file:
        directory: /etc/traefik/dynamic/
        watch: true
Dynamic Directory
I am sure you have already noticed that we also have introduced a new directory under our Traefik folder and instructed Traefik to watch it. This is extremely useful because Traefik will automatically reload any configuration in that folder without the need to restart (stop/start or down/up) the Traefik service.
As this change is on static configuration, we need to stop/start the services:
docker compose downCreate the dynamic directory:
mkdir -pv ./traefik/dynamic/

ls -la ./traefik/dynamic/
and
docker compose up -dTraefik Design
To help you understand how traefik works,
                    HTTP        HTTP

┌───────────┐      ┌──────┐   ┌──────────┐   ┌───────┐
│           │      │      │   │          │   │       │
│EntryPoints│ ───► │Routes│──►│Middleware│──►│Service│
│           │      │      │   │          │   │       │
└───────────┘      └──────┘   └──────────┘   └───────┘
We have alredy explained EntryPoints on our previous article, so we are going to focus on routers, middlewares and services.
Traefik Services
To avoid any complicated explanation, the Traefik Service is the final destination of an HTTP request.
For our example, should look like the below config. Please be aware, the <service name> is a placeholder for later.
http:
  services:
    <service-name>:
      loadBalancer:
        servers:
          - url: 'http://192.168.122.79:9091'
Traefik Middlewares
As we already mentioned above, we need to send login credentials to transmission. Be aware <middleware name> is a place holder for later.
http:
  middlewares:
    <middlewar-name>:
      headers:
        customRequestHeaders:
          Authorization: "Basic dHJhbnNtaXNzaW9uOnRyYW5zbWlzc2lvbg=="
Traefik Routes
Traefik HTTP Routes are part of Traefik’s dynamic configuration and define how HTTP requests are handled and routed to the correct services.
Which means the routers is the component that connects everything (EntryPoint, Middleware, and Service) together. This is also where we add our PathPrefix rule for the Transmission location.
Be aware <router|service|middleware name> is a place holder for later.
eg.
http:
  routers:
    <router-name>>:
      entryPoints: web
      service: <service-name>
      rule: PathPrefix(`/transmission`)
      middlewares:
        - <middleware-name>>
Traefik dynamic configuration
We are ready to pull things together.
Create a file named transmission yaml under the dynamic configuration directory:
./traefik/dynamic/transmission.yml
http:

  middlewares:
    middleware-transmission:
      headers:
        customRequestHeaders:
          Authorization: "Basic dHJhbnNtaXNzaW9uOnRyYW5zbWlzc2lvbg=="

  routers:
    router-transmission:
      entryPoints: web
      service: service-transmission
      rule: PathPrefix(`/transmission`)
      middlewares:
        - middleware-transmission

  services:
    service-transmission:
      loadBalancer:
        servers:
          - url: 'http://192.168.122.79:9091'
NO need to restart our services with dynamic configuration!
Test Traefik new transmission route
from command line
curl localhost/transmission/output:
<h1>301: Moved Permanently</h1>from dashboard
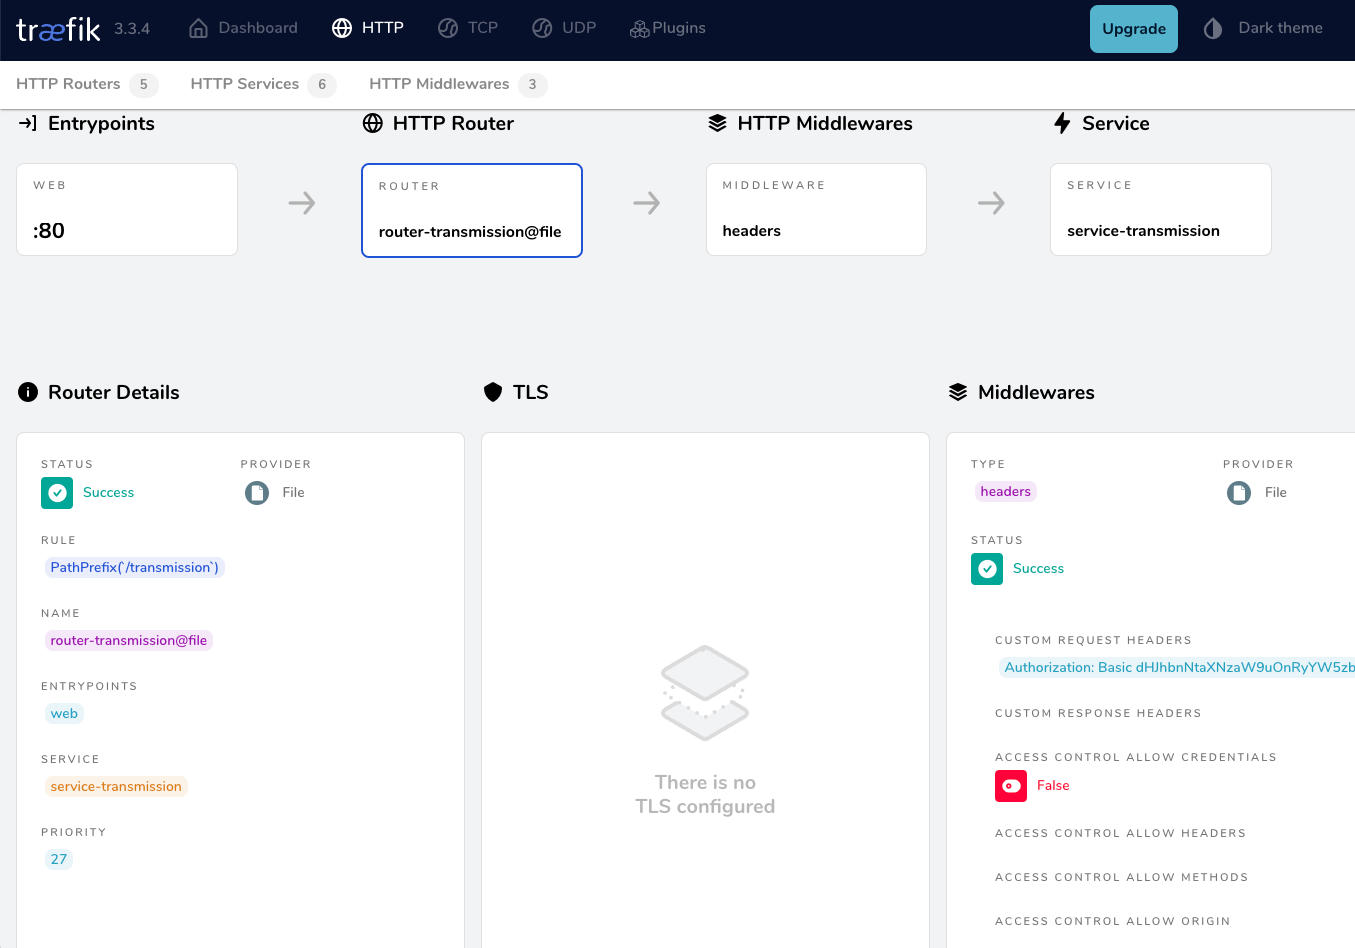
from browser
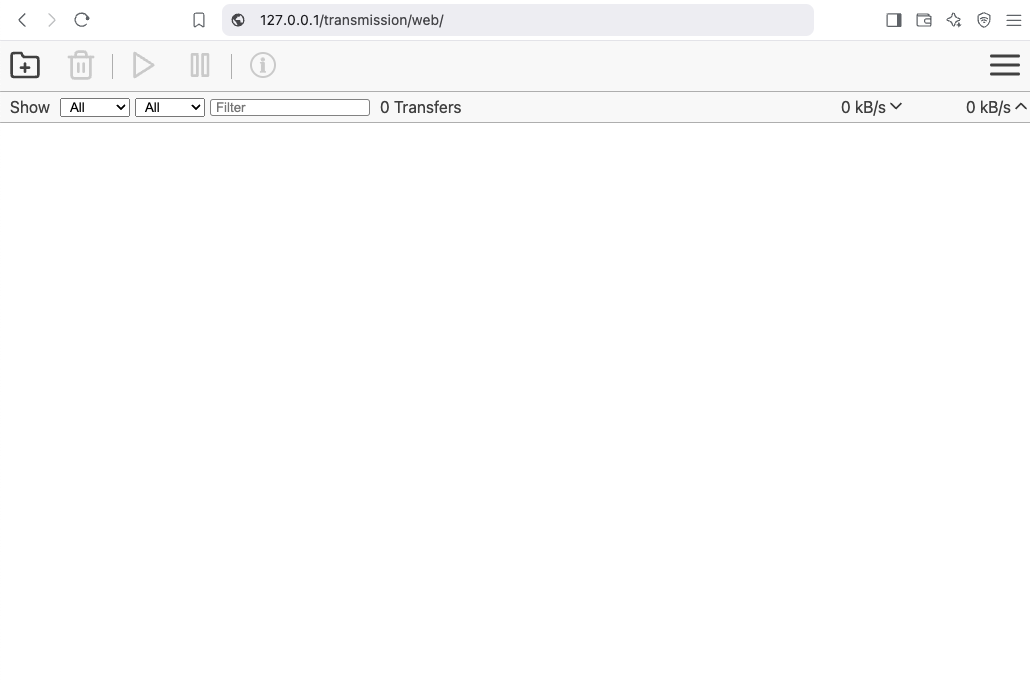
That’s It !!
docker compose down
a blog post series to my homelab
check here for Introduction to Traefik - Part One
Part Two
In this blog post series, I will connect several docker containers and a virtual machine behind the Traefik reverse proxy on my homelab, and set up Let’s Encrypt for TLS. In this post, I will connect our first docker container to the Traefik reverse proxy for testing and to learn how to do this.
I’ve also made a short video to accompany this blog post:

WhoAmI?
Traefik, whoami is often used as a simple test service to demonstrate how Traefik handles routing, especially when using dynamic routing and reverse proxy setups.
  # A container that exposes an API to show its IP address
  whoami:
    image: traefik/whoami
    container_name: whoami
    hostname: whoami
our updated docker compose file should look like:
docker-compose.yml
---
services:
  traefik:
    image: traefik:v3.3
    container_name: traefik
    hostname: traefik
    env_file:
      - path: ./.env
        required: true
    restart: unless-stopped
    ports:
      # The Web UI (enabled by --api.insecure=true)
      - 8080:8080
      # The HTTP port
      - 80:80
    volumes:
      - ./traefik:/etc/traefik
      - /var/run/docker.sock:/var/run/docker.sock:ro

  # A container that exposes an API to show its IP address
  whoami:
    image: traefik/whoami
    container_name: whoami
    hostname: whoami
Start all the services
docker compose up -doutput:
$ docker compose up -d
[+] Running 3/3
 ✔ Network homelab_default  Created    0.3s
 ✔ Container whoami         Started    2.2s
 ✔ Container traefik        Started    2.3s
Test WhoAmI - the wrong way
We can test our traefik reverse proxy with
curl -H Host:whoami.localhost http://127.0.0.1but the result should be:
404 page not foundWhy ?
We have not yet changed our traefik configuration file to enable an EntryPoint. EntryPoints are the network entry points into Traefik.
So let’s go back one step.
docker compose down
Traefik Configuration
The simplest approach is to update our configuration file and add a new EntryPoint. However, I’d like to take this opportunity to expand our configuration a little.
EntryPoints are Static Configuration, so they must be included on traefik.yml file.
## Static configuration
entryPoints:
  web:
   address: ":80"
so traefik/traefik.yml should look like:
# API and dashboard configuration
api:
  insecure: true

## Static configuration
entryPoints:
  web:
   address: ":80"
That should work, but given the opportunity, let’s enhance our Traefik configuration by including:
Ping
# The /ping health-check URL
ping: {

}
It would be useful to add a health check in the Docker Compose file later on.
Logs
This is how to enable the DEBUG (or INFO - just replace the verb in level)
# Debug log
log:
  filePath: /etc/traefik/traefik.log
  level: DEBUG
Docker provider
I want to explicitly include the Docker provider with a caveat: I don’t want to automatically expose all my docker containers behind Traefik. Instead, I prefer to manually add each docker container that I want to expose to the internet, rather than exposing all of them by default.
providers:
  # Enable docker provider
  docker: {
    exposedByDefault: false
  }
Traefik Configuration file updated
and now traefik/traefik.yml looks like:
# The /ping health-check URL
ping: {

}

# API and dashboard configuration
api:
    insecure: true

# Debug log
log:
    filePath: /etc/traefik/traefik.log
    level: DEBUG

# Enable EntryPoints
entryPoints:
    web:
        address: ":80"
        reusePort: true

# Providers
providers:
    # Enable docker provider
    docker: {
        exposedByDefault: false
    }
by running
docker compose up traefik -dwe can review Traefik dashboard with the new web EntryPoint and ping
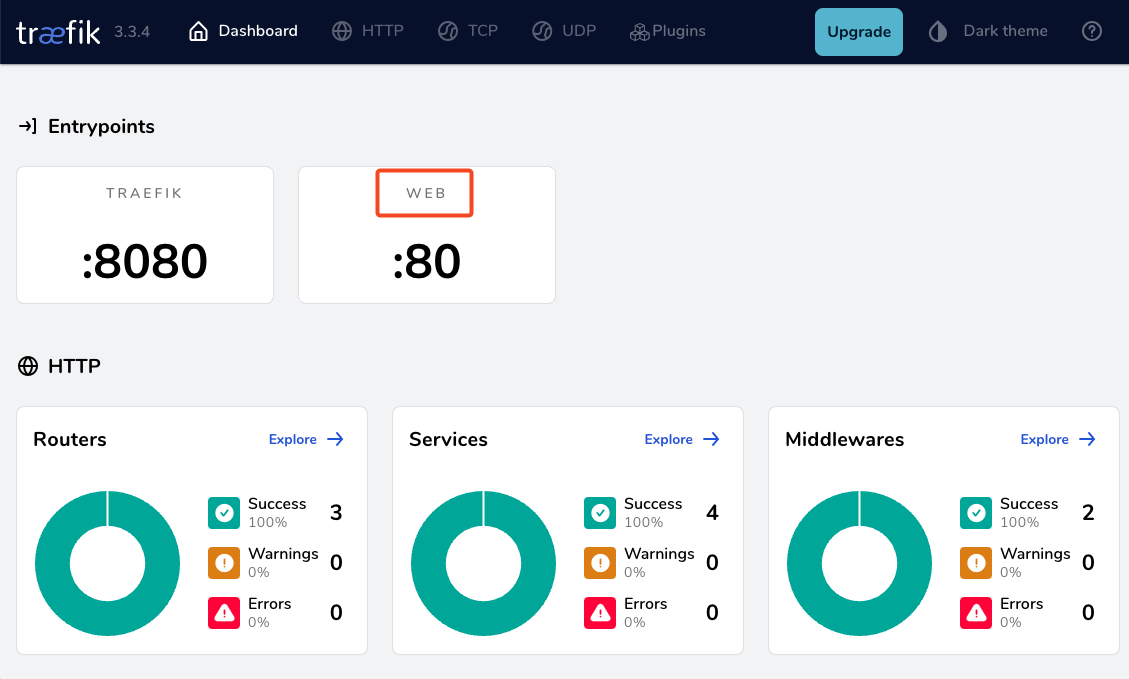
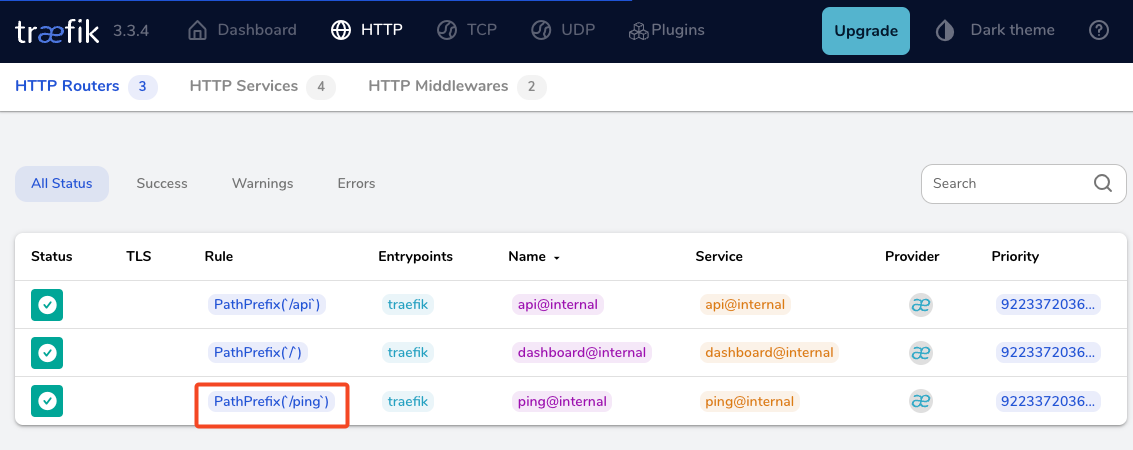
WhoAmI - the correct way
okay, we now have our EntryPoint in Traefik but we need to explicit expose our whoami docker container and in order to do that, we need to add some labels!
  # A container that exposes an API to show its IP address
  whoami:
    image: traefik/whoami
    container_name: whoami
    hostname: whoami
    labels:
        - "traefik.enable=true" # To enable whoami to Traefik
        - "traefik.http.routers.whoami.rule=Host(`whoami.localhost`)" # Declare the host rule for this service
        - "traefik.http.routers.whoami.entrypoints=web" # Declare the EntryPoint
let’s put everything together:
---
services:
  traefik:
    image: traefik:v3.3
    container_name: traefik
    hostname: traefik
    env_file:
      - path: ./.env
        required: true
    restart: unless-stopped
    ports:
      # The Web UI (enabled by --api.insecure=true)
      - 8080:8080
      # The HTTP port
      - 80:80
    volumes:
      - ./traefik:/etc/traefik
      - /var/run/docker.sock:/var/run/docker.sock:ro

  # A container that exposes an API to show its IP address
  whoami:
    image: traefik/whoami
    container_name: whoami
    hostname: whoami
    labels:
        - "traefik.enable=true" # To enable whoami to Traefik
        - "traefik.http.routers.whoami.rule=Host(`whoami.localhost`)" # Declare the host rule for this service
        - "traefik.http.routers.whoami.entrypoints=web" # Declare the EntryPoint
docker compose up -d
Test Who Am I
curl -H Host:whoami.localhost http://127.0.0.1output:
Hostname: whoami
IP: 127.0.0.1
IP: ::1
IP: 172.19.0.3
RemoteAddr: 172.19.0.2:41276
GET / HTTP/1.1
Host: whoami.localhost
User-Agent: curl/8.12.1
Accept: */*
Accept-Encoding: gzip
X-Forwarded-For: 172.19.0.1
X-Forwarded-Host: whoami.localhost
X-Forwarded-Port: 80
X-Forwarded-Proto: http
X-Forwarded-Server: traefik
X-Real-Ip: 172.19.0.1
Health Checks and Depends
before finishing this article, I would like to include two more things.
Traefik Health Check
We added above the ping section on Traefik configuration, it is time to use it. On our docker compose configuration file, we can add a health check section for Traefik service.
We can test this from our command line
curl -s --fail http://127.0.0.1:8080/pingthe result should be an OK !
and we can extend the Traefik service to include this
    healthcheck:
      test: curl -s --fail http://127.0.0.1:8080/ping
      interval: 30s
      retries: 3
      timeout: 10s
      start_period: 10s
Depends On
The above health check option can be used to specify service dependencies in docker compose, so we can ensure that the whoami docker service starts after Traefik.
    depends_on:
      - traefik
that means our docker compose yaml file should look like:
---
services:
  traefik:
    image: traefik:v3.3
    container_name: traefik
    hostname: traefik
    env_file:
      - path: ./.env
        required: true
    restart: unless-stopped
    ports:
      # The Web UI (enabled by --api.insecure=true)
      - 8080:8080
      # The HTTP port
      - 80:80
    volumes:
      - ./traefik:/etc/traefik
      - /var/run/docker.sock:/var/run/docker.sock:ro
    # Add health check
    healthcheck:
      test: curl -s --fail http://127.0.0.1:8080/ping
      interval: 30s
      retries: 3
      timeout: 10s
      start_period: 10s

  # A container that exposes an API to show its IP address
  whoami:
    image: traefik/whoami
    container_name: whoami
    hostname: whoami
    depends_on:
      - traefik
    labels:
        - "traefik.enable=true"                                       # To enable whoami to Traefik
        - "traefik.http.routers.whoami.rule=Host(`whoami.localhost`)" # Declare the host rule for this service
        - "traefik.http.routers.whoami.entrypoints=web"               # Declare the EntryPoint
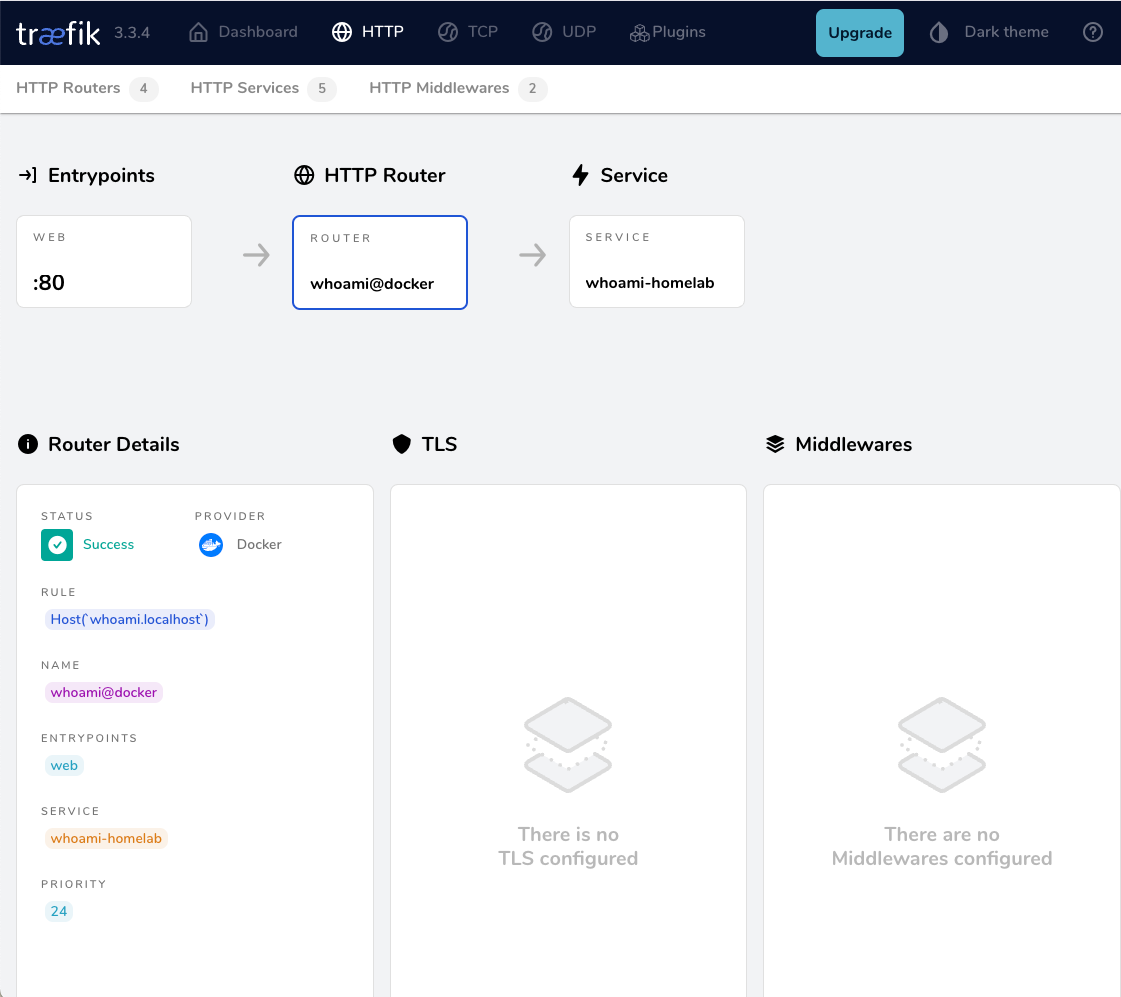
a blog post series to my homelab

Part One
In this blog post, I will start by walking you through the process of setting up Traefik as a reverse proxy for your homelab. My setup involves using a virtual machine connected via a point-to-point VPN to a cloud VPS, along with several Docker containers on my homelab for various tasks and learning purposes. The goal is to expose only Traefik to the internet, which will then provide access to my internal homelab. For certain applications, I also use Tailscale, which I prefer not to expose directly to the internet. In short, I have a complex internal homelab setup, and in this post, we’ll simplify it!
I’ve made a short video to accompany this blog post:

docker compose
To begin, we need to set up a basic Docker Compose YAML file.
As of the time of writing this blog post, the latest Traefik Docker container image is version 3.3. It is best to declare a specific version instead of using “latest” tag.
image: traefik:v3.3Using an .env file in a Docker Compose configuration is important for several reasons, as for configure variables, secrets and it is easy to reuse though several services and to avoid hardcoding values. For traefik is important so we can configure the docker GID in order traefil to be able to use the docker socket.
eg. .env
# This is my user id
PUID=1001
# This is my docker group id
PGID=142
UMASK="002"
TZ="Europe/Athens"
DNS="88.198.92.222"
Next interesting topic is the volumes section.
I would like to mount a local directory for the traefik configuration, which I will later use with the dynamic file provider. Additionally, to enable Traefik to recongize our (future) docker images, we need to mount the docker socket too.
    volumes:
      - ./traefik:/etc/traefik
      - /var/run/docker.sock:/var/run/docker.sock
to conclude, here is a very basic docker compose yaml file:
docker-compose.yml
---
services:
  traefik:
    image: traefik:v3.3
    container_name: traefik
    hostname: traefik
    env_file:
      - path: ./.env
        required: true
    restart: unless-stopped
    ports:
      # The Web UI (enabled by --api.insecure=true)
      - 8080:8080
      # The HTTP port
      - 80:80
    volumes:
      - ./traefik:/etc/traefik
      - /var/run/docker.sock:/var/run/docker.sock
pull traefik docker image
we can explicitly get the Traefik docker container image
docker compose pull traefiktraefik configuration file
we also need to create the configuration file by enabling the API and the dashboard for now.
Create the directory and file
traefik/traefik.yml
and write this:
# API and dashboard configuration
api:
  insecure: true
Start traefik docker
We are ready start and run our Traefik docker container:
docker compose upresult is something like:
[+] Running 2/2
 ✔ Network homelab_default  Created       0.3s
 ✔ Container traefik        Created       0.4s
Attaching to traefik
To stop traefik from docker compose, we need to open a new terminal and type from the same directory
docker compose downor, we ca run the docker compose and detach it so it runs on the background:
docker compose up traefik -dThis is going to be useful for the future as we starting each service one by one.
Test traefik
Open your browser and click on: http://127.0.0.1:8080
you will see something like: