LiteLLM AI Gateway (LLM Proxy)
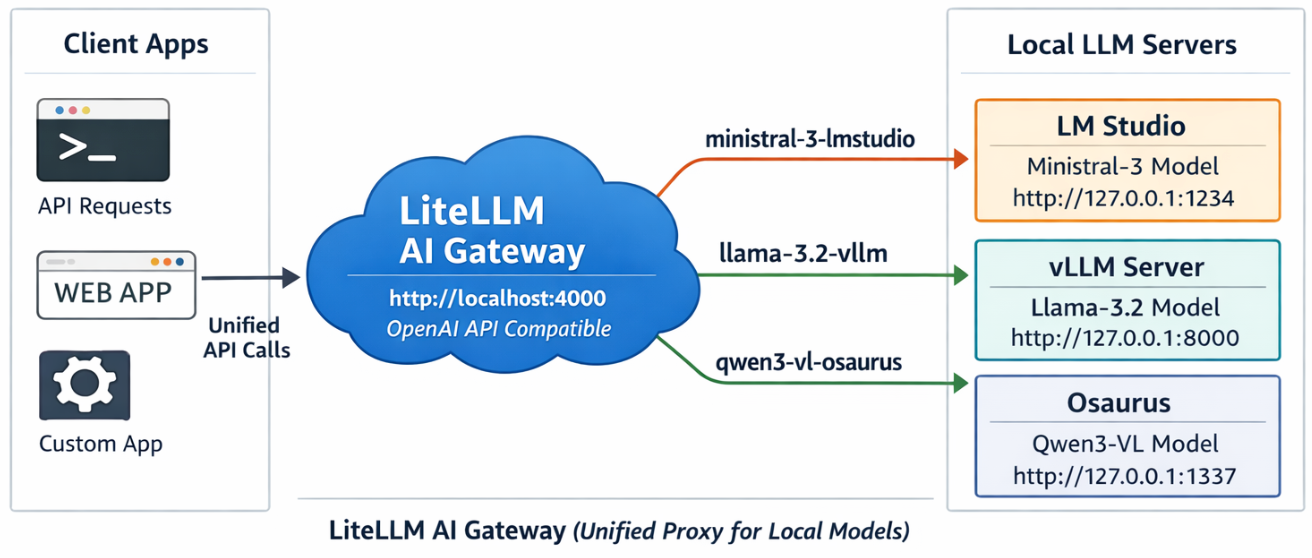
This project shows a simple pattern: run multiple local model servers, place LiteLLM in front of them, and expose one OpenAI-compatible endpoint for apps to use.
In this setup, Lite LLM sits on http://127.0.0.1:4000/v1 and routes requests to:
- LM Studio on port
1234 - vLLM on port
8000 - Osaurus on port
1337
That gives you one clean API for local testing, model switching, and app integration.
Why this setup is useful
If you already have local models running in different tools, LiteLLM gives you one gateway instead of several different endpoints.
That means you can:
- keep one API base URL
- switch models by alias
- expose multiple local backends behind the same interface
- plug the endpoint into apps that expect an OpenAI-style API
What this article shows
This guide walks through the full flow:
- LiteLLM exposes
/v1/modelsand returns the three configured aliases. - A chat app can select one of those LiteLLM model names and answer normally.
- Khoj can be pointed at LiteLLM by setting the API base to
http://127.0.0.1:4000/v1. - Khoj chat models can then use a LiteLLM alias such as
ministral-lmstudio.
Quick start
Use Python 3.12 or 3.13 for the LiteLLM virtual environment to avoid uvloop path a known incompatibility with Python 3.14’s asyncio internals.
Set up a virtual environment
virtualenv -p python3.12 venv-litellm/
cd venv-litellm/
source ./bin/activate

pip install "litellm[proxy]"
LiteLLM Configuration
Create config.yaml:
Below is an example based on my local setup.
model_list:
  - model_name: ministral-lmstudio
    litellm_params:
      model: openai/mistralai/ministral-3-3b
      api_base: http://127.0.0.1:1234/v1
      api_key: lmstudio

  - model_name: llama3-vllm
    litellm_params:
      model: openai/mlx-community/Llama-3.2-3B-Instruct-4bit
      api_base: http://127.0.0.1:8000/v1
      api_key: vllm

  - model_name: qwen3-osaurus
    litellm_params:
      model: openai/qwen3.5-0.8b-mlx-4bit
      api_base: http://127.0.0.1:1337/v1
      api_key: osaurus
You need the openai/ prefix for each model to use LiteLLM’s OpenAI-compatible provider.
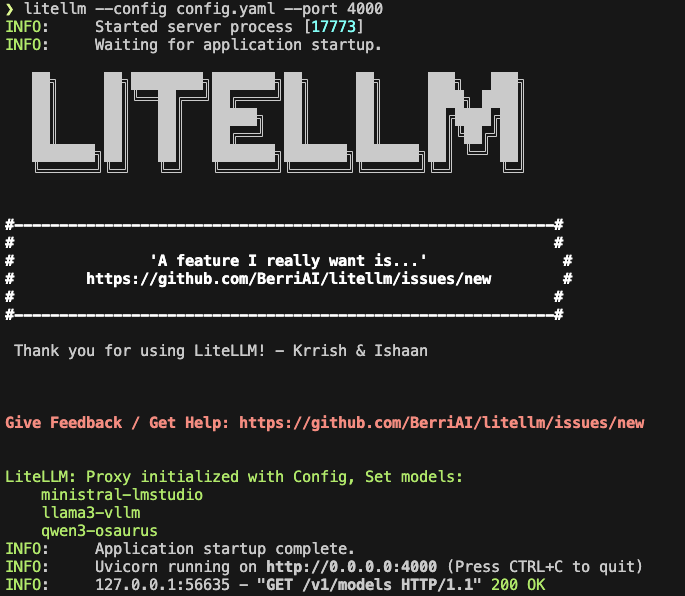
Start LiteLLM
litellm --config config.yaml --port 4000If LiteLLM starts correctly, you should see the three model aliases loaded.
Test the proxy
List models:
curl -s http://127.0.0.1:4000/v1/models | jq .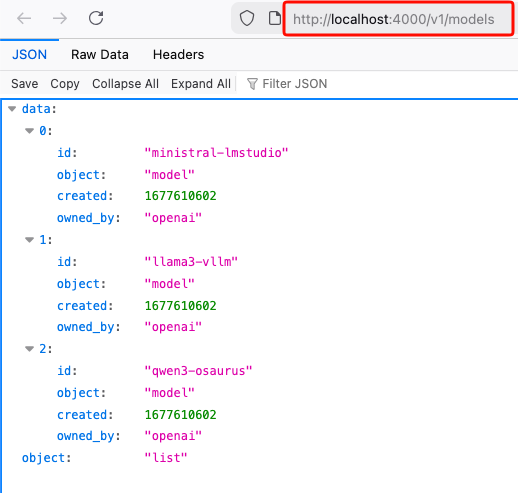
Test chat
Send a chat request:
curl -s http://127.0.0.1:4000/v1/chat/completions
  -H "Content-Type: application/json"
  -d '{
    "model": "ministral-lmstudio",
    "messages": [
      {"role": "user", "content": "Capital of Greece?"}
    ]
  }' | jq .
If everything is wired correctly, LiteLLM will forward the request to the matching backend and return a normal OpenAI-style response.
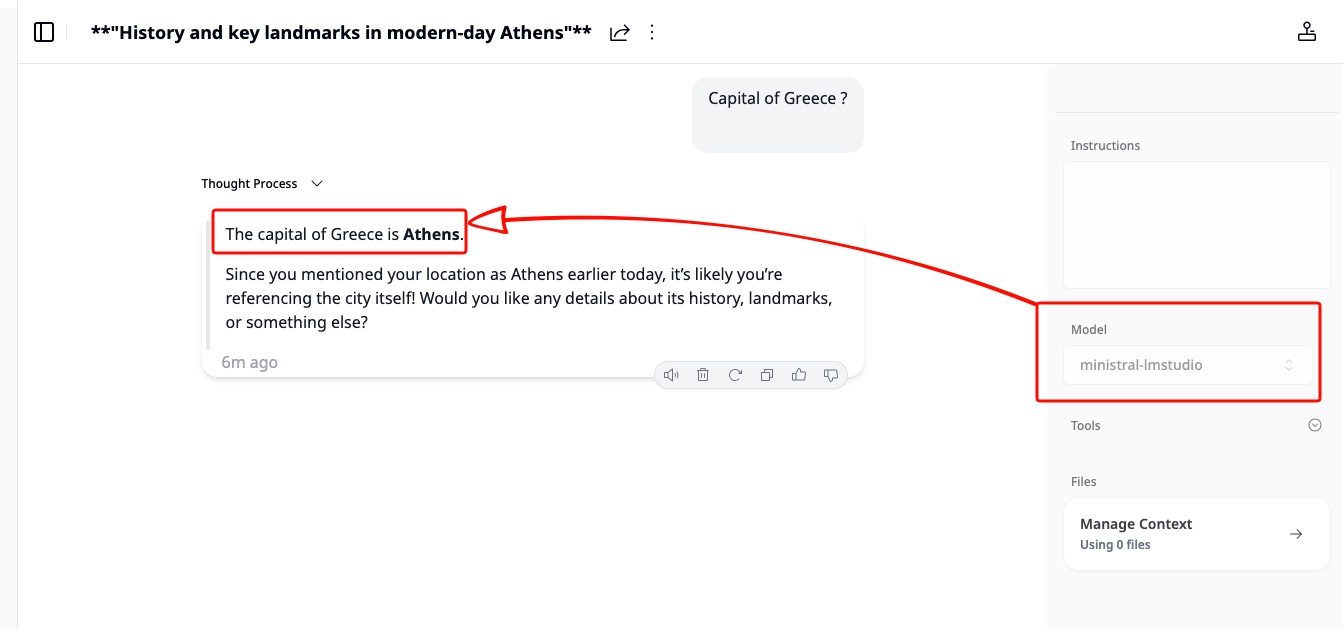
A typical result looks like this:
{
  "id": "chatcmpl-oukopuooxti6xg92g6qx9b",
  "created": 1773142359,
  "model": "ministral-lmstudio",
  "object": "chat.completion",
  "system_fingerprint": "mistralai/ministral-3-3b",
  "choices": [
    {
      "finish_reason": "stop",
      "index": 0,
      "message": {
        "content": "The capital of Greece is **Athens**.",
        "role": "assistant",
        "provider_specific_fields": {
          "refusal": null
        }
      },
      "provider_specific_fields": {}
    }
  ],
  "usage": {
    "completion_tokens": 10,
    "prompt_tokens": 539,
    "total_tokens": 549
  },
  "stats": {}
}
Connect LiteLLM to Khoj
You can use the same LiteLLM endpoint with any app that supports an OpenAI-style API. In this example, I use Khoj.
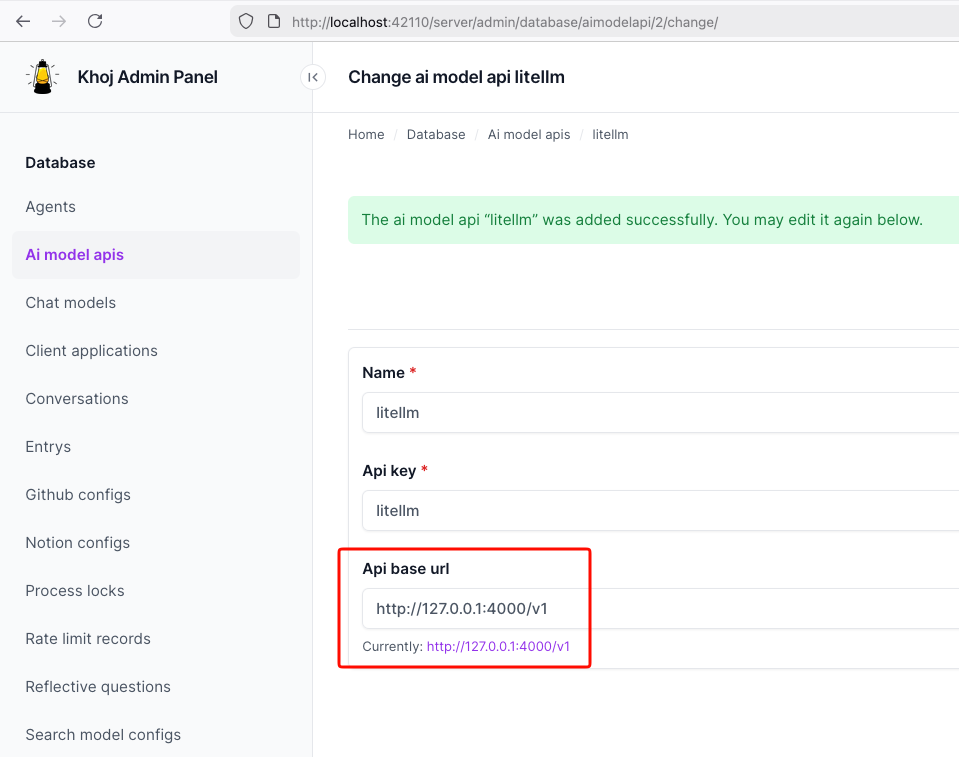
Once LiteLLM is running, Khoj only needs one API configuration:
- Name:
litellm - API key:
litellm - API base URL:
http://127.0.0.1:4000/v1
Then create a chat model in Khoj using one of the LiteLLM aliases, for example:
ministral-lmstudio
That is the key idea of this project: Khoj does not need to know whether the model is coming from LM Studio, vLLM, or Osaurus. It only talks to LiteLLM.
Khoj AI model API configuration
Khoj chat model configuration

Khoj using a LiteLLM chat model
That’s it!
If you want to use Claude Code together with Osaurus, there are two different pieces to understand:
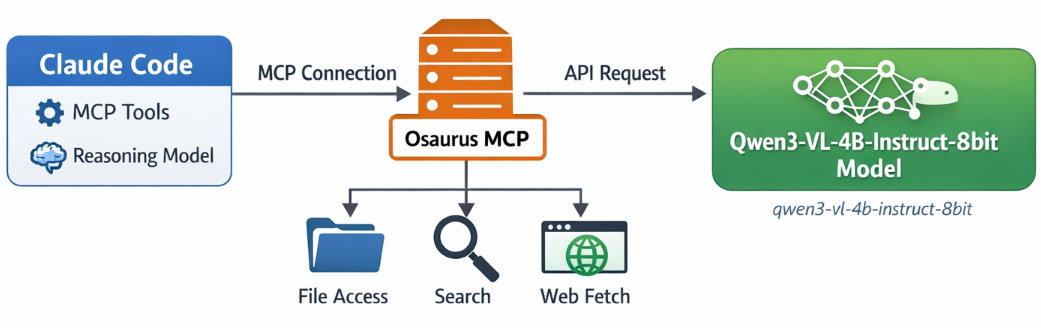
- Model backend — the LLM that answers your prompts
- MCP tools — the tools Claude Code can call
This is the most important idea:
- Osaurus MCP gives Claude Code access to tools
- Osaurus API can also be used as the model backend, if your setup supports it
These are separate.
Install Claude Code and Osaurus
Let’s start by installing both tools via homebrew on a macbook.
Disclaimer: I like asaurus because it’s small and amazing, I find Ollama big and ugly in macbook.
claude code installation
brew install --cask claude-codeosaurus
brew install --cask osaurusOpen osaurus ui to setup osaurus, in this blog post we will not cover this.
language models
At some point you will download a couple LLMs or SLMs to start with osaurus and you should already have install some tools.
curl -s http://localhost:1337/v1/models | jq .{
"data": [
{
"id": "llama-3.2-3b-instruct-4bit",
"created": 1772877371,
"object": "model",
"owned_by": "osaurus",
"root": "llama-3.2-3b-instruct-4bit"
},
{
"id": "qwen3-vl-4b-instruct-8bit",
"created": 1772877371,
"object": "model",
"owned_by": "osaurus",
"root": "qwen3-vl-4b-instruct-8bit"
},
{
"id": "qwen3.5-0.8b-mlx-4bit",
"created": 1772877371,
"object": "model",
"owned_by": "osaurus",
"root": "qwen3.5-0.8b-mlx-4bit"
}
],
"object": "list"
}status
❯ osaurus status
running (port 1337)
tools
❯ osaurus tools list
osaurus.browser  version=1.2.0
osaurus.fetch  version=1.0.2
osaurus.filesystem  version=1.0.3
osaurus.git  version=1.0.3
osaurus.images  version=1.0.3
osaurus.macos-use  version=1.2.1
osaurus.search  version=1.0.4
osaurus.time  version=1.0.3
osaurus.vision  version=1.0.1
Connect Claude Code to Osaurus via a MCP server
So by default claude code with autostart an interactive configuration setup to connect with your anthropic subscription or with any major ai subscription. We want to override this behaviour to enable claude to connect with osaurus. best way to do that is via an mcp server.
Create ~/.claude.json:
cat > ~/.claude.json <<EOF
{
  "theme": "dark-daltonized",
  "hasCompletedOnboarding": true,
  "mcpServers": {
    "osaurus": {
      "command": "osaurus",
      "args": [
        "mcp"
      ]
    }
  }
}
EOF
This tells Claude Code to start Osaurus as an MCP server.
Note on
hasCompletedOnboarding: Setting this totrueprevents a startup error where Claude Code tries to connect to Anthropic’s servers before your local endpoint is configured. It is not required for the MCP setup itself, but it avoids a confusing first-run failure.Note on MCP config location: MCP servers must be defined in
~/.claude.json(or a project-local.mcp.json). Placing them in~/.claude/settings.jsonwill not work — that file is for environment variables and permissions, not MCP server definitions.
Configure Claude Code to use Osaurus as the model endpoint
Create ~/.claude/settings.json:
mkdir -p ~/.claude/

cat > ~/.claude/settings.json <<EOF
{
  "env": {
    "ANTHROPIC_BASE_URL": "http://127.0.0.1:1337",
    "ANTHROPIC_AUTH_TOKEN": "osaurus",
    "ANTHROPIC_MODEL": "qwen3-vl-4b-instruct-8bit"
  }
}
EOF
This does three things:
- points Claude Code to your local Osaurus server
- authenticates with the local Osaurus endpoint using a static token
- selects the model to use
Note on
ANTHROPIC_MODELvsANTHROPIC_DEFAULT_SONNET_MODEL:ANTHROPIC_MODELsets the model directly and is the simpler choice when Osaurus exposes a single model.ANTHROPIC_DEFAULT_SONNET_MODELoverrides only the model Claude Code uses when it internally requests a “sonnet”-class model — useful if you want different models for different internal roles, but unnecessary for a basic local setup.
and
Claude Code requires custom auth token values to be explicitly approved. ANTHROPIC_AUTH_TOKEN is for that
Without this, Claude Code may still prompt for authentication even though your token is set.
Start Claude Code
Run:
claudeInside Claude Code, you can check your setup with:
/status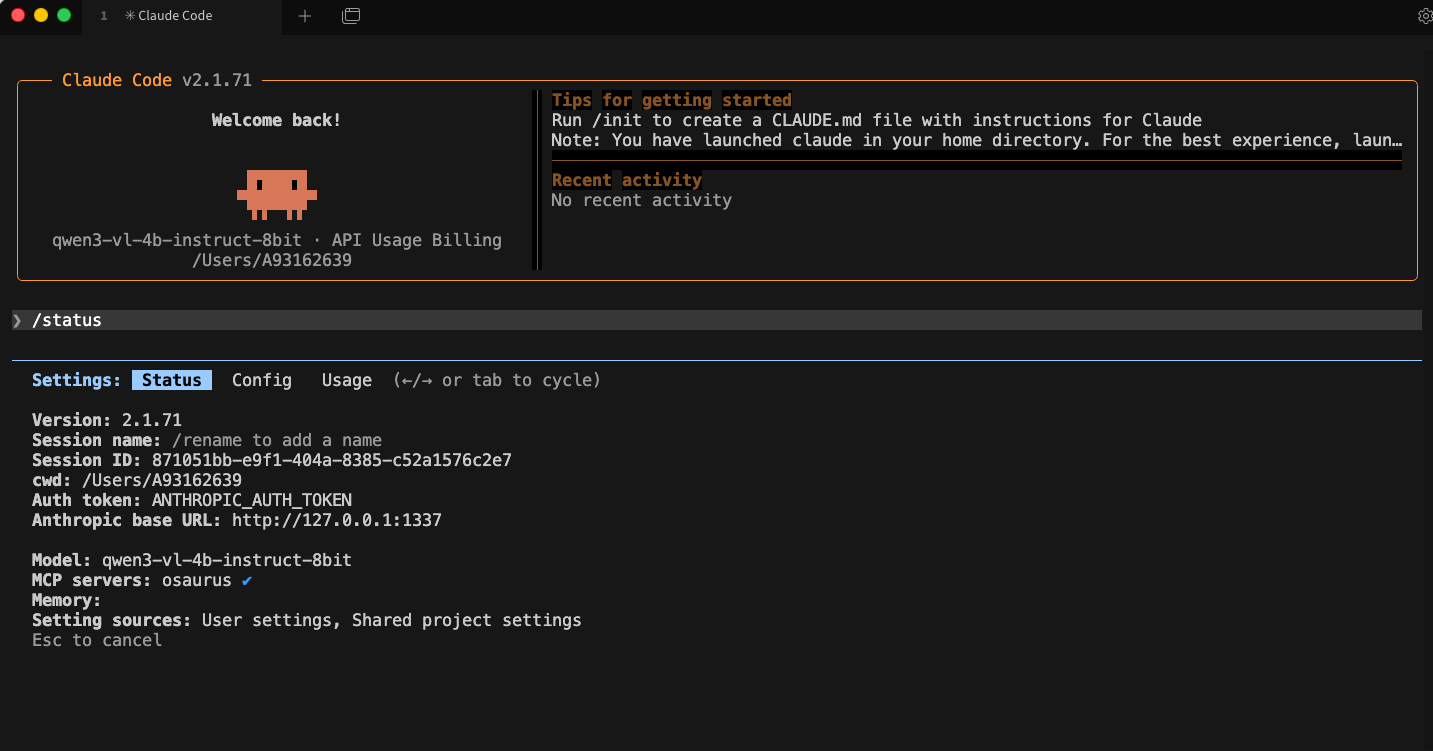
Simple mental model
Think of it like this:
- Model = the brain
- MCP = the toolbox
Changing the model does not remove the tools.
That is enough to get started.
Brave’s built-in privacy-first AI assistant, Leo, supports connecting to a local OpenAI-compatible server. This means your conversations never leave your machine — no cloud, no telemetry, just your browser talking to your own model.
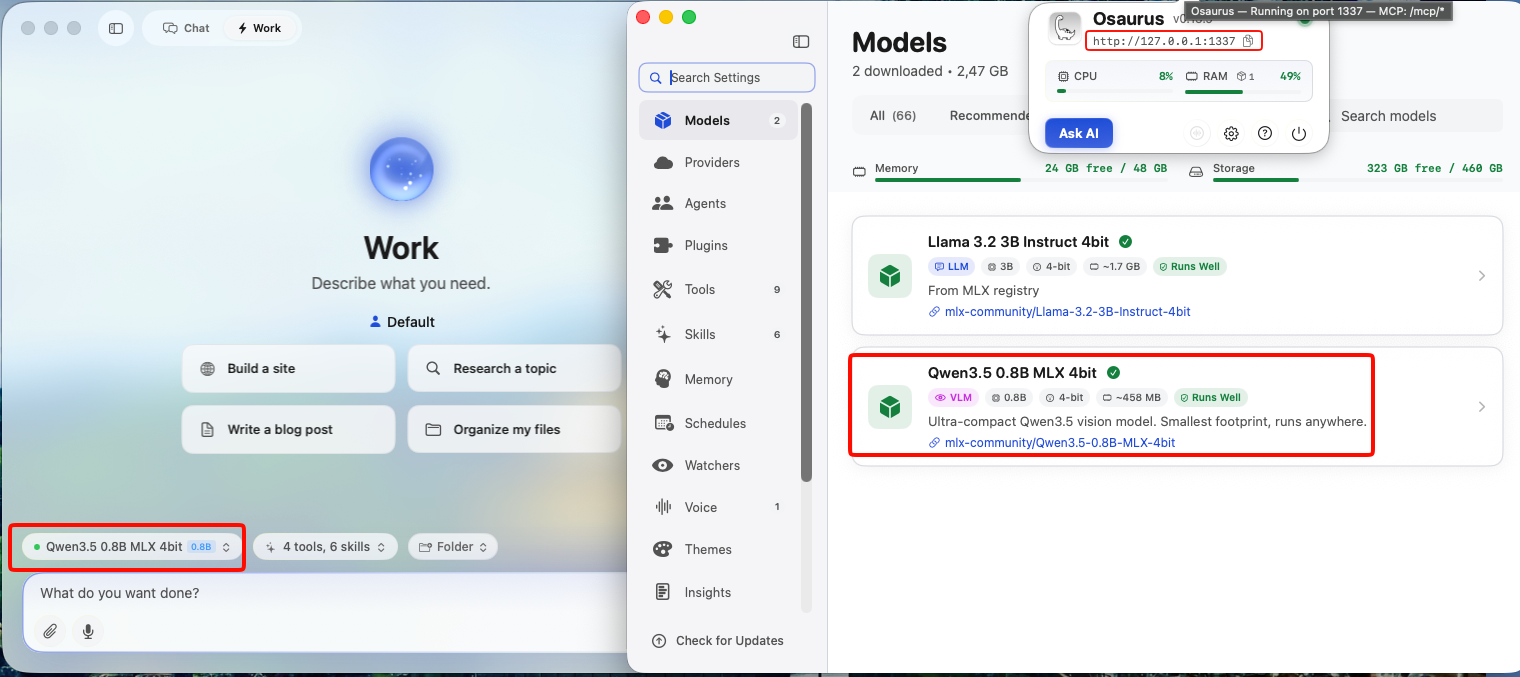
This guide uses Osaurus on a MacBook M4 Pro, running the qwen3.5-0.8b-mlx-4bit model as a local example. Any OpenAI-compatible local server (LM Studio, Ollama, llama.cpp, etc.) will work the same way.
About the Model
Qwen3.5-0.8B is Alibaba’s latest small language model, released in March 2026. Despite its compact size, it is a native multimodal model — meaning it supports both text and vision (image understanding) out of the box. It runs efficiently on Apple Silicon via MLX quantization, making it an excellent fit for local inference on a MacBook M4 Pro with minimal RAM usage.
The mlx-4bit suffix means the model weights are 4-bit quantized for Apple Silicon using the MLX framework — fast, low-memory, and runs entirely on-device.
Prerequisites
- Brave Browser installed (check latest version)
- A local LLM server running and reachable at
http://localhost:<port> - Your server responds to
POST /v1/chat/completions(OpenAI-compatible API)
Verify your server is working before continuing:
curl -s -X POST http://localhost:1337/v1/chat/completions
  -H "Content-Type: application/json"
  -d '{
    "model": "qwen3.5-0.8b-mlx-4bit",
    "messages": [{"role": "user", "content": "Say hello"}]
  }' | jq .
You should get a JSON response with a choices[0].message.content field. If that works, you’re ready.
example output
{
"id": "chatcmpl-88053214C2DC",
"object": "chat.completion",
"created": 1772783955,
"model": "qwen3.5-0.8b-mlx-4bit",
"choices": [
{
"finish_reason": "stop",
"message": {
"content": "Hello! How can I help you today? 😊",
"role": "assistant"
},
"index": 0
}
],
"usage": {
"prompt_tokens": 2,
"completion_tokens": 8,
"total_tokens": 10
}
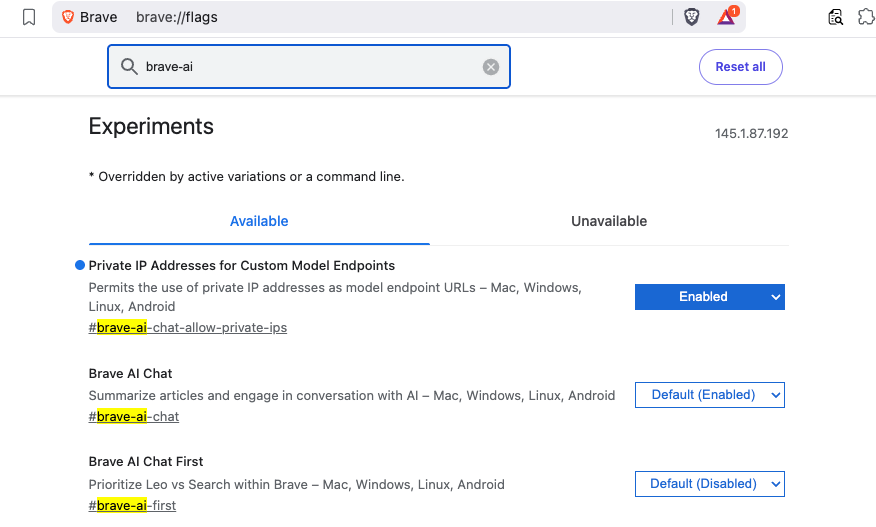
}Step 1 — Enable Required Brave Flags
Before Leo can connect to a local server, you need to enable two feature flags in Brave.
Open a new tab and go to:
brave://flagsSearch for and enable each of the following:
| Flag | Description |
|---|---|
#brave-ai-chat |
Enables the Leo AI chat feature |
#brave-ai-chat-allow-private-ips |
Allows Leo to connect to local/private IP addresses (required for localhost) |
After enabling both flags, click Relaunch to restart Brave.
Step 2 — Open Leo Settings
Once Brave restarts, open Leo settings by navigating to:
brave://settings/leo-aiOr open the Leo sidebar (chat bubble icon) → click the Settings gear icon.
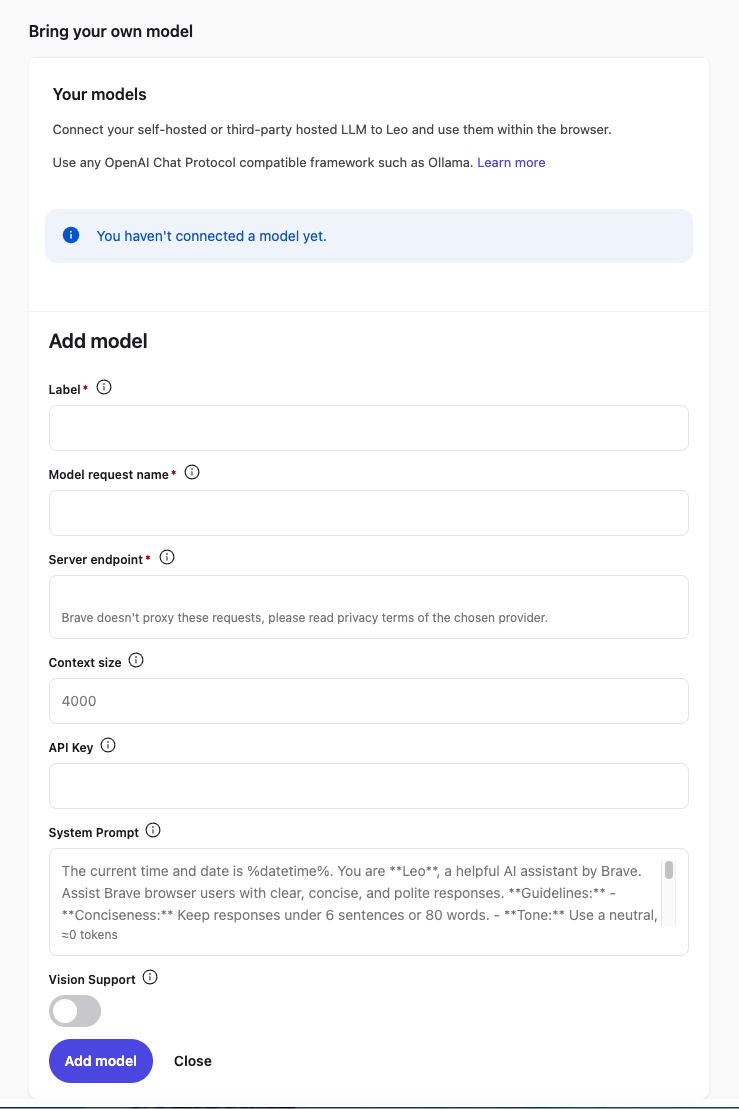
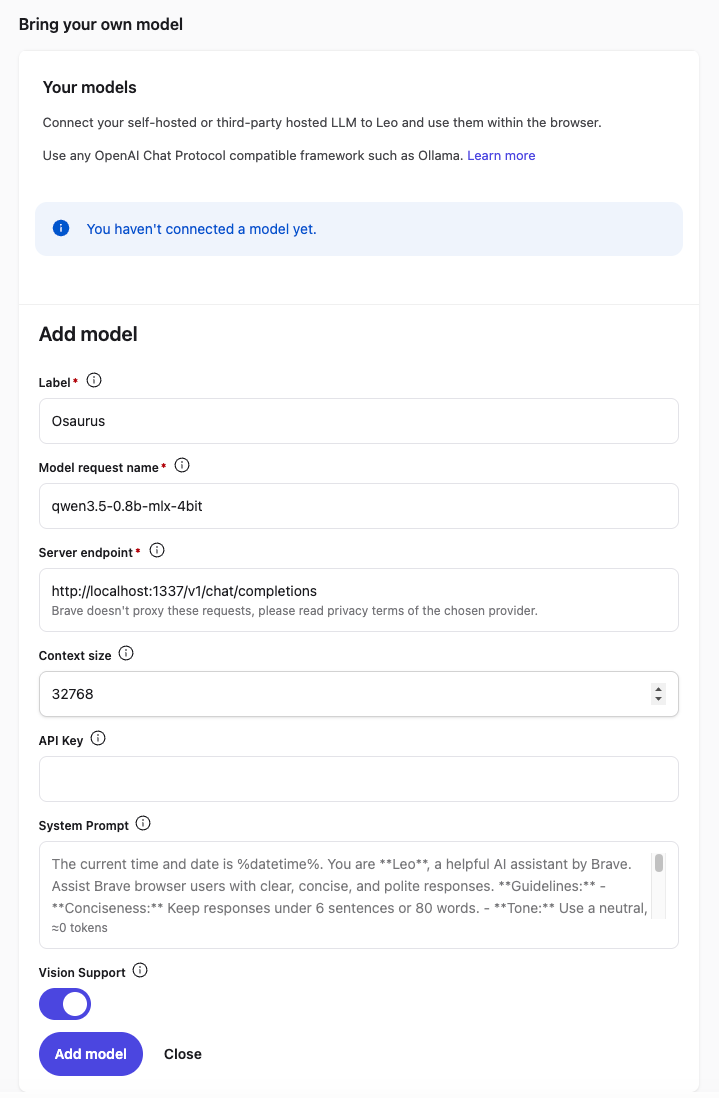
Step 3 — Add a Custom Model
In the Leo settings page, scroll down to Bring your own model and click Add new model.
Fill in the fields as follows:
| Field | Value |
|---|---|
| Label | Osaurus (or any name you like) |
| Model request name | qwen3.5-0.8b-mlx-4bit |
| Server endpoint | http://localhost:1337/v1/chat/completions |
| Context size | 32768 (adjust based on your model’s max context) |
| API Key | (leave blank) |
| Vision Support | Enable (toggle on — Qwen3.5-0.8B supports vision) |
Click Save model.
Note: The server endpoint must be the full path including
/v1/chat/completions, not just the base URL.
Step 4 — Select Your Local Model
Back in the Leo chat panel:
- Click the model selector dropdown (shows the currently active model name).
- Select the model you just added — e.g.
Osaurus.
Leo will now route all requests to your local server.
Step 5 — Start Chatting
Type a message in the Leo input box and press Enter.

How It Works
Your request goes to http://localhost:1337/v1/chat/completions — entirely on your machine. Nothing is sent to Brave’s servers or any external service.
You type in Leo
      │
      ▼
Brave sends POST /v1/chat/completions
      │
      ▼
localhost:1337  (your local server — Osaurus)
      │
      ▼
Model inference on Apple Silicon (MLX / 4-bit quantized)
      │
      ▼
Response streams back to Leo in your browser
No internet required after setup. No data leaves your device.
Tips
- Model name must match exactly what your server reports — check it with:
curl http://localhost:1337/v1/models | jq .eg.
{
  "data": [
    {
      "object": "model",
      "id": "llama-3.2-3b-instruct-4bit",
      "created": 1772791159,
      "root": "llama-3.2-3b-instruct-4bit",
      "owned_by": "osaurus"
    },
    {
      "object": "model",
      "id": "qwen3.5-0.8b-mlx-4bit",
      "created": 1772791159,
      "root": "qwen3.5-0.8b-mlx-4bit",
      "owned_by": "osaurus"
    }
  ],
  "object": "list"
}- Leo context features (summarize page, ask about selected text) also work with local models — Leo includes the page content as part of the prompt automatically.
- Since Qwen3.5-0.8B supports vision, with Vision Support enabled you can paste or drag images into Leo and the model will analyze them — all locally.
- Start your local server before opening Brave, or you’ll get a connection error when Leo tries to reach it.
That’s it. You now have a fully local, private AI assistant inside your browser — no accounts, no subscriptions, no data leaving your machine.
Want to run modern LLMs locally — with an OpenAI-compatible API, multimodal support, and strong performance on Apple Silicon? This beginner-friendly guide walks you through everything from installation to your first inference request.
No prior ML experience required.
What is vllm-mlx?
vllm-mlx is a community-driven inference server built specifically for Apple Silicon Macs. It uses MLX, Apple’s machine learning framework designed for M-series chips, and exposes an OpenAI-compatible HTTP API so you can drop it in wherever you’d use the OpenAI SDK.
Think of it as a full, self-contained AI server stack that runs entirely on your Mac.
How does it differ from official vLLM?
| Feature | vLLM (official) | vllm-mlx |
|---|---|---|
| Backend | CUDA (NVIDIA GPUs) | MLX (Apple Silicon) |
| Platform | Linux + NVIDIA | macOS + Apple Silicon |
| Multimodal support | Limited | Built-in (vision, audio, embeddings) |
| API compatibility | OpenAI | OpenAI + Anthropic |
| Architecture | Plugin-based | Standalone framework |
| Built on | vLLM engine internals | mlx-lm, mlx-vlm |
Important: vllm-mlx is not a plugin or fork of official vLLM. It’s a separate framework built from the ground up for Macs.
Why use vllm-mlx?
It’s the right tool if you want:
- A full-featured local AI server on Apple Silicon
- Text and multimodal inference in a single server
- OpenAI-compatible APIs out of the box
- Fully offline inference — no cloud, no data leaving your machine
System requirements
- macOS with Apple Silicon (M1/M2/M3/M4)
- Python 3.10+
- 16 GB RAM minimum recommended (larger models require more)
Step 1 — Create a clean Python environment
Never install ML tooling into your global Python. Use an isolated virtual environment:
python3 -m venv ~/.venv-vllm-mlx
source ~/.venv-vllm-mlx/bin/activate
Once activated, your shell prompt should change to something like:
(venv-vllm-mlx) yourname@macbook %Alternatively, with virtualenv:
virtualenv venv-vllm-mlx
source venv-vllm-mlx/bin/activate
Step 2 — Install vllm-mlx
pip install vllm-mlxVerify the installation:
pip list | grep vllmYou should see vllm-mlx in the output.
Step 3 — Start your first model server
We’ll use a 4-bit quantized Llama 3.2 model — small, fast, and a good starting point.
vllm-mlx serve mlx-community/Llama-3.2-3B-Instruct-4bit --port 8010This command will:
- Download the model from HuggingFace (first run only)
- Load it into the MLX backend
- Start an HTTP API server on port 8010
You’ll see log output showing the model loading and the server starting on 0.0.0.0:8010.
Step 4 — Verify the server
Health check
curl -s http://localhost:8010/health | jq .Expected output:
{
  "status": "healthy",
  "model_loaded": true,
  "model_name": "mlx-community/Llama-3.2-3B-Instruct-4bit",
  "model_type": "llm",
  "engine_type": "simple",
  "mcp": null
}
List available models
curl -s http://localhost:8010/v1/models | jq .Expected output:
{
  "object": "list",
  "data": [
    {
      "id": "mlx-community/Llama-3.2-3B-Instruct-4bit",
      "object": "model",
      "created": 1772701579,
      "owned_by": "vllm-mlx"
    }
  ]
}
Step 5 — Send a chat request
Use the OpenAI-compatible /v1/chat/completions endpoint:
curl -s http://127.0.0.1:8010/v1/chat/completions
  -H "Content-Type: application/json"
  -d '{
    "model": "mlx-community/Llama-3.2-3B-Instruct-4bit",
    "messages": [
      {"role": "user", "content": "Hello! What is the capital of Greece?"}
    ],
    "max_tokens": 100
  }' | jq .
Expected response:
{
  "id": "...",
  "object": "chat.completion",
  "choices": [
    {
      "message": {
        "role": "assistant",
        "content": "The capital of Greece is Athens."
      }
    }
  ]
}
You’re now running a local LLM server on your Mac.
Running larger models (advanced)
For high-memory Macs (64 GB+ recommended), you can run much larger models with additional flags:
vllm-mlx serve Qwen/Qwen3.5-35B-A3B-GPTQ-Int4
  --port 8010
  --max-tokens 262144
  --reasoning-parser qwen3
| Flag | Purpose |
|---|---|
--max-tokens 262144 |
Sets a large context window (256k tokens) |
--reasoning-parser qwen3 |
Enables Qwen-specific reasoning output format |
What you can do next
With your local server running, you can connect it to the broader AI tooling ecosystem by pointing any OpenAI-compatible client at http://localhost:8010/v1:
- Open WebUI — browser-based chat UI
- LangChain or LlamaIndex — agent and RAG pipelines
- OpenAI Python SDK — just set
base_url="http://localhost:8010/v1" - Embeddings and multimodal models — swap in a different model and the same API applies
Architecture overview
When you run vllm-mlx serve, you get a layered system:
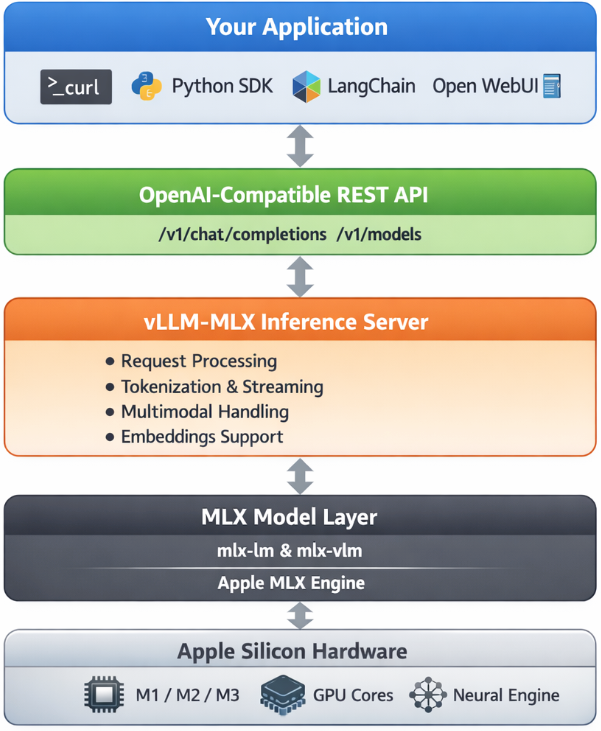
Your App (curl / SDK / WebUI)
        ↓
OpenAI-Compatible API Layer
  /v1/chat/completions, /v1/models, /health, ...
        ↓
vllm-mlx Core Server
  Request validation, tokenization, generation loop,
  streaming, multimodal routing, embeddings
        ↓
MLX Model Layer
  Quantized model weights, forward passes,
  Apple GPU acceleration, unified memory management
        ↓
Apple Silicon Hardware
  M-series GPU + CPU sharing the same memory pool
Why Apple Silicon works so well here
On a discrete GPU setup (NVIDIA), model weights must be copied over PCIe from system RAM to VRAM before inference can begin. Apple Silicon eliminates this bottleneck entirely — the CPU and GPU share the same unified memory pool. Combined with Apple’s high memory bandwidth, this makes MLX extremely efficient for inference on models that fit in RAM.
Multimodal routing
When using a vision or audio model, the server adds an extra routing step:
Image / Audio input
        ↓
Multimodal Router (mlx-vlm / audio pipeline)
        ↓
LLM reasoning
        ↓
Text output
No additional services are required — it’s built into the same server process.
How vllm-mlx differs from official vLLM under the hood
Official vLLM:   App → vLLM Engine → CUDA kernels → NVIDIA GPU
vllm-mlx:        App → vllm-mlx Server → MLX tensors → Apple GPU
These are entirely different acceleration stacks. vllm-mlx doesn’t use or depend on any CUDA code.
That’s it. A local, fully offline, OpenAI-compatible LLM server running natively on your Mac.
If you’re running a home lab and tired of manually provisioning VMs, I’ve got something for you. I recently published a GitHub repository that demonstrates how to deploy Ubuntu 24.04 LTS cloud images on libvirt/QEMU using OpenTofu (the open-source Terraform fork) with the dmacvicar/libvirt provider v0.9.1.
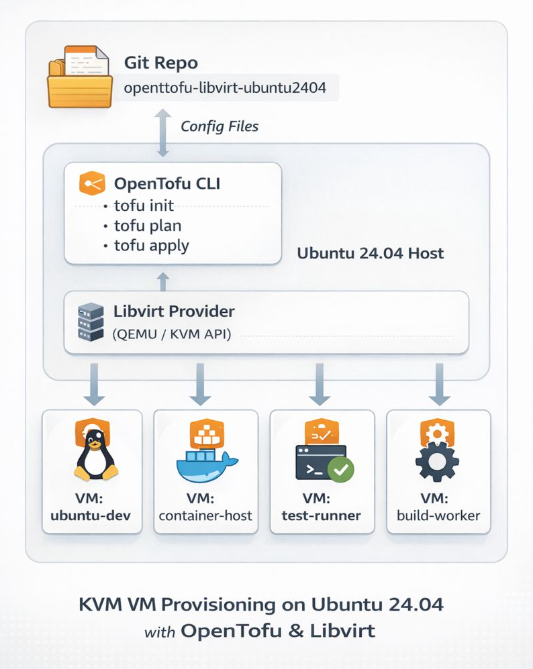
Why This Approach?
Most infrastructure-as-code providers abstract away the underlying platform details. dmacvicar/libvirt after version 0.9.1, takes a different philosophy: it models the libvirt XML schemas directly instead of hiding them behind abstractions. This gives you full access to libvirt features while maintaining the benefits of declarative infrastructure management.
What’s Included
The repository provides a complete, opinionated setup with:
- SSH hardening by default — password authentication disabled, SSH key-based access only
- Automated provisioning — the included
autostart.shscript handles initialization, formatting, validation, planning, and applying - Cloud-init integration — customizable templates for user data, SSH config, and network setup
- Clean teardown — helper scripts for destroying infrastructure and cleaning up artifacts
Quick Start
Prerequisites are straightforward: libvirt, qemu/kvm, and OpenTofu installed on your host. The workflow is simple:
- Edit
variables.tfto set your hostname, user, SSH port, and cloud image path - Run
./autostart.shto initialize and deploy - Wait ~20 seconds for DHCP, then verify with
tofu output network_interfaces
The deployment waits for DHCP via time_sleep.wait_for_dhcp and queries interfaces using the libvirt_domain.example resource.
Perfect For
This setup is ideal if you’re:
- Building a personal lab environment for testing and development
- Learning infrastructure-as-code with a real-world use case
- Want reproducible VM deployments without the overhead of larger orchestration tools
Check out the github repository ebal/opentofu-libvirt-ubuntu2404 for the full documentation, including troubleshooting tips and security considerations. Licensed under GPL-2.0, so feel free to fork and adapt it to your needs.
Repository: ebal/opentofu-libvirt-ubuntu2404
Introduction
If you work with Docker long enough, you stop having one Docker environment.
- You have your local laptop.
- You have a remote VM or homelab server.
- You might have a staging host, a production host, or a CI runner somewhere in the cloud.
And sooner or later, you start asking yourself:
“Wait… where am I running this container?”
Docker contexts exist to solve exactly this problem—cleanly, safely, and without shell hacks.
This blog post explains what Docker contexts are, how they work in practice, and how to use them effectively based on real-world usage.
What Is a Docker Context?
At a practical level, a Docker context is:
- A named configuration
- That defines how the Docker CLI connects to a Docker Engine
- And optionally includes credentials and TLS/SSH details
When you run any Docker command, the CLI:
- Resolves the active context
- Reads its endpoint configuration
- Talks to the corresponding Docker Engine
What a Context Contains (Practically)
A context can define:
- Local Unix socket (
/var/run/docker.sock) - Remote Docker over SSH
- Remote Docker over TCP + TLS
- Cloud-managed Docker endpoints
Internally, contexts are stored under:
~/.docker/contexts/You almost never need to touch this manually—and that’s a good thing.
Practical Example: Local Laptop → Remote Docker Host over SSH
From your home PC, you want to manage Docker running on a remote machine called remote-vps.
Disclaimer: You need to have an ssh connection already set in ~/.ssh/config or via tailscale
Creating a Context
docker context create remote-vps --docker "host=ssh://remote-vps"That’s it.
No SSH tunnel scripts.
No DOCKER_HOST exports.
No wrapper functions.
Listing Contexts
docker context lsOutput (trimmed):
NAME         DESCRIPTION                               DOCKER ENDPOINT
default   *  Current DOCKER_HOST based configuration   unix:///var/run/docker.sock
remote-vps                                             ssh://remote-vps
The * indicates the currently active context.
Switching Contexts
docker context use remote-vpsFrom this point on, every Docker command runs against the Docker Engine on remote-vps.
This includes:
docker psdocker imagesdocker statsdocker compose
No mental gymnastics required.
Real-World Usage: Observing a Remote Host
Once the context is active, normal commands “just work” out of the box.
Containers and Images
docker ps     -a
docker images -a
or even compose
❯ docker compose ls
NAME                STATUS              CONFIG FILES
traefik             running(9)          /opt/services/traefik/docker-compose.yml
You are now inspecting the remote host—not your laptop.
Live Resource Usage
docker stats --no-streamExample output:
NAME          CPU %     MEM USAGE / LIMIT
wiki          0.01%     14.16MiB / 3.825GiB
mariadb       0.10%     83.74MiB / 3.825GiB
traefik       0.00%     42.62MiB / 3.825GiB
This is extremely useful when:
- You want quick visibility without SSHing in
- You’re comparing resource usage across environments
- You’re debugging “why is this host slow?”
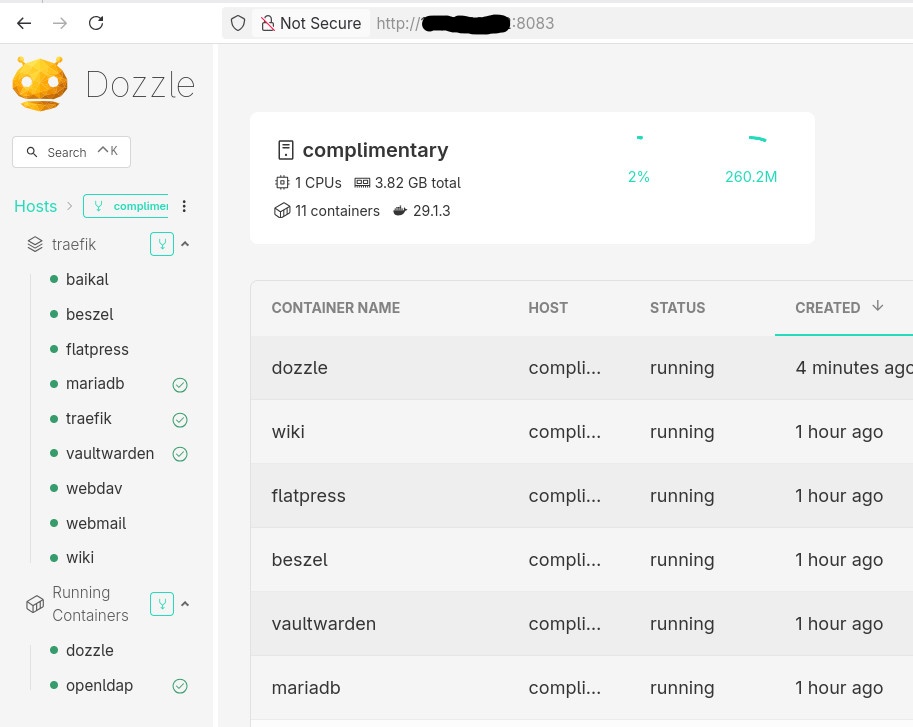
Example: Deploying a Service via Docker Compose
With the remote-vps context active, you can deploy services remotely using Compose as if they were local.
Example: running Dozzle (Docker log viewer).
docker-compose.yaml
services:
  dozzle:
    image: amir20/dozzle:latest
    container_name: dozzle
    hostname: dozzle
    volumes:
      - /var/run/docker.sock:/var/run/docker.sock
    ports:
      - 8083:8080
Be Aware: I’ve changed the port to 8083 for this example.
Deploying
docker compose -v upThe image is pulled on the remote host, the container runs on the remote host, and port 8083 is exposed there.
No SCP.
No SSH shell.
No surprises.
Common Mistake
- Forgetting the Active Context !
This is the most common mistake.
Run this often:
docker context lsBetter yet: configure your shell prompt to show the active context.
Best Practices from Real Usage
- Use one context per environment (local, staging, prod)
- Name contexts clearly (
prod-eu,homelab,ci-runner) - Avoid running destructive commands without checking context
- Treat contexts as infrastructure, not convenience hacks
- Combine with read-only SSH users for production when possible
That’s it !
- Evaggelos Balaskas