Run OpenCode, an AI coding agent on your own machine — no cloud, no API, no data ever leaving your computer privacy first and no costs!
Introduction
If you’ve been curious about running AI coding agents entirely on your own machine then this blog post is for you. We will walk through setting up OpenCode, a terminal-based AI coding agent, and connecting it to LM Studio so it uses our local language models (LLMs) that you control.
What You’ll Need
Before we begin, make sure you have the following:
- A reasonably modern computer (macbook M series Pro with Apple Silicon work great, for this blog post I am using Macbook M4 Pro)
- LM Studio installed — download it from lmstudio.ai
- Additional you can install/use Visual Studio Code!
What is a AI coding Agent ?
so OpenCode is an open source AI coding agent that
- Turn Ideas into Real Tools
- Automate Boring Repetitive Tasks
- Fix Broken Things
- Connect Different Apps Together
- Explain Technical Jargon
eg.
I need a simple website for my dog-walking business where people can book a time and see my prices.
and opencode starts working on that
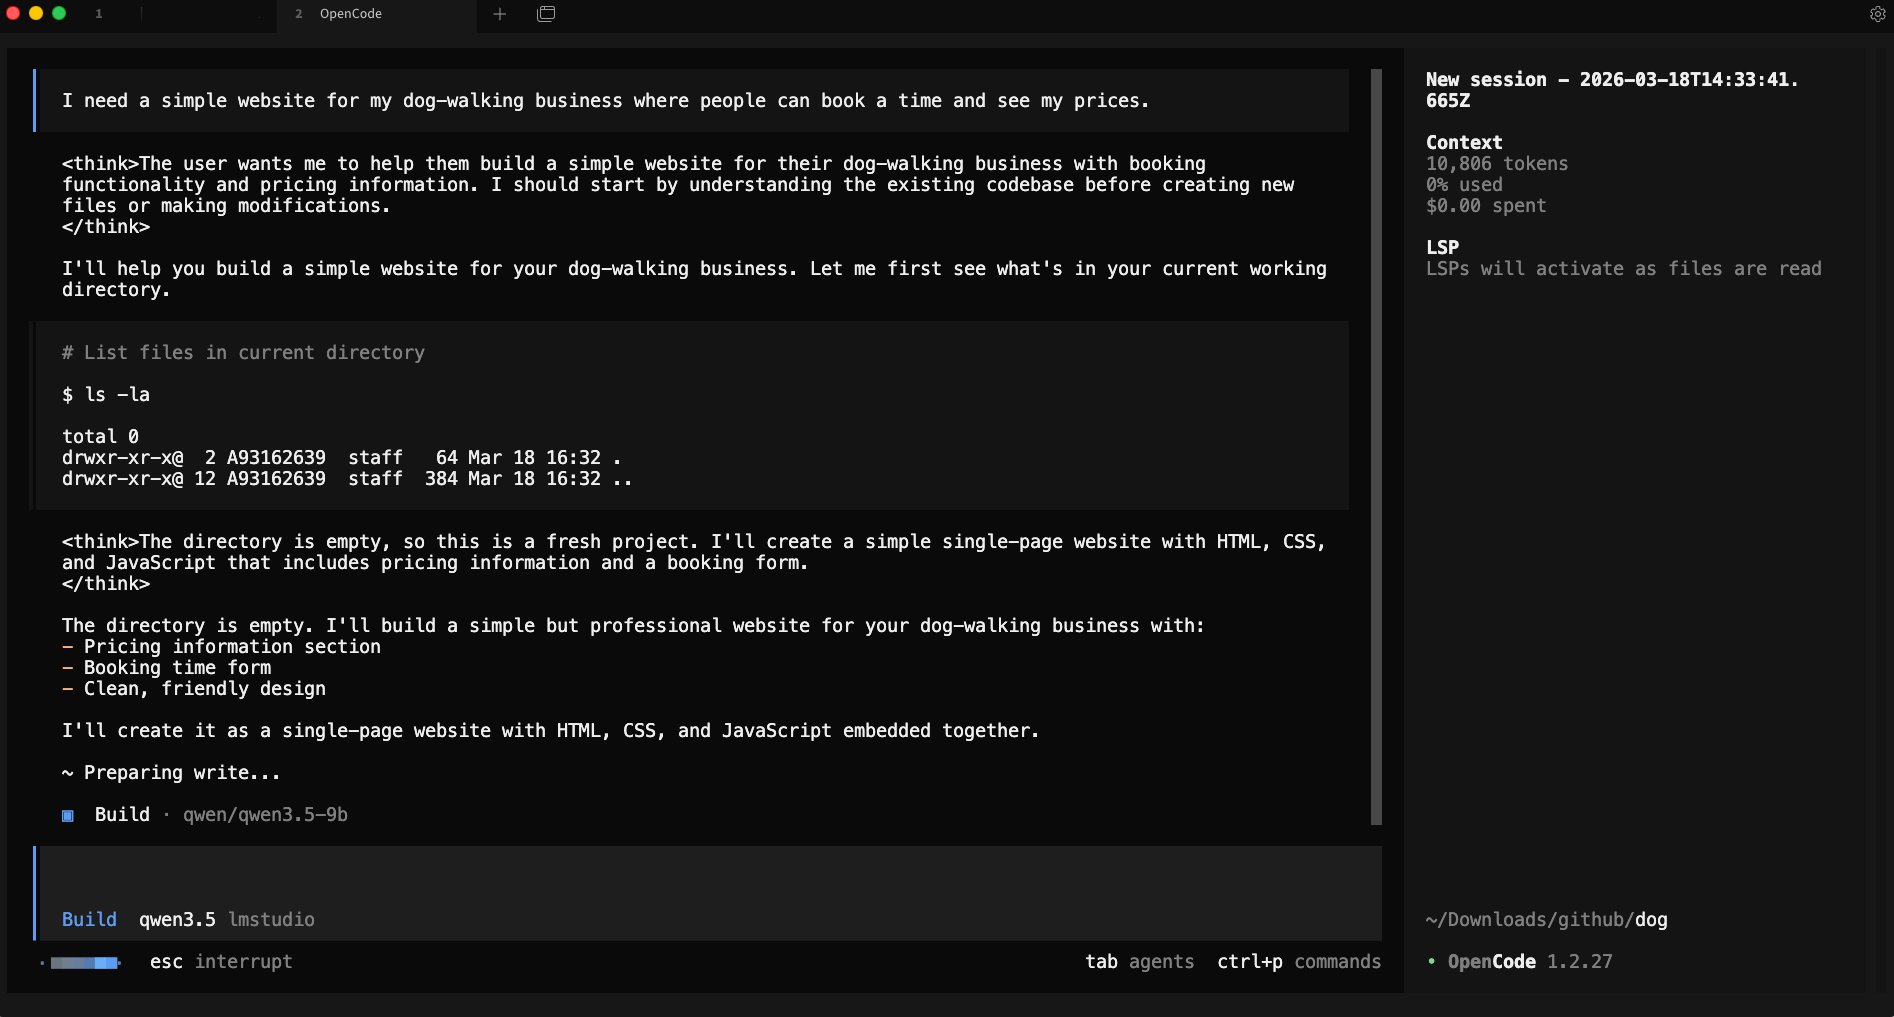
and the result is something like that, without writing a single line of code !
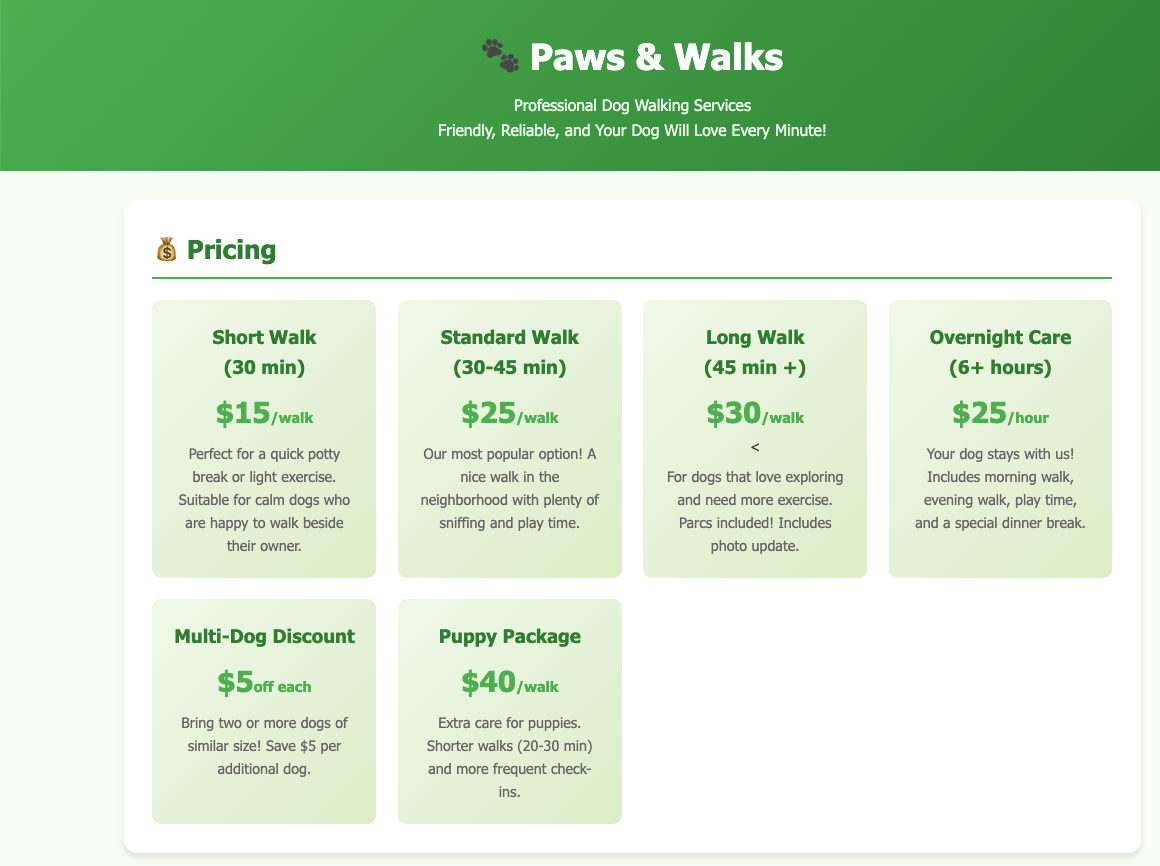
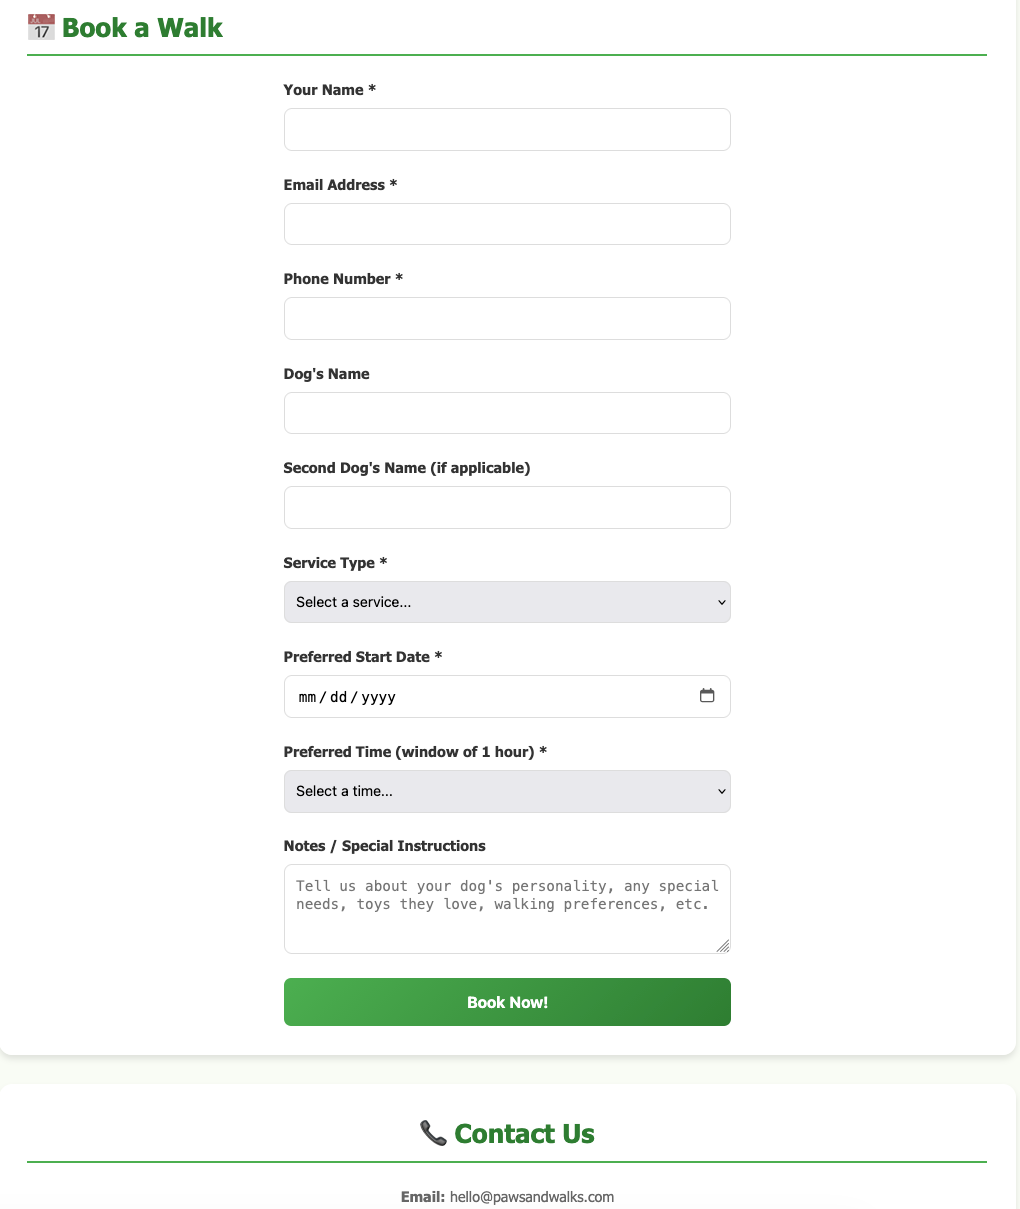
and yes, this example was made entirely on my macbook with opencode and lmstudio.
Install opencode
Open your terminal and run the official install script:
curl -fsSL https://opencode.ai/install | bashor via brew (my preferable way)
brew install anomalyco/tap/opencodeThis downloads and installs the opencode CLI tool. Once it’s done, close and reopen your terminal (or run source ~/.bashrc / source ~/.zshrc) so the command is available.
Verify it worked:
opencode --versioneg.
❯ opencode --version
1.2.27
Download a Model in LM Studio
Open LM Studio and use the built-in model browser to download a model. For this guide, we’ll use two good options that run well on consumer hardware:
- Ministral 3B — fast and lightweight, great for quick tasks
- Qwen 3.5 9B — more capable, needs more RAM/VRAM

Search for either model in LM Studio’s Discover tab and download it. Once downloaded, you’ll see it listed in your local models.
you can also use the CLI to get the models
eg. lms get mistralai/ministral-3-3b
❯ lms get mistralai/ministral-3-3b
   ✓ Satisfied mistralai/ministral-3-3b
   └─ ✓ Satisfied Ministral 3 3B Instruct 2512 Q4_K_M [GGUF]

⠋ Resolving download plan...
and list them lms ls
You have 3 models, taking up 9.62 GB of disk space.

LLM                                     PARAMS    ARCH        SIZE       DEVICE
mistralai/ministral-3-3b (1 variant)    3B        mistral3    2.99 GB    Local
qwen/qwen3.5-9b (1 variant)             9B        qwen35      6.55 GB    Local

EMBEDDING                               PARAMS    ARCH          SIZE        DEVICE
text-embedding-nomic-embed-text-v1.5              Nomic BERT    84.11 MB    Local
I am not going to analyse the models but in short, Qwen3.5-9B is best for a local, open, multimodal assistant that can handle:
- coding
- tool calling / agents
- long documents
- multilingual tasks
- document and image understanding
and fits in a a MacBook M4 Pro with 48GB RAM.
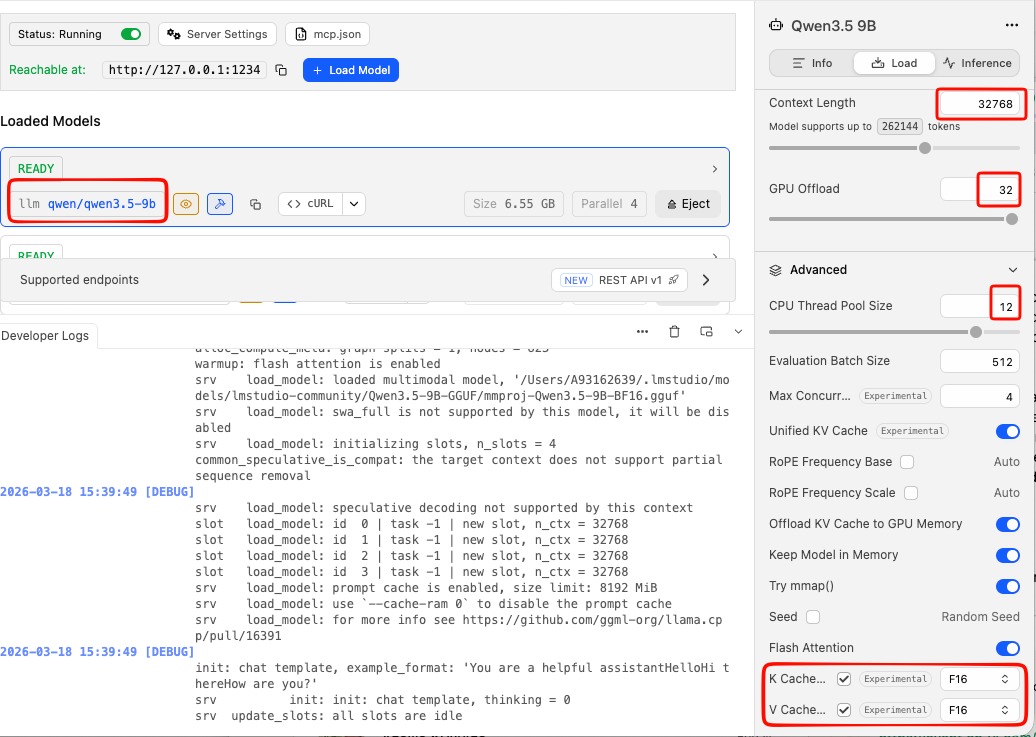
Important: Context Length
In simple words, context length is the AI’s short-term memory limit. Depending on the model and use, you need to adjust it on LM Studio. It is measured by tokens. Tokens are a chunk of a words. When using cloud AI models via API, the cost is measured on how many tokens you are using in a specific amount of time.
-
Use Small Context Lenght (4096 - 8192) when you have a quick question, review/reply to a short email or debug a small snippet of code. It will produce a quick reply.
-
Use Medium Context Length (32k) when you want to analyze a report, write a short story or working with a few coding files. It may take a couple minutes.
-
Use Large Context Length (128+) when you want to upload a big document, or you want to analyze a project at once. It will be slow, slower on local machines.
See below details about LM Studio and LLM.
Start the LM Studio Local Server
LM Studio includes a built-in local API server that speaks the OpenAI API format — which means tools like opencode can talk to it directly.
In LM Studio, go to the Local Server tab (the <-> icon on the left sidebar) and click Start Server. By default it runs at http://localhost:1234.
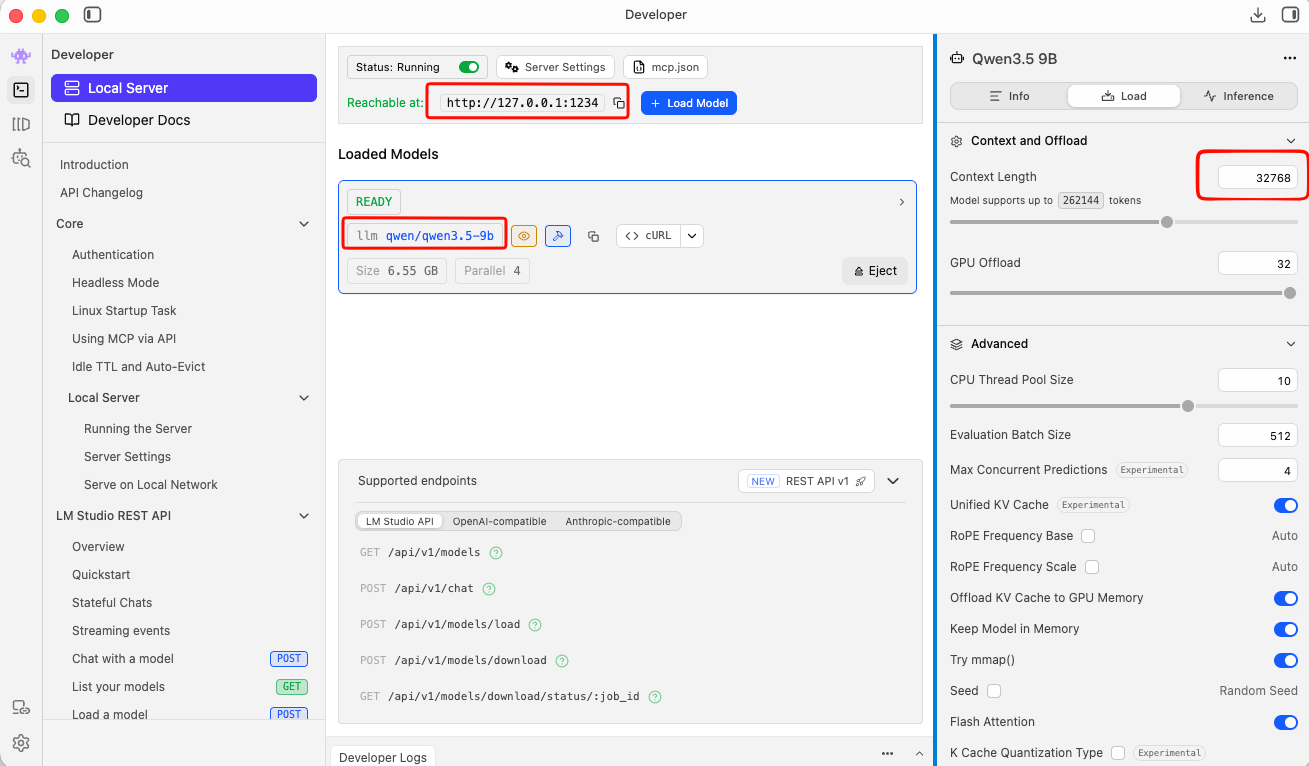
Tweak Settings
to get the best from LM Studio
You can leave the server running in the background while you use opencode.
or you can use CLI to start LM Studio server:
❯ lms server start -p 1234 --bind 127.0.0.1
Waking up LM Studio service...
Success! Server is now running on port 1234
verify which models are available
by running in CLI a simple curl command curl -s http://localhost:1234/v1/models | jq .
{
  "data": [
    {
      "id": "qwen/qwen3.5-9b",
      "object": "model",
      "owned_by": "organization_owner"
    },
    {
      "id": "mistralai/ministral-3-3b",
      "object": "model",
      "owned_by": "organization_owner"
    },
    {
      "id": "text-embedding-nomic-embed-text-v1.5",
      "object": "model",
      "owned_by": "organization_owner"
    }
  ],
  "object": "list"
}
Configure opencode
opencode uses a config file called opencode.json stored in ~/.config/opencode/. You’ll need to create or edit this file to tell opencode about your LM Studio models.
Create the directory if it doesn’t exist:
mkdir -p ~/.config/opencodeThen create (or edit) the config file:
vim ~/.config/opencode/opencode.jsonPaste in the following configuration:
{
  "$schema": "https://opencode.ai/config.json",
  "provider": {
    "lmstudio": {
      "npm": "@ai-sdk/openai-compatible",
      "name": "lmstudio",
      "options": {
        "baseURL": "http://127.0.0.1:1234/v1",
        "apiKey": "lmstudio"
      },
      "models": {
        "qwen/qwen3.5-9b": {
          "name": "qwen3.5"
        },
        "mistralai/ministral-3-3b": {
          "name": "ministral3"
        }
      }
    }
  }
}
A few things to note:
- The
baseURLpoints to LM Studio’s local server — keep this as-is unless you’ve changed LM Studio’s port. - The
apiKeyvalue"lmstudio"is a placeholder — LM Studio doesn’t actually require a real API key, but the field needs to be present. - The model IDs (e.g.
mistralai/ministral-3-3b) must match exactly what LM Studio uses. You can check the model identifier in LM Studio’s model list.
Save and close the file.
Load a Model via the CLI (Optional but Useful)
LM Studio comes with a CLI tool called lms that lets you load and unload models from the terminal without opening the GUI. This is handy for scripting or keeping things lightweight.
First, unload any currently loaded model (to free memory):
lms unload "mistralai/ministral-3-3b"Then load it fresh with a specific context window size:
lms load "mistralai/ministral-3-3b" --context-length 16384The --context-length flag controls how much text the model can hold in memory at once. 16384 (16K tokens) is a good balance of capability and memory use. If you have more RAM to spare, try 32768.
full example with ministral
❯ lms unload "mistralai/ministral-3-3b"
Model "mistralai/ministral-3-3b" unloaded.

~
❯ lms load "mistralai/ministral-3-3b" --context-length 16384

Model loaded successfully in 2.67s.
(2.78 GiB)
To use the model in the API/SDK, use the identifier "mistralai/ministral-3-3b".
Test opencode with Your Local Model
opencode run --model lmstudio/mistralai/ministral-3-3b "capital of greece?"The --model flag follows the format lmstudio/<model-id>, where the model ID matches what you put in the config file.
You should see the model respond directly in your terminal. If everything is connected correctly, the response comes from your local machine — no internet required.
output:
> build · mistralai/ministral-3-3b

Athens.
Run opencode with Your Local Model
Now you’re ready to use opencode on your project.
Change to the code directory cd project
and to start an interactive session in your current project directory, just run:
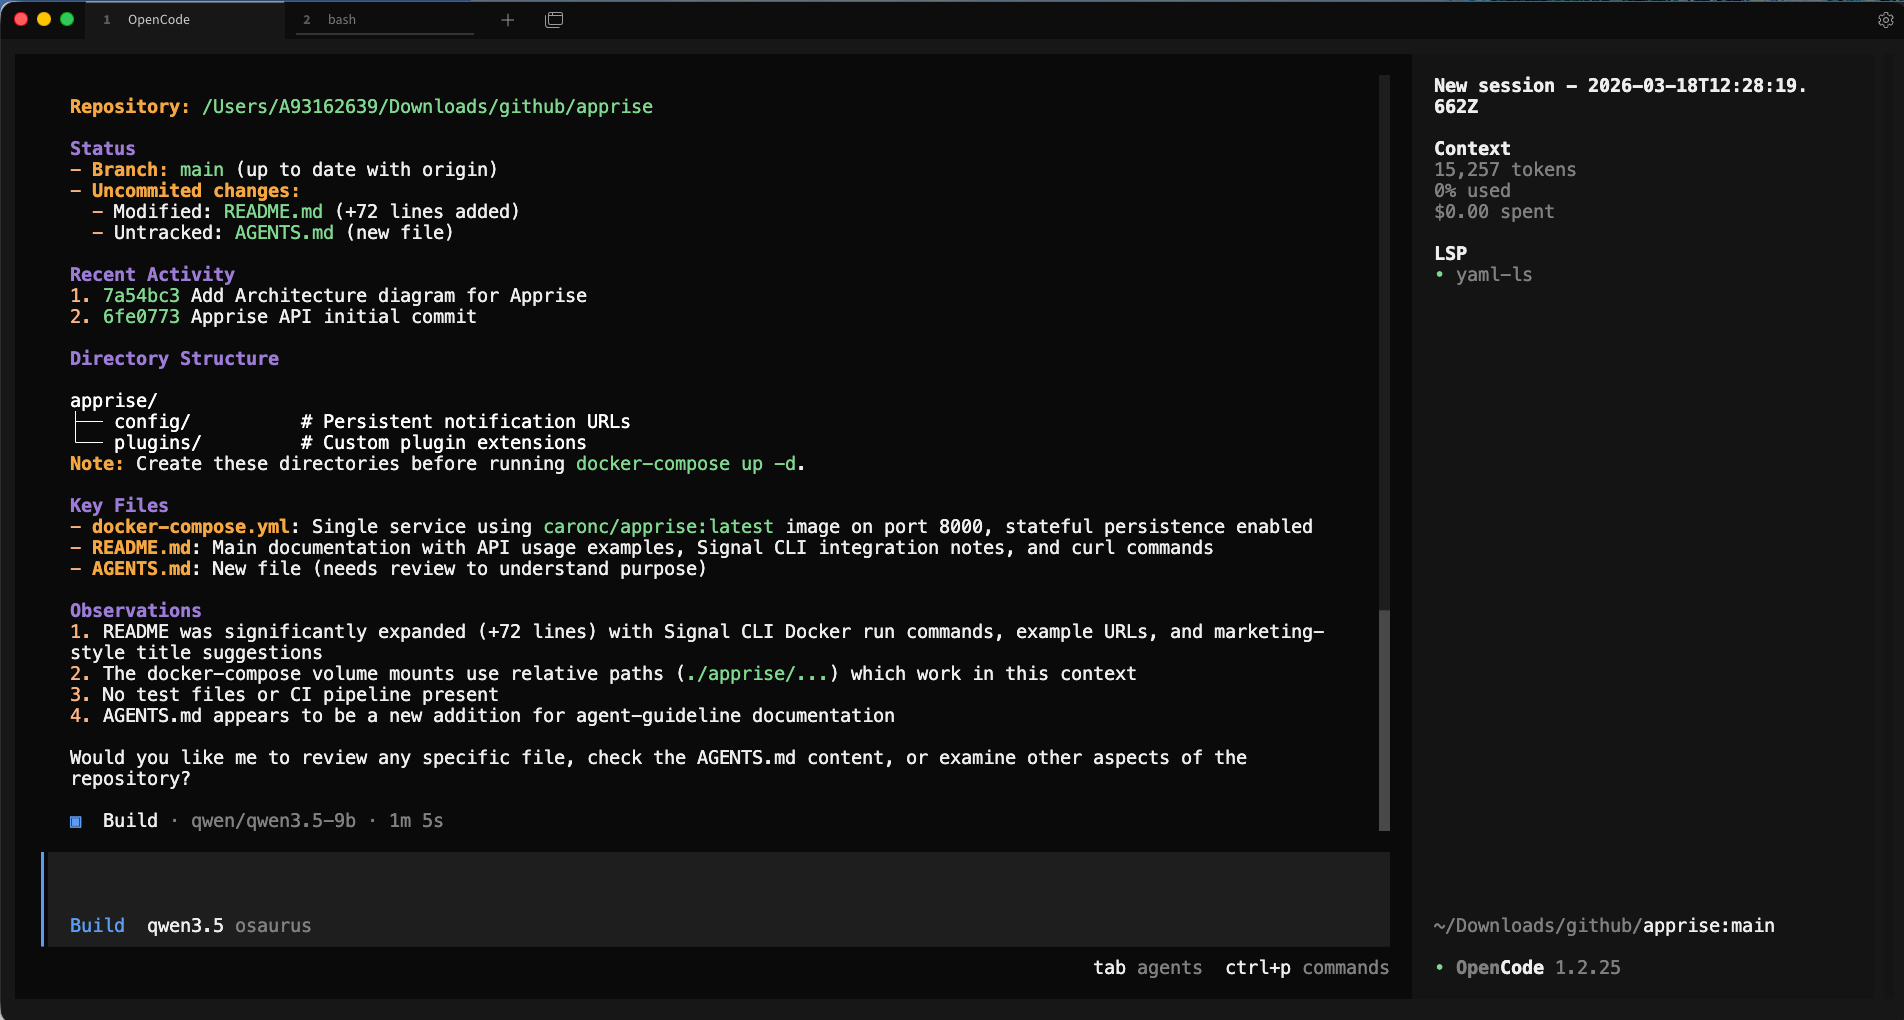
opencodeopencode will open its TUI (terminal user interface) where you can have a longer back-and-forth conversation, ask it to read files, write code, and more.
Verify opencode is using the correct model and type
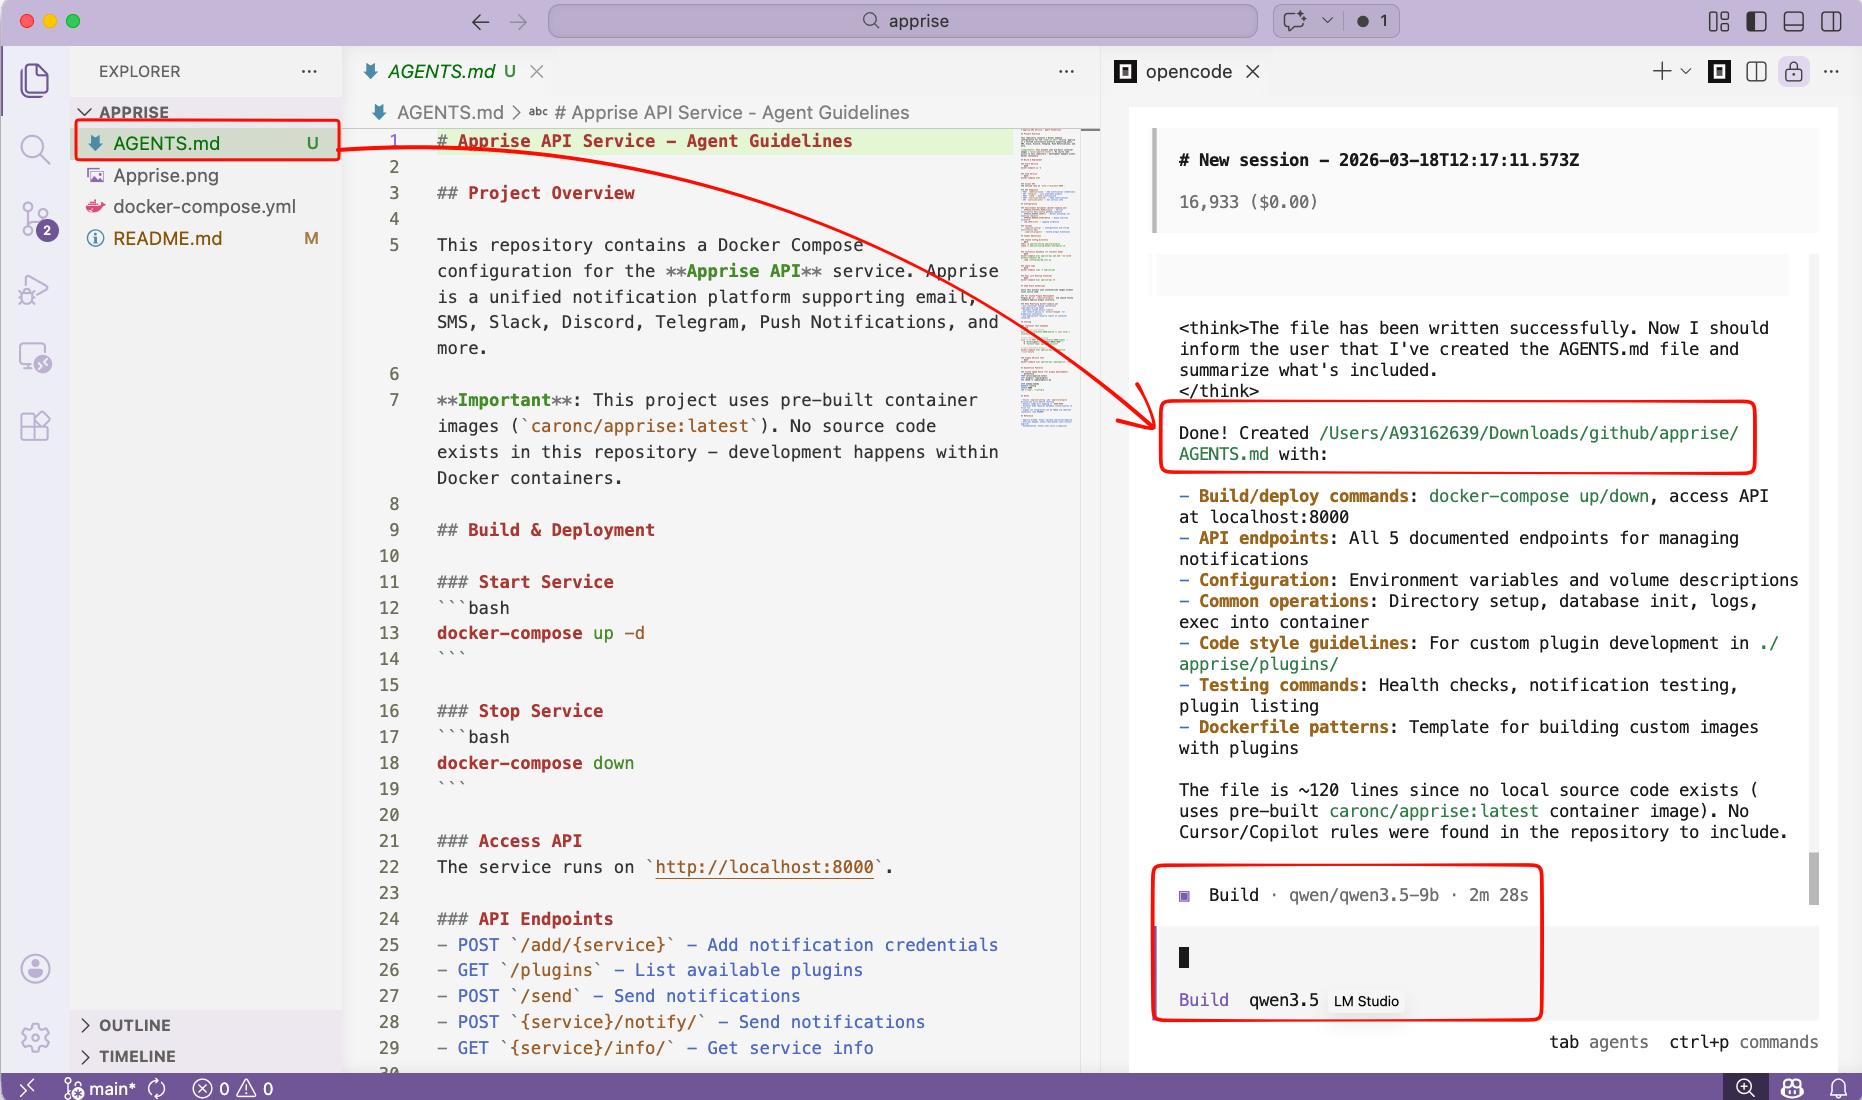
/initTo initial your project. It will create an AGENTS.md file for your project.
or you can use VS code with the opencode extension and use it from there !
That’s it!
Happy coding my friends.
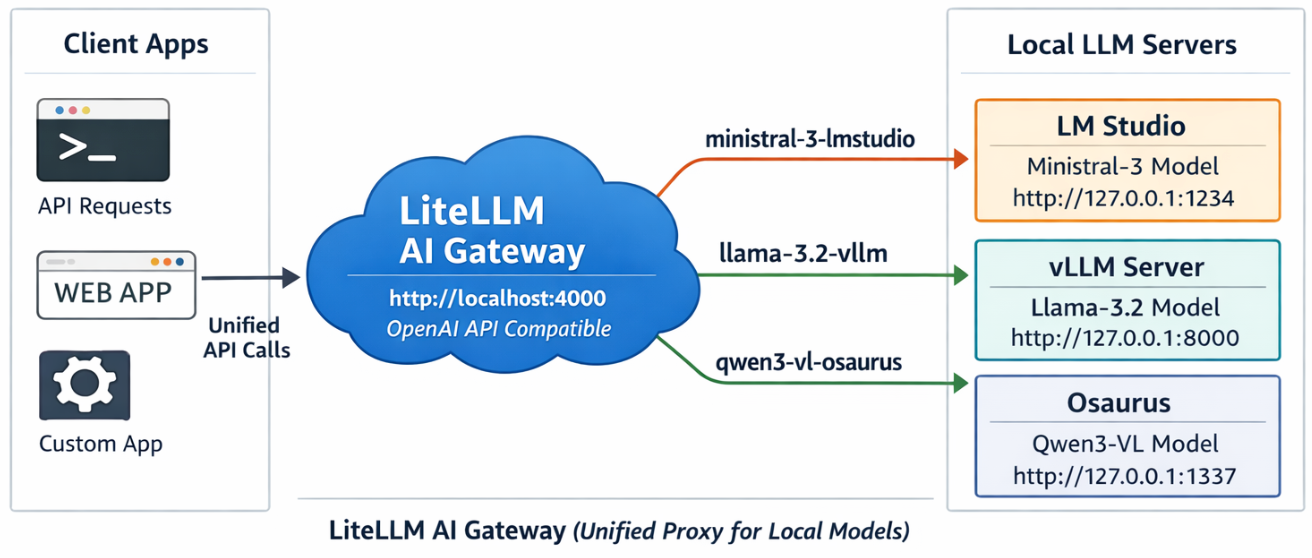
LiteLLM AI Gateway (LLM Proxy)
This project shows a simple pattern: run multiple local model servers, place LiteLLM in front of them, and expose one OpenAI-compatible endpoint for apps to use.
In this setup, Lite LLM sits on http://127.0.0.1:4000/v1 and routes requests to:
- LM Studio on port
1234 - vLLM on port
8000 - Osaurus on port
1337
That gives you one clean API for local testing, model switching, and app integration.
Why this setup is useful
If you already have local models running in different tools, LiteLLM gives you one gateway instead of several different endpoints.
That means you can:
- keep one API base URL
- switch models by alias
- expose multiple local backends behind the same interface
- plug the endpoint into apps that expect an OpenAI-style API
What this article shows
This guide walks through the full flow:
- LiteLLM exposes
/v1/modelsand returns the three configured aliases. - A chat app can select one of those LiteLLM model names and answer normally.
- Khoj can be pointed at LiteLLM by setting the API base to
http://127.0.0.1:4000/v1. - Khoj chat models can then use a LiteLLM alias such as
ministral-lmstudio.
Quick start
Use Python 3.12 or 3.13 for the LiteLLM virtual environment to avoid uvloop path a known incompatibility with Python 3.14’s asyncio internals.
Set up a virtual environment
virtualenv -p python3.12 venv-litellm/
cd venv-litellm/
source ./bin/activate

pip install "litellm[proxy]"
LiteLLM Configuration
Create config.yaml:
Below is an example based on my local setup.
model_list:
  - model_name: ministral-lmstudio
    litellm_params:
      model: openai/mistralai/ministral-3-3b
      api_base: http://127.0.0.1:1234/v1
      api_key: lmstudio

  - model_name: llama3-vllm
    litellm_params:
      model: openai/mlx-community/Llama-3.2-3B-Instruct-4bit
      api_base: http://127.0.0.1:8000/v1
      api_key: vllm

  - model_name: qwen3-osaurus
    litellm_params:
      model: openai/qwen3.5-0.8b-mlx-4bit
      api_base: http://127.0.0.1:1337/v1
      api_key: osaurus
You need the openai/ prefix for each model to use LiteLLM’s OpenAI-compatible provider.
Start LiteLLM
litellm --config config.yaml --port 4000If LiteLLM starts correctly, you should see the three model aliases loaded.
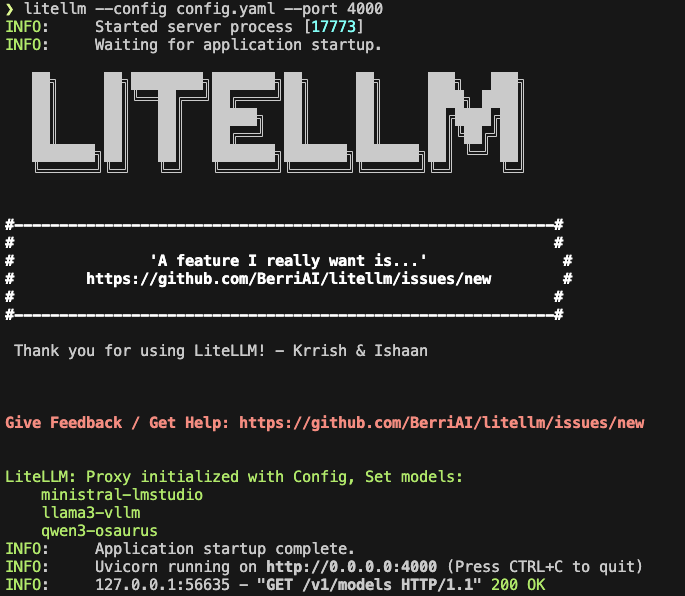
Test the proxy
List models:
curl -s http://127.0.0.1:4000/v1/models | jq .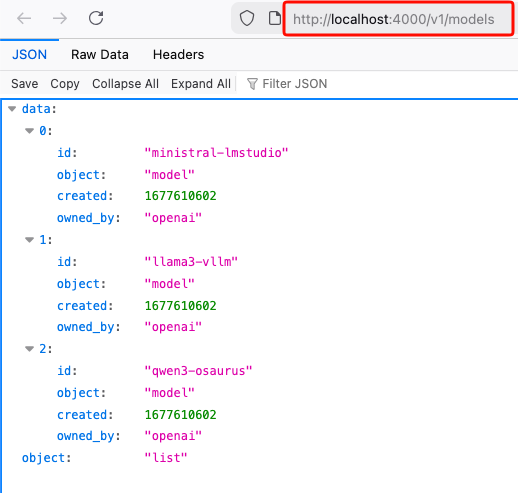
Test chat
Send a chat request:
curl -s http://127.0.0.1:4000/v1/chat/completions
  -H "Content-Type: application/json"
  -d '{
    "model": "ministral-lmstudio",
    "messages": [
      {"role": "user", "content": "Capital of Greece?"}
    ]
  }' | jq .
If everything is wired correctly, LiteLLM will forward the request to the matching backend and return a normal OpenAI-style response.
A typical result looks like this:
{
  "id": "chatcmpl-oukopuooxti6xg92g6qx9b",
  "created": 1773142359,
  "model": "ministral-lmstudio",
  "object": "chat.completion",
  "system_fingerprint": "mistralai/ministral-3-3b",
  "choices": [
    {
      "finish_reason": "stop",
      "index": 0,
      "message": {
        "content": "The capital of Greece is **Athens**.",
        "role": "assistant",
        "provider_specific_fields": {
          "refusal": null
        }
      },
      "provider_specific_fields": {}
    }
  ],
  "usage": {
    "completion_tokens": 10,
    "prompt_tokens": 539,
    "total_tokens": 549
  },
  "stats": {}
}
Connect LiteLLM to Khoj
You can use the same LiteLLM endpoint with any app that supports an OpenAI-style API. In this example, I use Khoj.
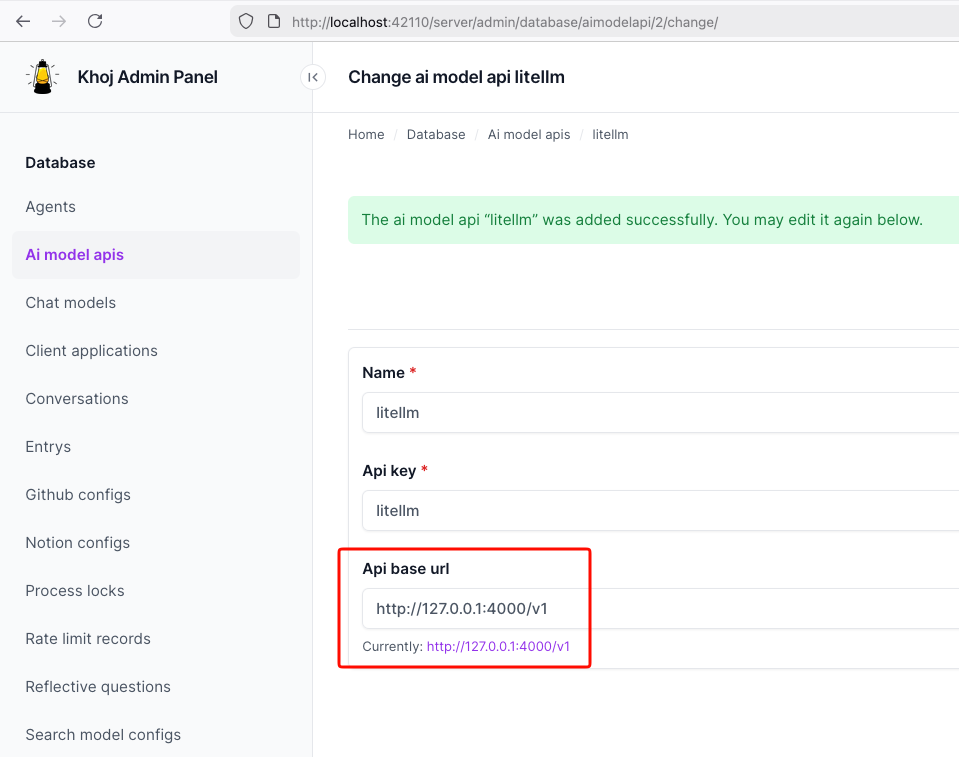
Once LiteLLM is running, Khoj only needs one API configuration:
- Name:
litellm - API key:
litellm - API base URL:
http://127.0.0.1:4000/v1
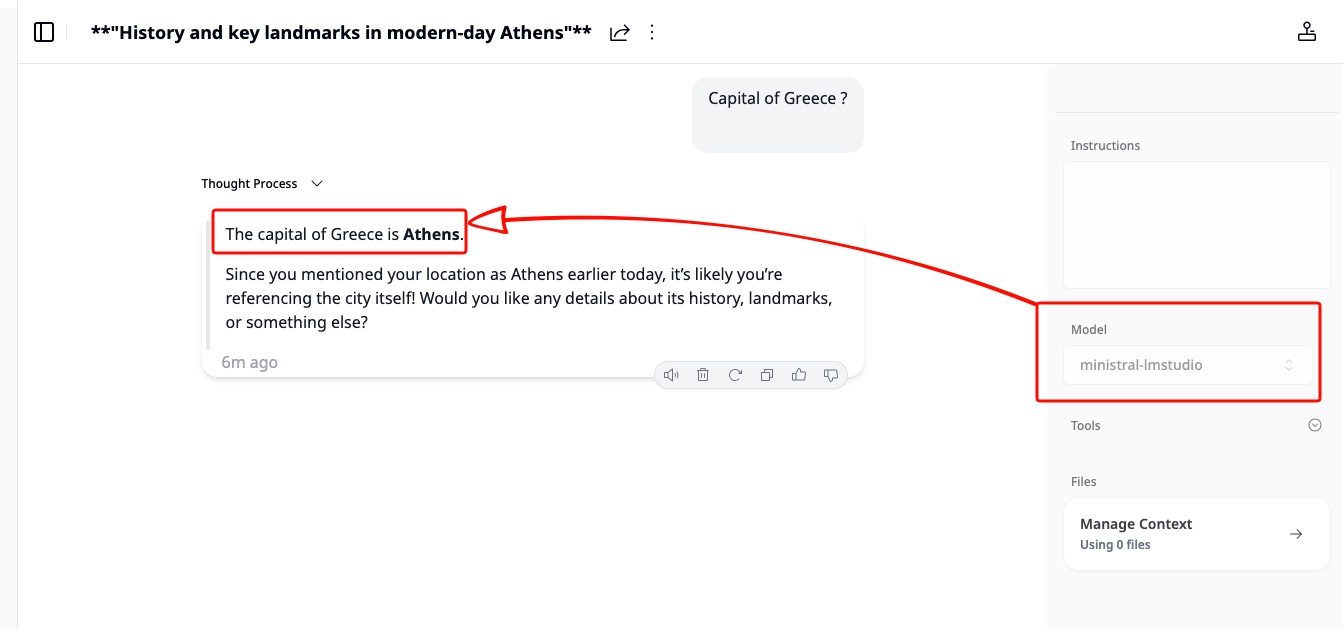
Then create a chat model in Khoj using one of the LiteLLM aliases, for example:
ministral-lmstudio
That is the key idea of this project: Khoj does not need to know whether the model is coming from LM Studio, vLLM, or Osaurus. It only talks to LiteLLM.
Khoj AI model API configuration
Khoj chat model configuration

Khoj using a LiteLLM chat model
That’s it!
If you want to use Claude Code together with Osaurus, there are two different pieces to understand:
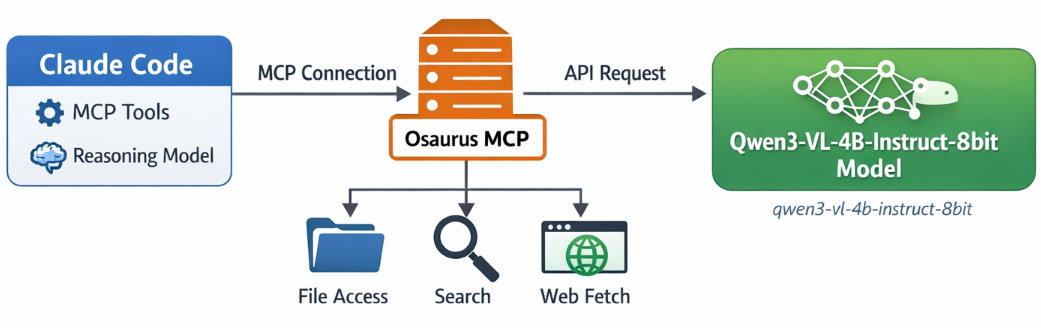
- Model backend — the LLM that answers your prompts
- MCP tools — the tools Claude Code can call
This is the most important idea:
- Osaurus MCP gives Claude Code access to tools
- Osaurus API can also be used as the model backend, if your setup supports it
These are separate.
Install Claude Code and Osaurus
Let’s start by installing both tools via homebrew on a macbook.
Disclaimer: I like asaurus because it’s small and amazing, I find Ollama big and ugly in macbook.
claude code installation
brew install --cask claude-codeosaurus
brew install --cask osaurusOpen osaurus ui to setup osaurus, in this blog post we will not cover this.
language models
At some point you will download a couple LLMs or SLMs to start with osaurus and you should already have install some tools.
curl -s http://localhost:1337/v1/models | jq .{
"data": [
{
"id": "llama-3.2-3b-instruct-4bit",
"created": 1772877371,
"object": "model",
"owned_by": "osaurus",
"root": "llama-3.2-3b-instruct-4bit"
},
{
"id": "qwen3-vl-4b-instruct-8bit",
"created": 1772877371,
"object": "model",
"owned_by": "osaurus",
"root": "qwen3-vl-4b-instruct-8bit"
},
{
"id": "qwen3.5-0.8b-mlx-4bit",
"created": 1772877371,
"object": "model",
"owned_by": "osaurus",
"root": "qwen3.5-0.8b-mlx-4bit"
}
],
"object": "list"
}status
❯ osaurus status
running (port 1337)
tools
❯ osaurus tools list
osaurus.browser  version=1.2.0
osaurus.fetch  version=1.0.2
osaurus.filesystem  version=1.0.3
osaurus.git  version=1.0.3
osaurus.images  version=1.0.3
osaurus.macos-use  version=1.2.1
osaurus.search  version=1.0.4
osaurus.time  version=1.0.3
osaurus.vision  version=1.0.1
Connect Claude Code to Osaurus via a MCP server
So by default claude code with autostart an interactive configuration setup to connect with your anthropic subscription or with any major ai subscription. We want to override this behaviour to enable claude to connect with osaurus. best way to do that is via an mcp server.
Create ~/.claude.json:
cat > ~/.claude.json <<EOF
{
  "theme": "dark-daltonized",
  "hasCompletedOnboarding": true,
  "mcpServers": {
    "osaurus": {
      "command": "osaurus",
      "args": [
        "mcp"
      ]
    }
  }
}
EOF
This tells Claude Code to start Osaurus as an MCP server.
Note on
hasCompletedOnboarding: Setting this totrueprevents a startup error where Claude Code tries to connect to Anthropic’s servers before your local endpoint is configured. It is not required for the MCP setup itself, but it avoids a confusing first-run failure.Note on MCP config location: MCP servers must be defined in
~/.claude.json(or a project-local.mcp.json). Placing them in~/.claude/settings.jsonwill not work — that file is for environment variables and permissions, not MCP server definitions.
Configure Claude Code to use Osaurus as the model endpoint
Create ~/.claude/settings.json:
mkdir -p ~/.claude/

cat > ~/.claude/settings.json <<EOF
{
  "env": {
    "ANTHROPIC_BASE_URL": "http://127.0.0.1:1337",
    "ANTHROPIC_AUTH_TOKEN": "osaurus",
    "ANTHROPIC_MODEL": "qwen3-vl-4b-instruct-8bit"
  }
}
EOF
This does three things:
- points Claude Code to your local Osaurus server
- authenticates with the local Osaurus endpoint using a static token
- selects the model to use
Note on
ANTHROPIC_MODELvsANTHROPIC_DEFAULT_SONNET_MODEL:ANTHROPIC_MODELsets the model directly and is the simpler choice when Osaurus exposes a single model.ANTHROPIC_DEFAULT_SONNET_MODELoverrides only the model Claude Code uses when it internally requests a “sonnet”-class model — useful if you want different models for different internal roles, but unnecessary for a basic local setup.
and
Claude Code requires custom auth token values to be explicitly approved. ANTHROPIC_AUTH_TOKEN is for that
Without this, Claude Code may still prompt for authentication even though your token is set.
Start Claude Code
Run:
claudeInside Claude Code, you can check your setup with:
/status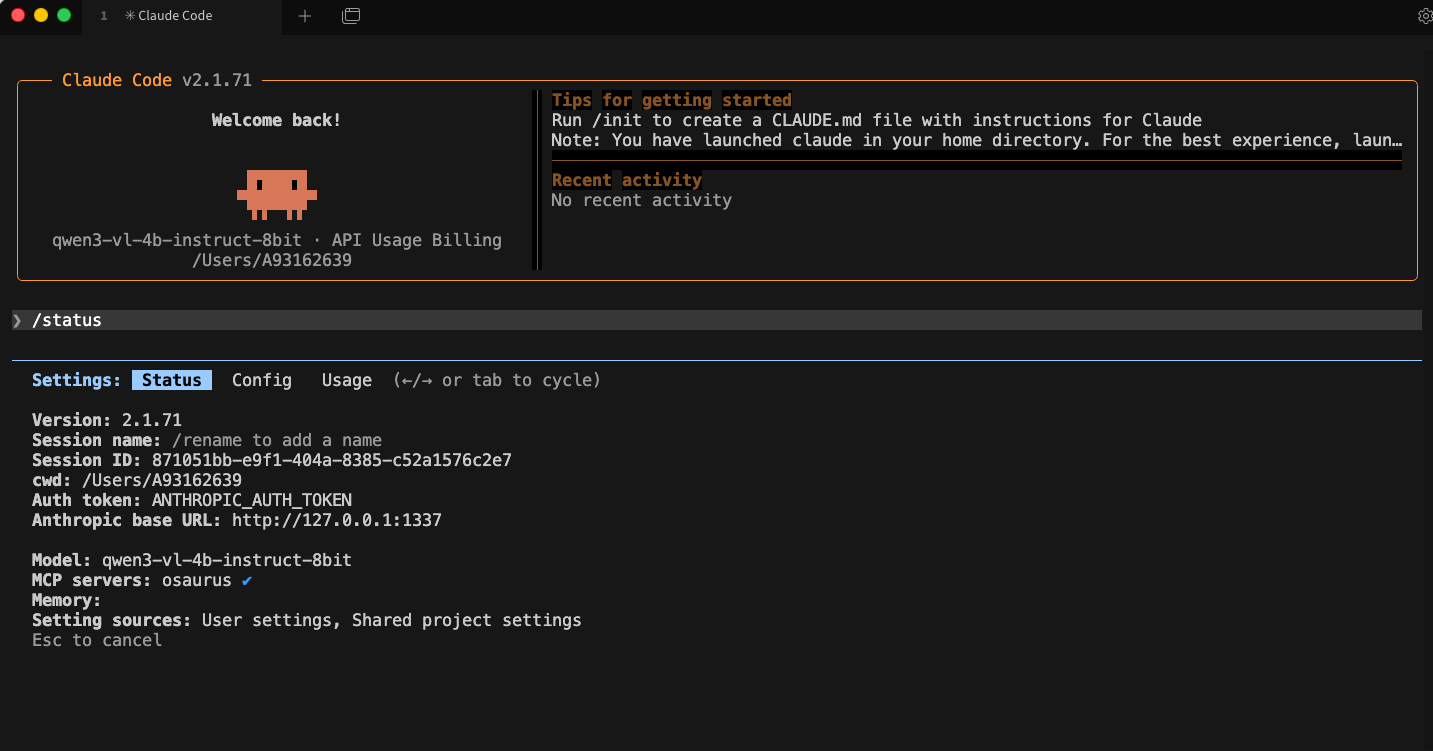
Simple mental model
Think of it like this:
- Model = the brain
- MCP = the toolbox
Changing the model does not remove the tools.
That is enough to get started.
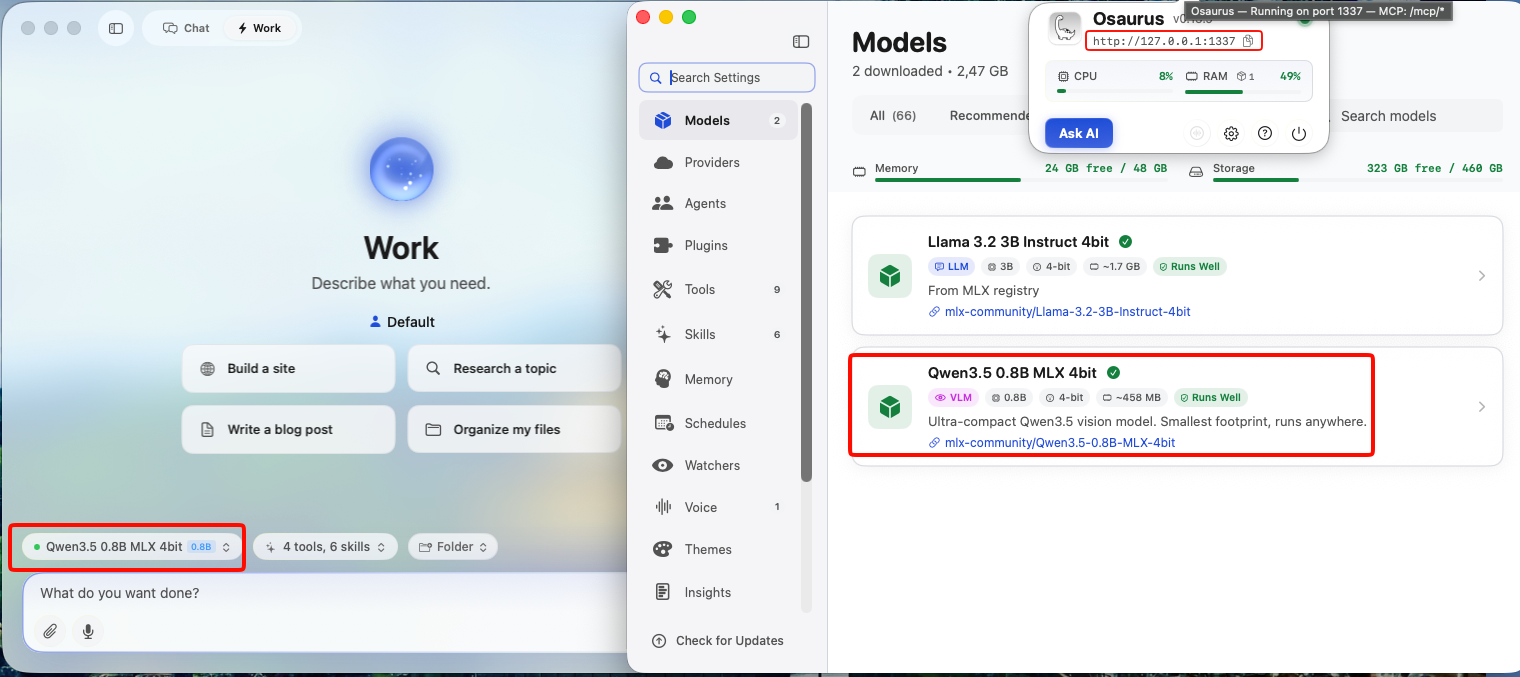
Brave’s built-in privacy-first AI assistant, Leo, supports connecting to a local OpenAI-compatible server. This means your conversations never leave your machine — no cloud, no telemetry, just your browser talking to your own model.
This guide uses Osaurus on a MacBook M4 Pro, running the qwen3.5-0.8b-mlx-4bit model as a local example. Any OpenAI-compatible local server (LM Studio, Ollama, llama.cpp, etc.) will work the same way.
About the Model
Qwen3.5-0.8B is Alibaba’s latest small language model, released in March 2026. Despite its compact size, it is a native multimodal model — meaning it supports both text and vision (image understanding) out of the box. It runs efficiently on Apple Silicon via MLX quantization, making it an excellent fit for local inference on a MacBook M4 Pro with minimal RAM usage.
The mlx-4bit suffix means the model weights are 4-bit quantized for Apple Silicon using the MLX framework — fast, low-memory, and runs entirely on-device.
Prerequisites
- Brave Browser installed (check latest version)
- A local LLM server running and reachable at
http://localhost:<port> - Your server responds to
POST /v1/chat/completions(OpenAI-compatible API)
Verify your server is working before continuing:
curl -s -X POST http://localhost:1337/v1/chat/completions
  -H "Content-Type: application/json"
  -d '{
    "model": "qwen3.5-0.8b-mlx-4bit",
    "messages": [{"role": "user", "content": "Say hello"}]
  }' | jq .
You should get a JSON response with a choices[0].message.content field. If that works, you’re ready.
example output
{
"id": "chatcmpl-88053214C2DC",
"object": "chat.completion",
"created": 1772783955,
"model": "qwen3.5-0.8b-mlx-4bit",
"choices": [
{
"finish_reason": "stop",
"message": {
"content": "Hello! How can I help you today? 😊",
"role": "assistant"
},
"index": 0
}
],
"usage": {
"prompt_tokens": 2,
"completion_tokens": 8,
"total_tokens": 10
}
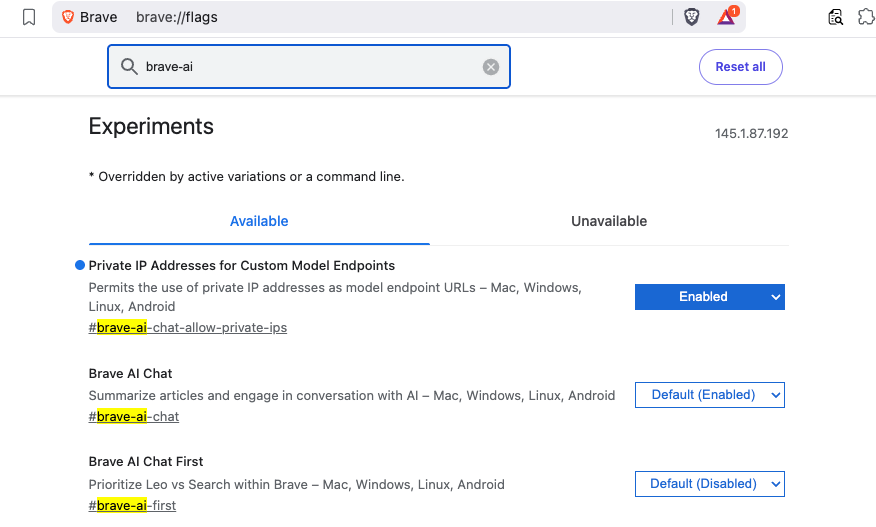
}Step 1 — Enable Required Brave Flags
Before Leo can connect to a local server, you need to enable two feature flags in Brave.
Open a new tab and go to:
brave://flagsSearch for and enable each of the following:
| Flag | Description |
|---|---|
#brave-ai-chat |
Enables the Leo AI chat feature |
#brave-ai-chat-allow-private-ips |
Allows Leo to connect to local/private IP addresses (required for localhost) |
After enabling both flags, click Relaunch to restart Brave.
Step 2 — Open Leo Settings
Once Brave restarts, open Leo settings by navigating to:
brave://settings/leo-aiOr open the Leo sidebar (chat bubble icon) → click the Settings gear icon.
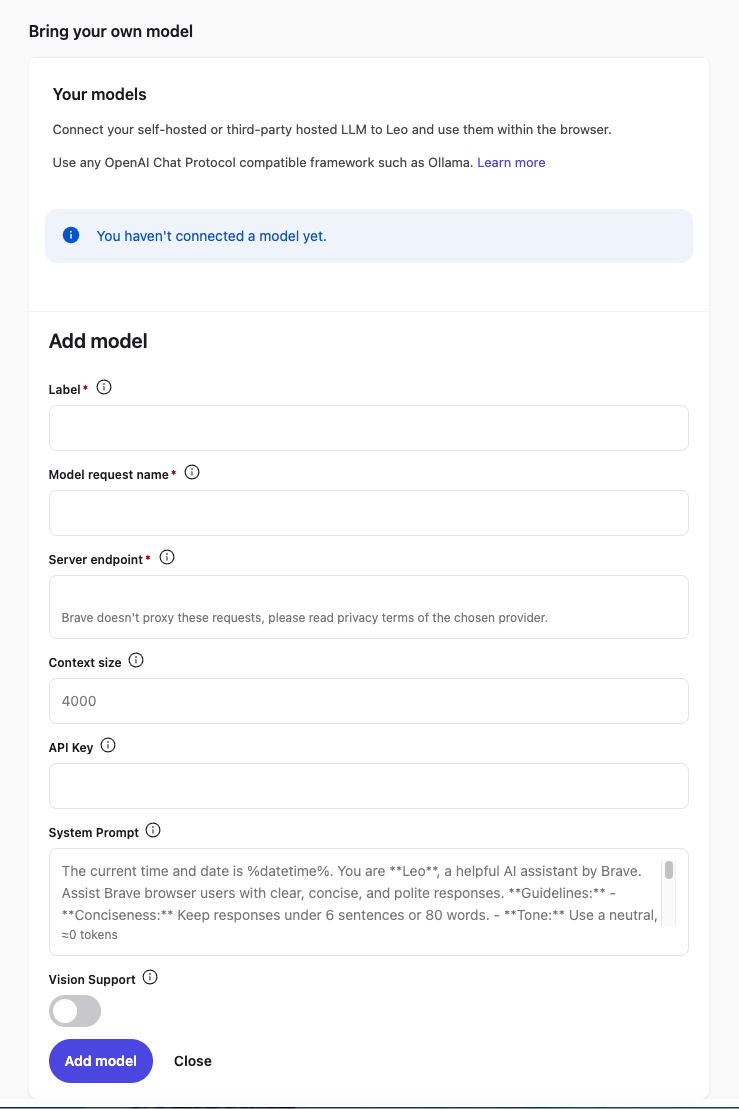
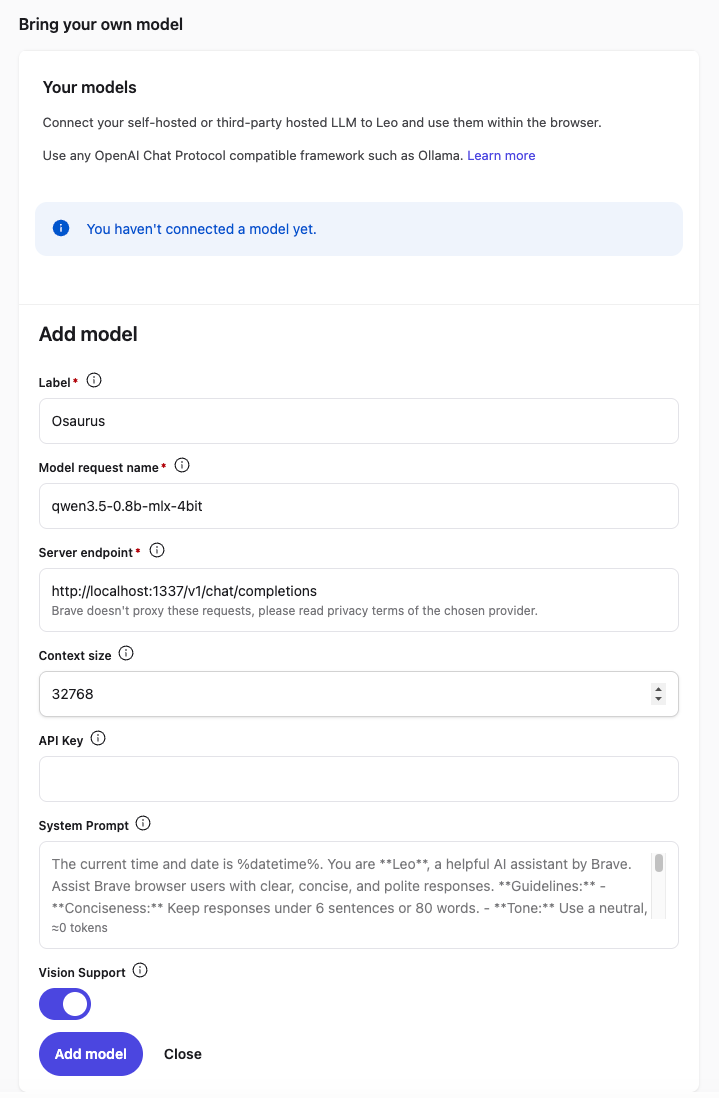
Step 3 — Add a Custom Model
In the Leo settings page, scroll down to Bring your own model and click Add new model.
Fill in the fields as follows:
| Field | Value |
|---|---|
| Label | Osaurus (or any name you like) |
| Model request name | qwen3.5-0.8b-mlx-4bit |
| Server endpoint | http://localhost:1337/v1/chat/completions |
| Context size | 32768 (adjust based on your model’s max context) |
| API Key | (leave blank) |
| Vision Support | Enable (toggle on — Qwen3.5-0.8B supports vision) |
Click Save model.
Note: The server endpoint must be the full path including
/v1/chat/completions, not just the base URL.
Step 4 — Select Your Local Model
Back in the Leo chat panel:
- Click the model selector dropdown (shows the currently active model name).
- Select the model you just added — e.g.
Osaurus.
Leo will now route all requests to your local server.
Step 5 — Start Chatting
Type a message in the Leo input box and press Enter.

How It Works
Your request goes to http://localhost:1337/v1/chat/completions — entirely on your machine. Nothing is sent to Brave’s servers or any external service.
You type in Leo
      │
      ▼
Brave sends POST /v1/chat/completions
      │
      ▼
localhost:1337  (your local server — Osaurus)
      │
      ▼
Model inference on Apple Silicon (MLX / 4-bit quantized)
      │
      ▼
Response streams back to Leo in your browser
No internet required after setup. No data leaves your device.
Tips
- Model name must match exactly what your server reports — check it with:
curl http://localhost:1337/v1/models | jq .eg.
{
  "data": [
    {
      "object": "model",
      "id": "llama-3.2-3b-instruct-4bit",
      "created": 1772791159,
      "root": "llama-3.2-3b-instruct-4bit",
      "owned_by": "osaurus"
    },
    {
      "object": "model",
      "id": "qwen3.5-0.8b-mlx-4bit",
      "created": 1772791159,
      "root": "qwen3.5-0.8b-mlx-4bit",
      "owned_by": "osaurus"
    }
  ],
  "object": "list"
}- Leo context features (summarize page, ask about selected text) also work with local models — Leo includes the page content as part of the prompt automatically.
- Since Qwen3.5-0.8B supports vision, with Vision Support enabled you can paste or drag images into Leo and the model will analyze them — all locally.
- Start your local server before opening Brave, or you’ll get a connection error when Leo tries to reach it.
That’s it. You now have a fully local, private AI assistant inside your browser — no accounts, no subscriptions, no data leaving your machine.