





coding agents are useful, but they forget. I’ve find it from time and time to either repeat my self or creating skills to reuse them. But I also use multiple agents and on different machines too which is also complicated. I was looking for a way to keep a common memory to my agents. And built my services and setup without … forgetting !
This guide shows a simple MVP setup for giving your AI coding agents one shared memory system.
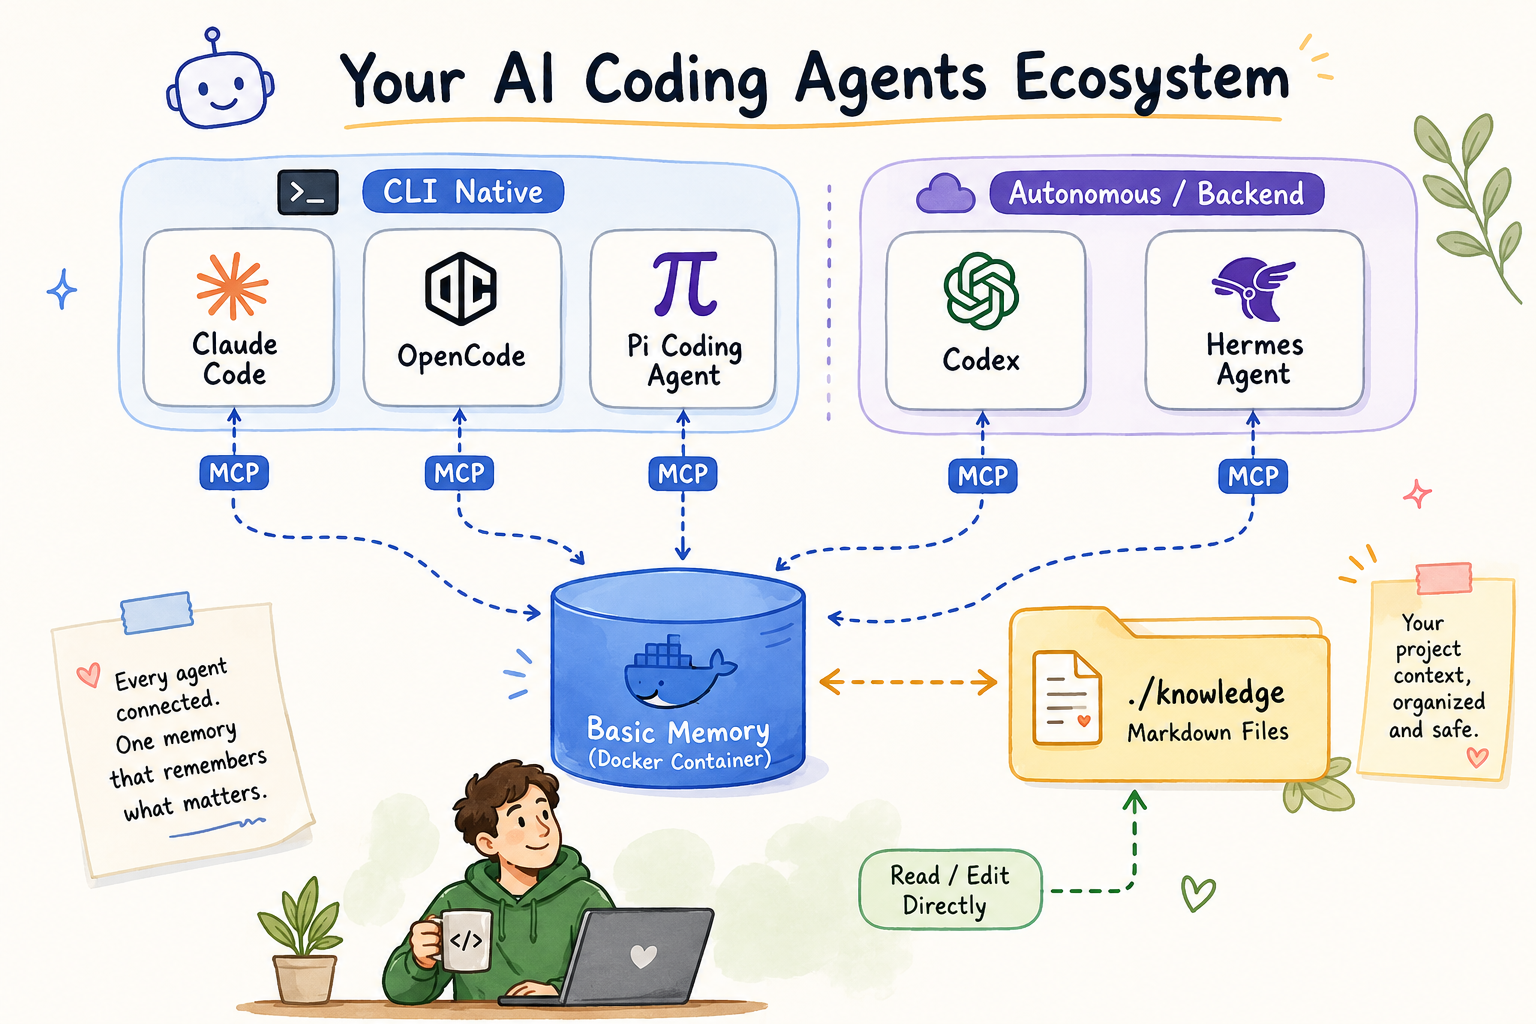
What we are building
I will be using Basic Memory as the memory service and connect agents through MCP, running it with docker compose using the official image.
Model Context Protocol (MCP) is an open standard introduced by Anthropic in November 2024 that enables AI agents and large language models (LLMs) to securely connect with external tools, data sources, and services
One agent writes a note, any agent — in any later session — can retrieve it back. You can also open the same files yourself, since they are just Markdown files on disk.So basic memory becomes a shared notebook for your coding agents.
What you need
You need:
- Docker
- Docker Compose
- Git (optional)
- A terminal
- One coding agent with MCP support
No model provider API key needed here. Basic Memory’s default semantic search runs on local FastEmbed embeddings.
Official docs:
- Basic Memory repo: https://github.com/basicmachines-co/basic-memory
- Basic Memory docs: https://docs.basicmemory.com/
- Basic Memory Docker guide: https://github.com/basicmachines-co/basic-memory/blob/main/docs/Docker.md
Why no model provider is needed
Some memory systems have an LLM read your conversation and extract facts before storing anything - every save costs a model call, and you need a provider API key for that.
Basic Memory skips this. The agent (or you) writes structured Markdown directly:
---
title: Testing Conventions
permalink: testing-conventions
tags: [testing]
---

# Testing Conventions

## Observations
- [tool] Use Vitest instead of Jest
- [rule] Do not edit generated files

## Relations
- relates_to [[Project Architecture]]
Observations, Relations, done. A local SQLite index gives full-text and semantic search over these files, no cloud calls.
Step 1: Start Basic Memory with Docker Compose
Default install is
uv tool install basic-memory(oruvx basic-memory mcp), a stdio MCP server per agent - no Docker needed. I wanted one server for all my agents, so Docker it is.
The pre-built image runs as UID/GID 1000, so create and own the folders first:
mkdir -p knowledge basic-memory-config
sudo chown -R 1000:1000 knowledge basic-memory-config
docker compose
docker-compose.yml
name: basic-memory

# runs the MCP server over SSE/HTTP on :8000 - no auth on that endpoint.
# keep it on a trusted network, or put a reverse proxy + auth in front of it.

services:
  basic-memory:
    image: ghcr.io/basicmachines-co/basic-memory:latest
    container_name: basic-memory-server

    volumes:
      - ./knowledge:/app/data:rw
      # config + sqlite index, container user is appuser -> /home/appuser
      - ./basic-memory-config:/home/appuser/.basic-memory:rw

    environment:
      - BASIC_MEMORY_DEFAULT_PROJECT=main
      - BASIC_MEMORY_SYNC_CHANGES=true
      - BASIC_MEMORY_LOG_LEVEL=INFO
      - BASIC_MEMORY_SYNC_DELAY=1000

    ports:
      - "8000:8000"

    command: ["basic-memory", "mcp", "--transport", "sse", "--host", "0.0.0.0", "--port", "8000"]

    restart: unless-stopped

    healthcheck:
      test: ["CMD", "basic-memory", "--version"]
      interval: 30s
      timeout: 10s
      retries: 3
      start_period: 30s
and start it:
docker compose -v up -dConfirm it’s healthy:
docker compose -v ps -a

# view logs
docker compose logs -f basic-memory
a healthy container looks like this in the logs:
❯ docker compose logs -f basic-memory
basic-memory-server  | [07/06/26 09:23:04] INFO     Starting MCP server 'Basic Memory'
basic-memory-server  |                              with transport 'sse' on
basic-memory-server  |                              http://0.0.0.0:8000/mcp
basic-memory-server  | INFO:     Uvicorn running on http://0.0.0.0:8000 (Press CTRL+C to quit)
Step 2: Confirm the project
The default project (main) is your ./knowledge folder, mounted into the container at /app/data. To add another project pointing at a different mounted folder:
docker exec basic-memory-server basic-memory project add my-project /app/data/my-project
docker exec basic-memory-server basic-memory project list
Decide upfront whether you want one shared notebook across all your repos, or one project per repo — it’s easier to choose now than to migrate later.
If you just want to have one shared notebook, then ignore project add my-project command.
Step 3: Connect Claude Code
Claude Code connects over SSE, worked fine against the Dockerized server:
claude mcp add --transport sse basic-memory http://localhost:8000/mcpVerify inside Claude Code:
/mcpExpect something like:
Local MCPs (/home/<user>/.claude.json [project: <project path>])
❯ basic-memory · ✔ connected · 23 tools
To remove it:
claude mcp remove basic-memoryThere’s also a Claude Code plugin for session-start briefings and /basic-memory:* commands, optional:
claude plugin marketplace add basicmachines-co/basic-memory --sparse .claude-plugin plugins/claude-code
claude plugin install basic-memory@basicmachines-co
OpenCode example
OpenCode has a native "remote" MCP type, also worked directly against the same server, no proxy. Add to ~/.config/opencode/opencode.json:
{
  "$schema": "https://opencode.ai/config.json",
  "mcp": {
    "basic-memory": {
      "type": "remote",
      "url": "http://localhost:8000/mcp",
      "enabled": true
    }
  }
}
Verify:
opencode mcp listExpect:
┌  MCP Servers
│
●  ✓ basic-memory connected
│      http://localhost:8000/mcp
│
└  1 server(s)
OpenCode’s config shape for remote MCP servers might change, check their docs if it stops working: https://opencode.ai/docs/mcp-servers/
Test it
Ask your connected agent, in plain language:
"Create a note about our project architecture decisions."A Markdown file should appear under ./knowledge on your host in real time. Open it — you’ll see the frontmatter, an Observations list, and a Relations list. That’s the entire format.
Then start a fresh session (or switch agents) and ask:
Retrieve all notes from basic-memoryIf the agent surfaces what you saved earlier, memory is working end to end. In practice it looks like this:
What to put in memory
Good:
- Project conventions
- Folder structure
- Testing framework
- Architecture decisions
- Things the agent should avoid
here is an example from my homepc:
❯ tree knowledge/
knowledge/
└── basic-memory
    ├── conventions
    │   └── Docker Healthcheck Convention.md
    ├── projects
    │   ├── Changelog Conventions.md
    │   ├── Deployment Preferences.md
    │   ├── Git Commit Conventions.md
    │   └── README Conventions.md
    └── services
        ├── Hermes Agent.md
        ├── Port Registry.md
        ├── Port Suggestion Registry.md
        └── Service Registry.md

5 directories, 9 files
Bad:
do not put
- Passwords
- Private keys
- Production tokens
- Customer private data
See the Security notes near the top — treat ./knowledge like any other sensitive project directory, and don’t commit it to a public repo unless that’s actually intended.
Troubleshooting
Agent can’t connect to the MCP server? run the proxy bridge manually and see what breaks:
uvx mcp-proxy http://localhost:8000/mcpYour coding agent cannot connect to an MCP server that isn’t reachable, obviously.
Notes not showing up, or search feels stale:
docker exec basic-memory-server basic-memory status
docker exec basic-memory-server basic-memory doctor
doctor checks file-vs-database consistency and rebuilds the local search index if it’s out of sync.
Running multiple projects and not sure which one is active:
docker exec basic-memory-server basic-memory project listI hope you find the article useful.
That’s it !
-Evaggelos
Want to run modern LLMs locally — with an OpenAI-compatible API, multimodal support, and strong performance on Apple Silicon? This beginner-friendly guide walks you through everything from installation to your first inference request.
No prior ML experience required.
What is vllm-mlx?
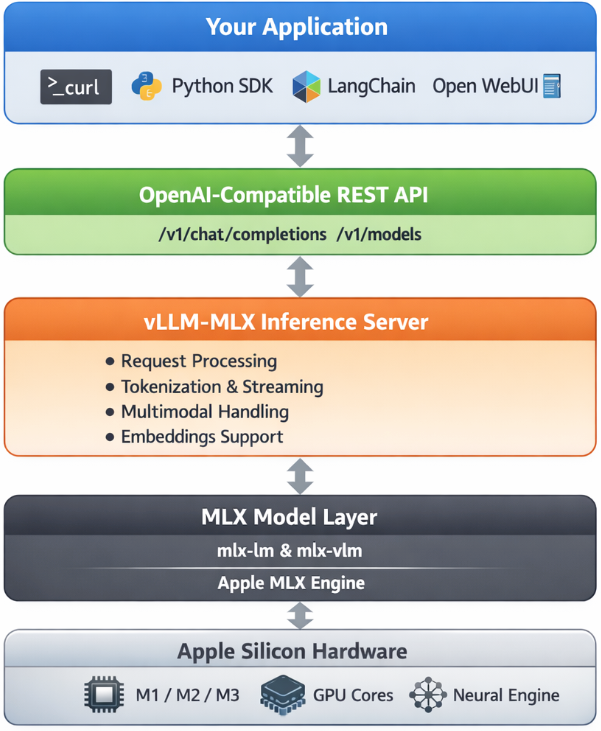
vllm-mlx is a community-driven inference server built specifically for Apple Silicon Macs. It uses MLX, Apple’s machine learning framework designed for M-series chips, and exposes an OpenAI-compatible HTTP API so you can drop it in wherever you’d use the OpenAI SDK.
Think of it as a full, self-contained AI server stack that runs entirely on your Mac.
How does it differ from official vLLM?
| Feature | vLLM (official) | vllm-mlx |
|---|---|---|
| Backend | CUDA (NVIDIA GPUs) | MLX (Apple Silicon) |
| Platform | Linux + NVIDIA | macOS + Apple Silicon |
| Multimodal support | Limited | Built-in (vision, audio, embeddings) |
| API compatibility | OpenAI | OpenAI + Anthropic |
| Architecture | Plugin-based | Standalone framework |
| Built on | vLLM engine internals | mlx-lm, mlx-vlm |
Important: vllm-mlx is not a plugin or fork of official vLLM. It’s a separate framework built from the ground up for Macs.
Architecture overview
When you run vllm-mlx serve, you get a layered system:
Why use vllm-mlx?
It’s the right tool if you want:
- A full-featured local AI server on Apple Silicon
- Text and multimodal inference in a single server
- OpenAI-compatible APIs out of the box
- Fully offline inference — no cloud, no data leaving your machine
System requirements
- macOS with Apple Silicon (M1/M2/M3/M4)
- Python 3.10+
- 16 GB RAM minimum recommended (larger models require more)
Step 1 — Create a clean Python environment
Never install ML tooling into your global Python. Use an isolated virtual environment:
python3 -m venv ~/.venv-vllm-mlx
source ~/.venv-vllm-mlx/bin/activate
Once activated, your shell prompt should change to something like:
(venv-vllm-mlx) yourname@macbook %Alternatively, with virtualenv:
virtualenv venv-vllm-mlx
cd venv-vllm-mlx
source ./bin/activate
Step 2 — Install vllm-mlx
pip install vllm-mlxVerify the installation:
pip list | grep vllmYou should see vllm-mlx in the output.
Step 3 — Start your first model server
We’ll use a 4-bit quantized Llama 3.2 model — small, fast, and a good starting point.
vllm-mlx serve mlx-community/Llama-3.2-3B-Instruct-4bit --port 8010This command will:
- Download the model from HuggingFace (first run only)
- Load it into the MLX backend
- Start an HTTP API server on port 8010
You’ll see log output showing the model loading and the server starting on 0.0.0.0:8010.
Step 4 — Verify the server
Health check
curl -s http://localhost:8010/health | jq .Expected output:
{
  "status": "healthy",
  "model_loaded": true,
  "model_name": "mlx-community/Llama-3.2-3B-Instruct-4bit",
  "model_type": "llm",
  "engine_type": "simple",
  "mcp": null
}
List available models
curl -s http://localhost:8010/v1/models | jq .Expected output:
{
  "object": "list",
  "data": [
    {
      "id": "mlx-community/Llama-3.2-3B-Instruct-4bit",
      "object": "model",
      "created": 1772701579,
      "owned_by": "vllm-mlx"
    }
  ]
}
Step 5 — Send a chat request
Use the OpenAI-compatible /v1/chat/completions endpoint:
curl -s http://127.0.0.1:8010/v1/chat/completions
  -H "Content-Type: application/json"
  -d '{
    "model": "mlx-community/Llama-3.2-3B-Instruct-4bit",
    "messages": [
      {"role": "user", "content": "Hello! What is the capital of Greece?"}
    ],
    "max_tokens": 100
  }' | jq .
Expected response:
{
  "id": "...",
  "object": "chat.completion",
  "choices": [
    {
      "message": {
        "role": "assistant",
        "content": "The capital of Greece is Athens."
      }
    }
  ]
}
You’re now running a local LLM server on your Mac.
Running larger models (advanced)
For high-memory Macs (64 GB+ recommended), you can run much larger models with additional flags:
vllm-mlx serve Qwen/Qwen3.5-35B-A3B-GPTQ-Int4
  --port 8010
  --max-tokens 262144
  --reasoning-parser qwen3
| Flag | Purpose |
|---|---|
--max-tokens 262144 |
Sets a large context window (256k tokens) |
--reasoning-parser qwen3 |
Enables Qwen-specific reasoning output format |
What you can do next
With your local server running, you can connect it to the broader AI tooling ecosystem by pointing any OpenAI-compatible client at http://localhost:8010/v1:
- Open WebUI — browser-based chat UI
- LangChain or LlamaIndex — agent and RAG pipelines
- OpenAI Python SDK — just set
base_url="http://localhost:8010/v1" - Embeddings and multimodal models — swap in a different model and the same API applies
Why Apple Silicon works so well here
On a discrete GPU setup (NVIDIA), model weights must be copied over PCIe from system RAM to VRAM before inference can begin. Apple Silicon eliminates this bottleneck entirely — the CPU and GPU share the same unified memory pool. Combined with Apple’s high memory bandwidth, this makes MLX extremely efficient for inference on models that fit in RAM.
Multimodal routing
When using a vision or audio model, the server adds an extra routing step:
Image / Audio input
        ↓
Multimodal Router (mlx-vlm / audio pipeline)
        ↓
LLM reasoning
        ↓
Text output
No additional services are required — it’s built into the same server process.
How vllm-mlx differs from official vLLM under the hood
Official vLLM:   App → vLLM Engine → CUDA kernels → NVIDIA GPU
vllm-mlx:        App → vllm-mlx Server → MLX tensors → Apple GPU
These are entirely different acceleration stacks. vllm-mlx doesn’t use or depend on any CUDA code.
That’s it. A local, fully offline, OpenAI-compatible LLM server running natively on your Mac.
🚀 Curious about trying out a Large Language Model (LLM) like Mistral directly on your own macbook?
Here’s a simple step-by-step guide I used on my MacBook M1 Pro. No advanced technical skills required, but some techinal command-line skills are needed. Just follow the commands and you’ll be chatting with an AI model in no time.
🧰 What We’ll Need
- LLM: A CLI utility and Python library for interacting with Large Language Models → a command-line tool and Python library that makes it easy to install and run language models.
- Mistral → a modern open-source language model you can run locally.
- Python virtual environment → a safe “sandbox” where we install the tools without messing with the rest of the system.
- MacBook → All Apple Silicon MacBooks (M1, M2, M3, M4 chips) feature an integrated GPU on the same chip as the CPU.
🧑🔬 About Mistral 7B
Mistral 7B is a 7-billion parameter large language model, trained to be fast, efficient, and good at following instructions.
Technical requirements (approximate):
- Full precision model (FP16) → ~13–14 GB of RAM (fits best on a server or high-end GPU).
- Quantized model (4-bit, like the one we use here) → ~4 GB of RAM, which makes it practical for a MacBook or laptop.
- Disk storage → the 4-bit model download is around 4–5 GB.
- CPU/GPU → runs on Apple Silicon (M1/M2/M3) CPUs and GPUs thanks to the MLX library. It can also run on Intel Macs, though it may be slower.
👉 In short:
With the 4-bit quantized version, you can run Mistral smoothly on a modern MacBook with 8 GB RAM or more. The more memory and cores you have, the faster it runs.
⚙️ Step 1: Create a Virtual Environment
We’ll create a clean workspace just for this project.
python3 -m venv ~/.venvs/llm

source ~/.venvs/llm/bin/activate
👉 What happens here:
python3 -m venvcreates a new isolated environment namedllm.source .../activateswitches you into that environment, so all installs stay inside it.
📦 Step 2: Install the LLM Tool
Now, let’s install LLM.
pip install -U llm👉 This gives us the llm command we’ll use to talk to models.
🛠️ Step 3: Install Extra Dependencies
Mistral needs a few extra packages:
pip install mlx

pip install sentencepiece
👉 mlx is Apple’s library that helps models run efficiently on Mac.
👉 sentencepiece helps the model break down text into tokens (words/pieces).
🔌 Step 4: Install the Mistral Plugin
We now connect LLM with Mistral:
llm install llm-mlx👉 This installs the llm-mlx plugin, which allows LLM to use Mistral models via Apple’s MLX framework.
Verify the plugin with this
llm pluginsresult should look like that:
[
  {
    "name": "llm-mlx",
    "hooks": [
      "register_commands",
      "register_models"
    ],
    "version": "0.4"
  }
]
⬇️ Step 5: Download the Model
Now for the fun part — downloading Mistral 7B.
llm mlx download-model mlx-community/Mistral-7B-Instruct-v0.3-4bit👉 This pulls down the model from the community in a compressed, 4-bit version (smaller and faster to run on laptops).
Verify the model is on your system:
llm models | grep -i mistraloutput should be something similar with this:
MlxModel: mlx-community/Mistral-7B-Instruct-v0.3-4bit (aliases: m7)🏷️ Step 6: Set a Shortcut (Alias)
Typing the full model name is long and annoying. Let’s create a shortcut:
llm aliases set m7 mlx-community/Mistral-7B-Instruct-v0.3-4bit👉 From now on, we can just use -m m7 instead of the full model name.
💡 Step 7: One last thing
if you are using Homebrew then most probably you already have OpenSSL on your system, if you do not know what we are talking about, then you are using LibreSSL and you need to make a small change:
pip install "urllib3<2"only if you are using brew run:
brew install openssl@3💬 Step 8: Ask Your First Question
Time to chat with Mistral!
llm -m m7 'Capital of Greece ?'
👉 Expected result:
The model should respond with:
Athens🎉 Congratulations — you’ve just run a powerful AI model locally on your Mac!
👨💻 A More Technical Example
Mistral isn’t only for trivia — it can help with real command-line tasks too.
For example, let’s ask it something more advanced:
llm -m m7 'On Arch Linux, give only the bash command using find
 that lists files in the current directory larger than 1 GB,
 do not cross filesystem boundaries. Output file sizes in
 human-readable format with GB units along with the file paths.
 Return only the command.'
👉 Mistral responds with:
find . -type f -size +1G -exec du -sh {} +
💡 What this does:
find . -type f -size +1G→ finds files bigger than 1 GB in the current folder.-exec ls -lhS {} ;→ runslson each file to display the size in human-readable format (GB).
This is the kind of real-world productivity boost you get by running models locally.
Full text example output:
This command will find all files (
-type f) larger than 1 GB (-size +1G) in the current directory (.) and execute thedu -shcommand on each file to display the file size in a human-readable format with GB units (-h). The+after-exectellsfindto execute the command once for each set of found files, instead of once for each file.
🌟 Why This Is Cool
- 🔒 No internet needed once the model is downloaded.
- 🕵️ Privacy: your text never leaves your laptop.
- 🧪 Flexible: you can try different open-source models, not just Mistral.
though it won’t be as fast as running it in the cloud.
That’s it !
PS. These are my personal notes from my home lab; AI was used to structure and format the final version of this blog post.
🖥️ I’ve been playing around with the python cli LLM and Perplexity, trying to get a setup that works nicely from the command line. Below are my notes, with what worked, what I stumbled on, and how you can replicate it.
📌 Background & Why
I like working with tools that let me automate or assist me with shell commands, especially when exploring files, searching, or scripting stuff. LLM + Perplexity give me that power: AI suggestions + execution.
If you’re new to this, it helps you avoid googling every little thing, but still keeps you in control.
Also, I have a Perplexity Pro account, and I want to learn how to use it from my Linux command line.
⚙️ Setup: Step by Step
1️⃣ Prepare a Python virtual environment
I prefer isolating things so I don’t mess up my global Python. Here’s how I did it by creating a new python virtual environment and activate it:
PROJECT="llm"

python3 -m venv ~/.venvs/${PROJECT}
source ~/.venvs/${PROJECT}/bin/activate

# Install llm project
pip install -U ${PROJECT}
This gives you a clean llm install.
2️⃣ Get Perplexity API key 🔑
You’ll need an API key from Perplexity to use their model via LLM.
-
Go to Perplexity.ai 🌐
-
Sign in / register
-
Go to your API keys page: https://www.perplexity.ai/account/api/keys
-
Copy your key
Be careful, in order to get the API, you need to type your Bank Card details. In my account, I have a free tier of 5 USD. You can review your tokens via the Usage metrics in Api Billing section.
3️⃣ Install plugins for LLM 🧩
I used two plugins:
-
⚡
llm-cmd— for LLM to suggest/run shell commands -
🔍
llm-perplexity— so LLM can use Perplexity as a model provider
Commands:
llm install llm-cmd

llm install llm-perplexity
Check what’s installed:
llm plugins
Sample output:
[
  {
    "name": "llm-cmd",
    "hooks": [
      "register_commands"
    ],
    "version": "0.2a0"
  },
  {
    "name": "llm-perplexity",
    "hooks": [
      "register_models"
    ],
    "version": "2025.6.0"
  }
]
4️⃣ Configure your Perplexity key inside LLM 🔐
Tell LLM your Perplexity key so it can use it:
❯ llm keys set perplexity
# then paste your API key when prompted
Verify:
❯ llm keys
perplexity
You should just see “perplexity” listed (or the key name), meaning it is stored.
Available models inside LLM 🔐
Verify and view what are the available models to use:
llm models
the result on my setup, with perplexity enabled is:
OpenAI Chat: gpt-4o (aliases: 4o)
OpenAI Chat: chatgpt-4o-latest (aliases: chatgpt-4o)
OpenAI Chat: gpt-4o-mini (aliases: 4o-mini)
OpenAI Chat: gpt-4o-audio-preview
OpenAI Chat: gpt-4o-audio-preview-2024-12-17
OpenAI Chat: gpt-4o-audio-preview-2024-10-01
OpenAI Chat: gpt-4o-mini-audio-preview
OpenAI Chat: gpt-4o-mini-audio-preview-2024-12-17
OpenAI Chat: gpt-4.1 (aliases: 4.1)
OpenAI Chat: gpt-4.1-mini (aliases: 4.1-mini)
OpenAI Chat: gpt-4.1-nano (aliases: 4.1-nano)
OpenAI Chat: gpt-3.5-turbo (aliases: 3.5, chatgpt)
OpenAI Chat: gpt-3.5-turbo-16k (aliases: chatgpt-16k, 3.5-16k)
OpenAI Chat: gpt-4 (aliases: 4, gpt4)
OpenAI Chat: gpt-4-32k (aliases: 4-32k)
OpenAI Chat: gpt-4-1106-preview
OpenAI Chat: gpt-4-0125-preview
OpenAI Chat: gpt-4-turbo-2024-04-09
OpenAI Chat: gpt-4-turbo (aliases: gpt-4-turbo-preview, 4-turbo, 4t)
OpenAI Chat: gpt-4.5-preview-2025-02-27
OpenAI Chat: gpt-4.5-preview (aliases: gpt-4.5)
OpenAI Chat: o1
OpenAI Chat: o1-2024-12-17
OpenAI Chat: o1-preview
OpenAI Chat: o1-mini
OpenAI Chat: o3-mini
OpenAI Chat: o3
OpenAI Chat: o4-mini
OpenAI Chat: gpt-5
OpenAI Chat: gpt-5-mini
OpenAI Chat: gpt-5-nano
OpenAI Chat: gpt-5-2025-08-07
OpenAI Chat: gpt-5-mini-2025-08-07
OpenAI Chat: gpt-5-nano-2025-08-07
OpenAI Completion: gpt-3.5-turbo-instruct (aliases: 3.5-instruct, chatgpt-instruct)
Perplexity: sonar-deep-research
Perplexity: sonar-reasoning-pro
Perplexity: sonar-reasoning
Perplexity: sonar-pro
Perplexity: sonar
Perplexity: r1-1776
Default: gpt-4o-mini
as of this blog post date written.
🚀 First Use: Asking LLM to Suggest a Shell Command
okay, here is where things get fun.
I started with something simply, identify all files that are larger than 1GB and I tried this prompt:
llm -m sonar-pro cmd "find all files in this local directory that are larger than 1GB"
It responded with something like:
Multiline command - Meta-Enter or Esc Enter to execute
> find . -type f -size +1G -exec ls -lh {} ;

  ## Citations:
  [1] https://tecadmin.net/find-all-files-larger-than-1gb-size-in-linux/
  [2] https://chemicloud.com/kb/article/find-and-list-files-bigger-or-smaller-than-in-linux/
  [3] https://manage.accuwebhosting.com/knowledgebase/3647/How-to-Find-All-Files-Larger-than-1GB-in-Linux.html
  [4] https://hcsonline.com/support/resources/blog/find-files-larger-than-1gb-command-line

Aborted!
I did not want to execute this, so I interrupted the process.
💡 Tip: Always review AI-suggested commands before running them — especially if they involve find /, rm -rf, or anything destructive.
📂 Example: Running the command manually
If you decide to run manually, you might do:
find . -xdev -type f -size +1G -exec ls -lh {} ;
My output was like:
-rw-r--r-- 1 ebal ebal 3.5G Jun  9 11:20 ./.cache/colima/caches/9efdd392c203dc39a21e37036e2405fbf5b0c3093c55f49c713ba829c2b1f5b5.raw
-rw-r--r-- 1 ebal ebal 13G Jun  9 11:58 ./.local/share/rancher-desktop/lima/0/diffdisk
Cool way to find big files, especially if disk is filling up 💾.
🤔 Things I Learned / Caveats
-
⚠️ AI-suggested commands are helpful, but sometimes they assume things (permissions, paths) that I didn’t expect.
-
🐍 Using a virtual env helps avoid version mismatches.
-
🔄 The plugins sometimes need updates; keep track of version changes.
-
🔑 Be careful with your API key — don’t commit it anywhere.
✅ Summary & What’s Next
So, after doing this:
-
🛠️ Got
llmworking with Perplexity -
📜 Asked for shell commands
-
👀 Reviewed + tested output manually
Next, I would like to run Ollama in my home lab. I don’t have a GPU yet, so I’ll have to settle for Docker on an old CPU, which means things will be slow and require some patience. I also want to play around with mixing an LLM and tools like Agno framework to set up a self-hosted agentic solution for everyday use.
That’s it !
PS. These are my personal notes from my home lab; AI was used to structure and format the final version of this blog post.