





I am in the process of migrating my self-hosted email server to a new virtual private server. I also want to upgrade and test some new features, more specifically add oauth2 capabilities with an authentication and authorization server. To avoid big mistakes and keeping my current backend, I looked into how to proxy IMAP traffic to a new mail setup.
Fortunately, dovecot, has the ability to act as an imap proxy. The setup is really easy. I will run everything local on my archlinux homepc, so I do not need to expose anything till I am ready. My preferred way to run services is via containers and docker compose make this really easy.
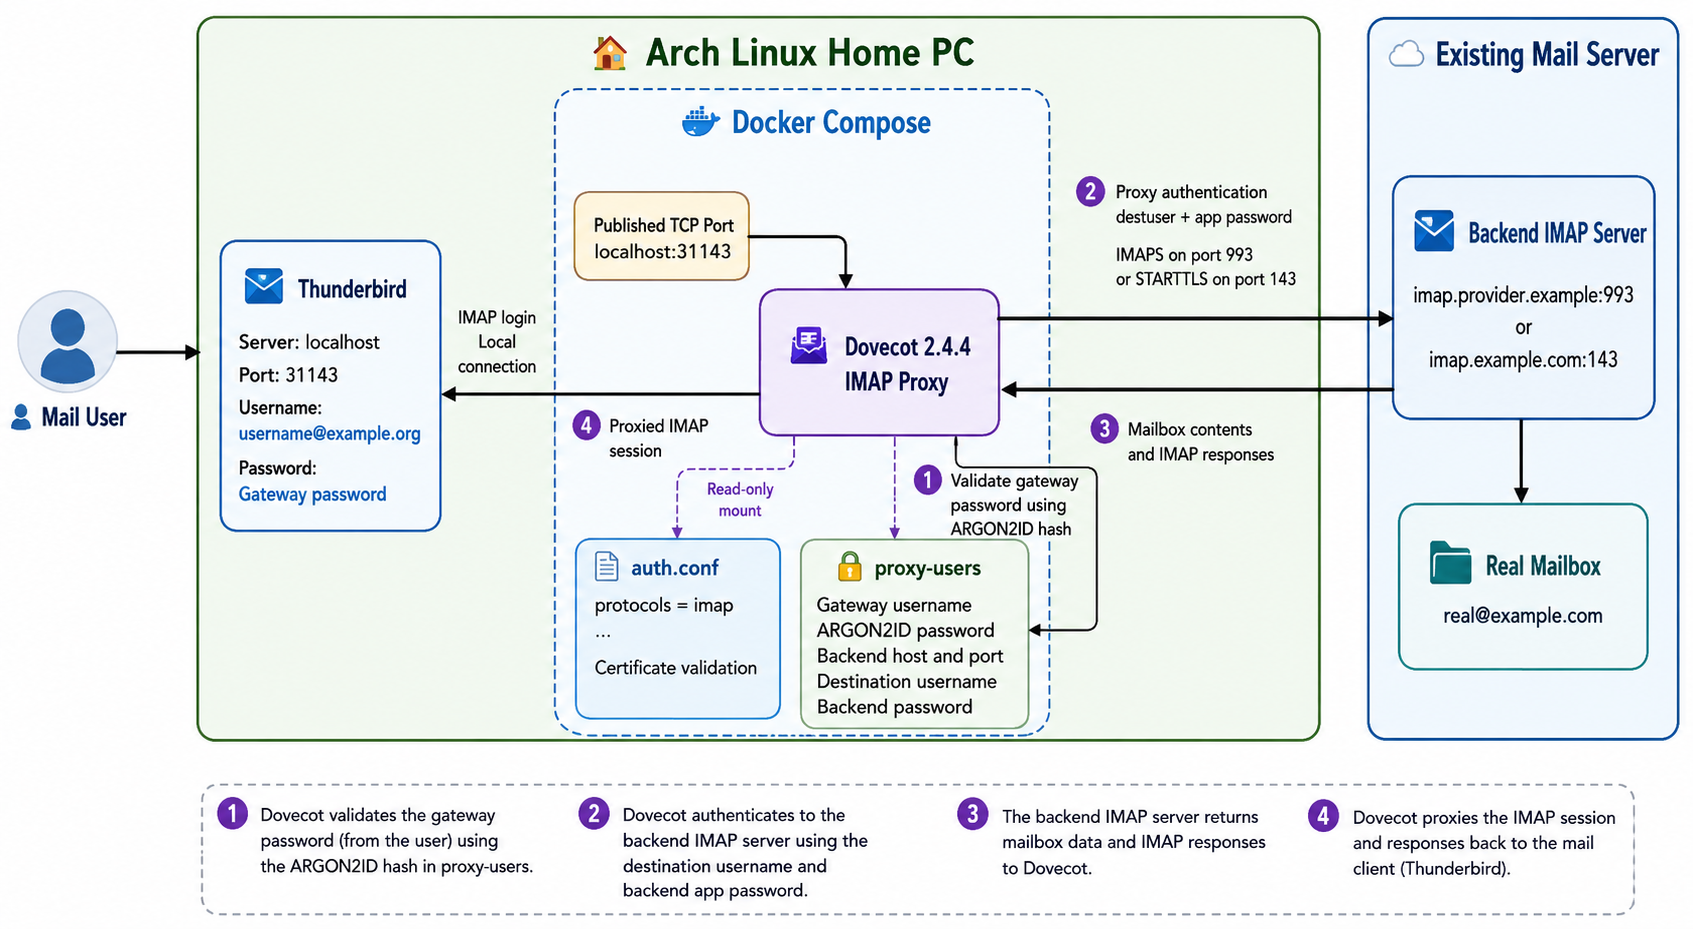
dovecot docker compose
Let’s start with the dovecot docker compose setup.
docker-compose.yml
---
services:
  dovecot:
    image: dovecot/dovecot:2.4.4
    container_name: dovecot
    restart: unless-stopped
    ports:
      - 31143:31143
    volumes:
      - ./auth.conf:/etc/dovecot/conf.d/auth.conf:ro
      - ./proxy-users:/etc/dovecot/proxy-users:ro
Note: You can either use latest tag if you prefer. It is a best practice to avoid latest so you always know what is the running version, but you can also use dovecot/dovecot:latest if you like.
Run the below command to download the container image:
docker compose -v pulldovecot configuration
Now, let’s dive into the configuration files.
auth.conf
# Tells Dovecot to only load and listen for the IMAP protocol.

# Enable only the IMAP protocol.
protocols = imap

# Authentication used by the IMAP client.
auth_mechanisms = plain login

# Required when the IMAP client connects without TLS.
# Safe only on a private, non-published Docker network.
auth_allow_cleartext = yes

# Authenticate the local gateway account and return proxy fields.
passdb passwd-file {
    passwd_file_path = /etc/dovecot/proxy-users
}

# Tells Dovecot which Certificate Authorities (CAs) to trust.

# Use ca-certificates to check TLS/SSL
ssl_client_ca_file = /etc/ssl/certs/ca-certificates.crt

# enforces strict certificate validation
ssl_client_require_valid_cert = yes
Let’s explain everything.
This is a local instance, so there is no need to be extravagance configuration.
- Enable only the IMAP protocol.
- Enable plain login for the imap client e.g. thunderbird.
- Allow clear text password, as we do not have TLS (for now).
- Use a text file for username, password and proxy to the real imap mail server.
- Enable TLS/SSL check (our real imap server uses startTLS) and
- Validate the certificate of our real imap server.
Start the dovecot docker compose service
docker compose -v up
No worries if it fails, the
Username and Password
Now the important thing, how to create a new user and how to proxy to the real imap mail server !
But before that, let’s create a new secure password:
docker compose exec dovecot doveadm pw -s ARGON2ID
This is a test password.
a full example
❯ docker compose exec dovecot doveadm pw -s ARGON2ID

Enter new password: <test>
Retype new password: <test>

{ARGON2ID}$argon2id$v=19$m=65536,t=3,p=1$I4BtU8w1KdKI6DNxdJ4aNQ$gP+dEXRDp7vD7IBirwHPe3HqXPwKfbDV+nh8qsdBhaE
It is important to keep the output.
Next item on the list, to select a new username.
And I chose: username@example.org 🙂
For SSL (TCP Port: 993), the proxy settings are:
host=imap.provider.example
port=993
ssl=yes
destuser=real@example.com
pass=app-password
For starttls the proxy settings are:
host=imap.example.com
port=143 starttls=yes
destuser=real@example.com
pass=REAL_APP_PASSWORD
proxy_mech=CRAM-MD5
And I’ve added the CRAM-MD5 (encrypted password) just for additional info.
Now, let’s put everything together
vim proxy-users
{ARGON2ID}$argon2id$v=19$m=65536,t=3,p=1$I4BtU8w1KdKI6DNxdJ4aNQ$gP+dEXRDp7vD7IBirwHPe3HqXPwKfbDV+nh8qsdBhaE::::::proxy=y host=imap.provider.example port=993 ssl=yes destuser=real@example.com pass=app-passwordAnd make sure you change ownership and permissions before you start the container.
sudo chown 1000:1000 proxy-users
sudo chmod 600 proxy-users
Let’s recreate or stop/start dovecot docker compose and test it
docker compose -v down
docker compose -v up -d
thunderbird
finally let’s check our mail client
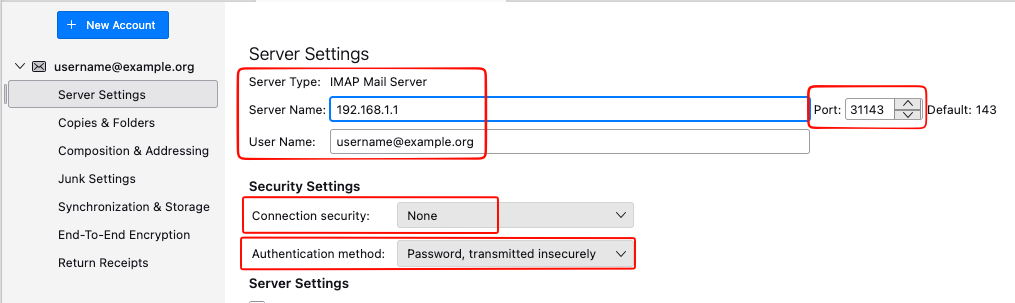
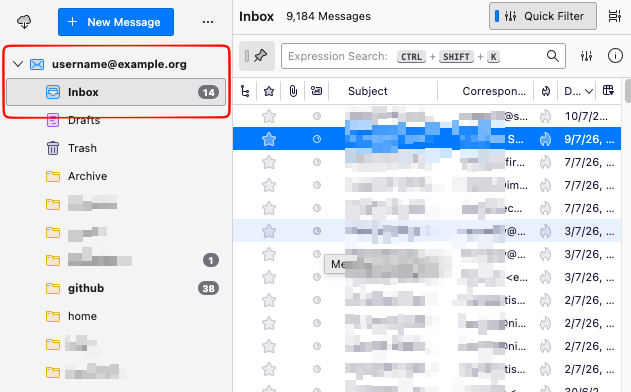
That’s it!
Evaggelos
LiteLLM AI Gateway (LLM Proxy)
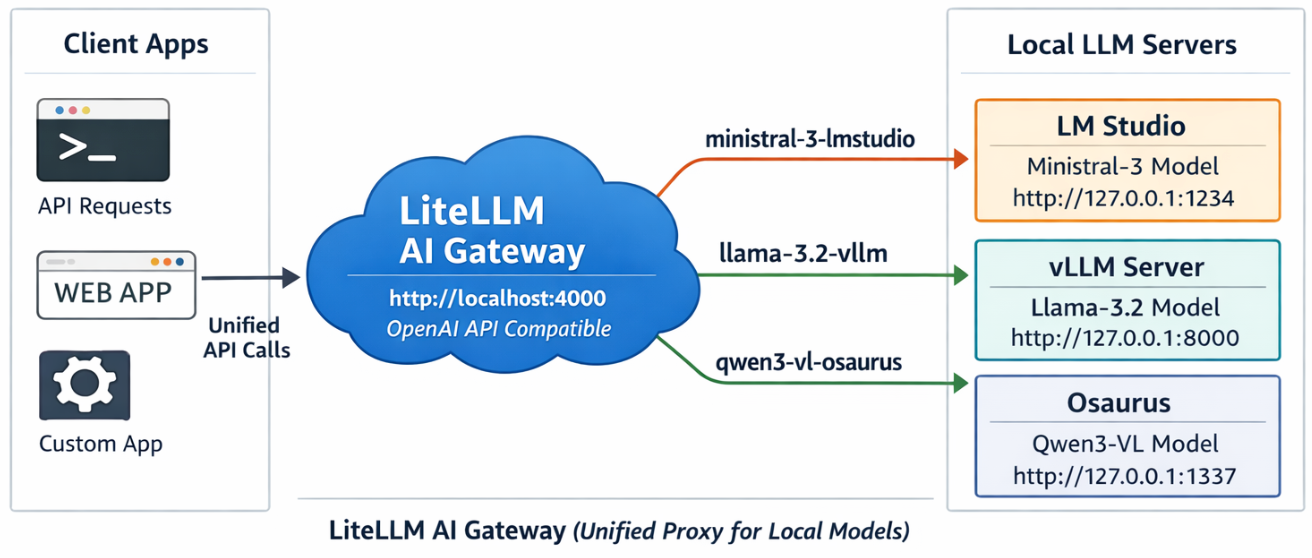
This project shows a simple pattern: run multiple local model servers, place LiteLLM in front of them, and expose one OpenAI-compatible endpoint for apps to use.
In this setup, Lite LLM sits on http://127.0.0.1:4000/v1 and routes requests to:
- LM Studio on port
1234 - vLLM on port
8000 - Osaurus on port
1337
That gives you one clean API for local testing, model switching, and app integration.
Why this setup is useful
If you already have local models running in different tools, LiteLLM gives you one gateway instead of several different endpoints.
That means you can:
- keep one API base URL
- switch models by alias
- expose multiple local backends behind the same interface
- plug the endpoint into apps that expect an OpenAI-style API
What this article shows
This guide walks through the full flow:
- LiteLLM exposes
/v1/modelsand returns the three configured aliases. - A chat app can select one of those LiteLLM model names and answer normally.
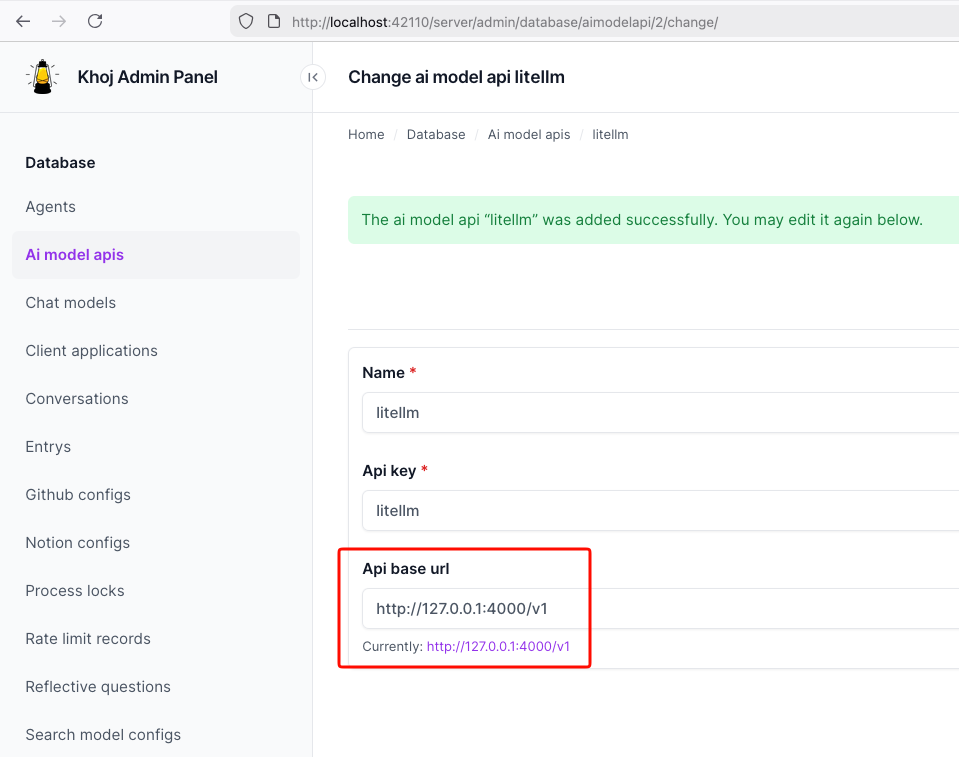
- Khoj can be pointed at LiteLLM by setting the API base to
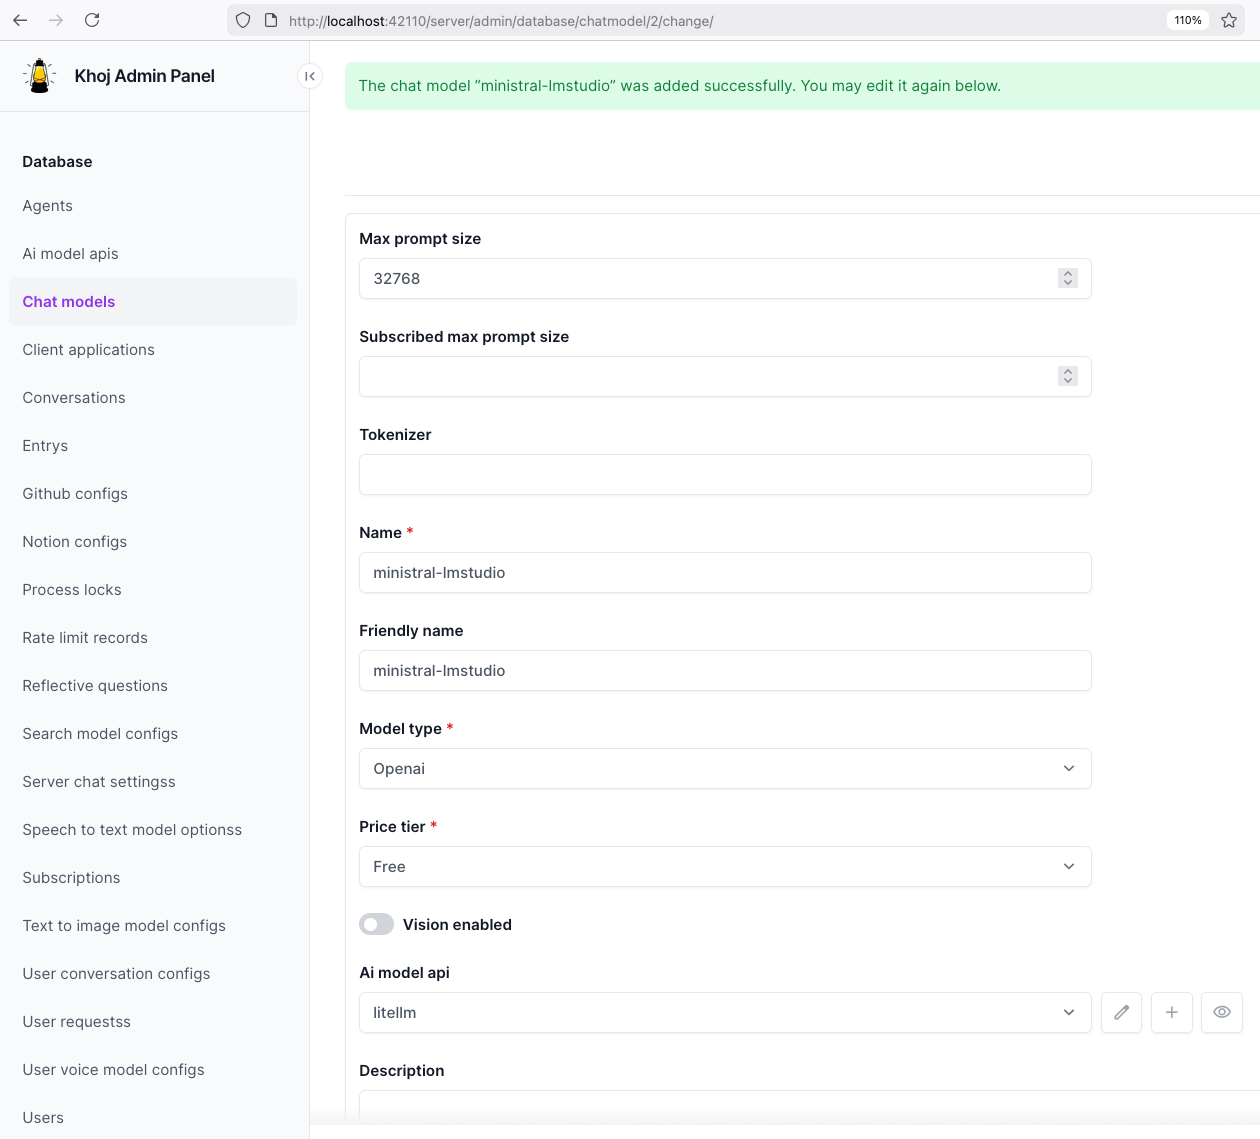
http://127.0.0.1:4000/v1. - Khoj chat models can then use a LiteLLM alias such as
ministral-lmstudio.
Quick start
Use Python 3.12 or 3.13 for the LiteLLM virtual environment to avoid uvloop path a known incompatibility with Python 3.14’s asyncio internals.
Set up a virtual environment
virtualenv -p python3.12 venv-litellm/
cd venv-litellm/
source ./bin/activate

pip install "litellm[proxy]"
LiteLLM Configuration
Create config.yaml:
Below is an example based on my local setup.
model_list:
  - model_name: ministral-lmstudio
    litellm_params:
      model: openai/mistralai/ministral-3-3b
      api_base: http://127.0.0.1:1234/v1
      api_key: lmstudio

  - model_name: llama3-vllm
    litellm_params:
      model: openai/mlx-community/Llama-3.2-3B-Instruct-4bit
      api_base: http://127.0.0.1:8000/v1
      api_key: vllm

  - model_name: qwen3-osaurus
    litellm_params:
      model: openai/qwen3.5-0.8b-mlx-4bit
      api_base: http://127.0.0.1:1337/v1
      api_key: osaurus
You need the openai/ prefix for each model to use LiteLLM’s OpenAI-compatible provider.
Start LiteLLM
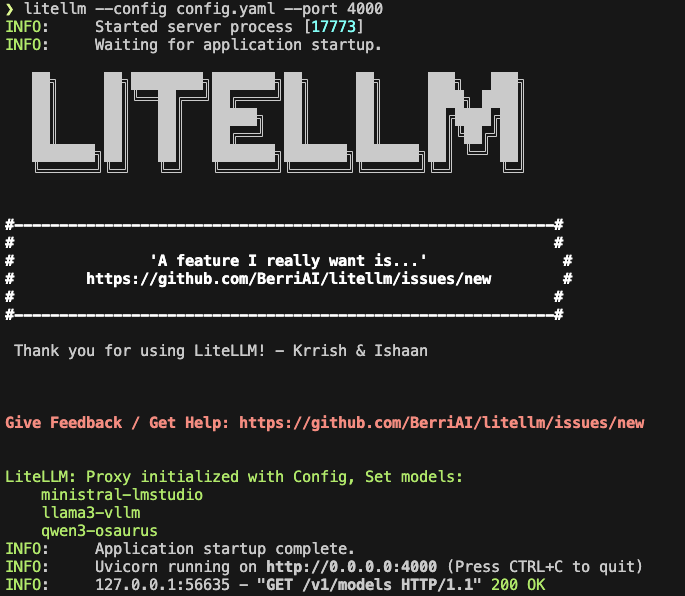
litellm --config config.yaml --port 4000If LiteLLM starts correctly, you should see the three model aliases loaded.
Test the proxy
List models:
curl -s http://127.0.0.1:4000/v1/models | jq .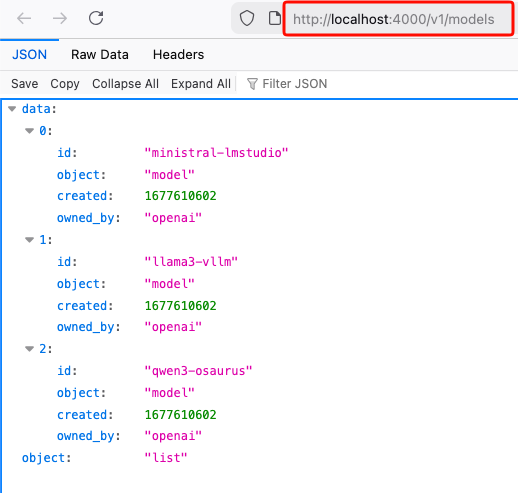
Test chat
Send a chat request:
curl -s http://127.0.0.1:4000/v1/chat/completions
  -H "Content-Type: application/json"
  -d '{
    "model": "ministral-lmstudio",
    "messages": [
      {"role": "user", "content": "Capital of Greece?"}
    ]
  }' | jq .
If everything is wired correctly, LiteLLM will forward the request to the matching backend and return a normal OpenAI-style response.
A typical result looks like this:
{
  "id": "chatcmpl-oukopuooxti6xg92g6qx9b",
  "created": 1773142359,
  "model": "ministral-lmstudio",
  "object": "chat.completion",
  "system_fingerprint": "mistralai/ministral-3-3b",
  "choices": [
    {
      "finish_reason": "stop",
      "index": 0,
      "message": {
        "content": "The capital of Greece is **Athens**.",
        "role": "assistant",
        "provider_specific_fields": {
          "refusal": null
        }
      },
      "provider_specific_fields": {}
    }
  ],
  "usage": {
    "completion_tokens": 10,
    "prompt_tokens": 539,
    "total_tokens": 549
  },
  "stats": {}
}
Connect LiteLLM to Khoj
You can use the same LiteLLM endpoint with any app that supports an OpenAI-style API. In this example, I use Khoj.
Once LiteLLM is running, Khoj only needs one API configuration:
- Name:
litellm - API key:
litellm - API base URL:
http://127.0.0.1:4000/v1
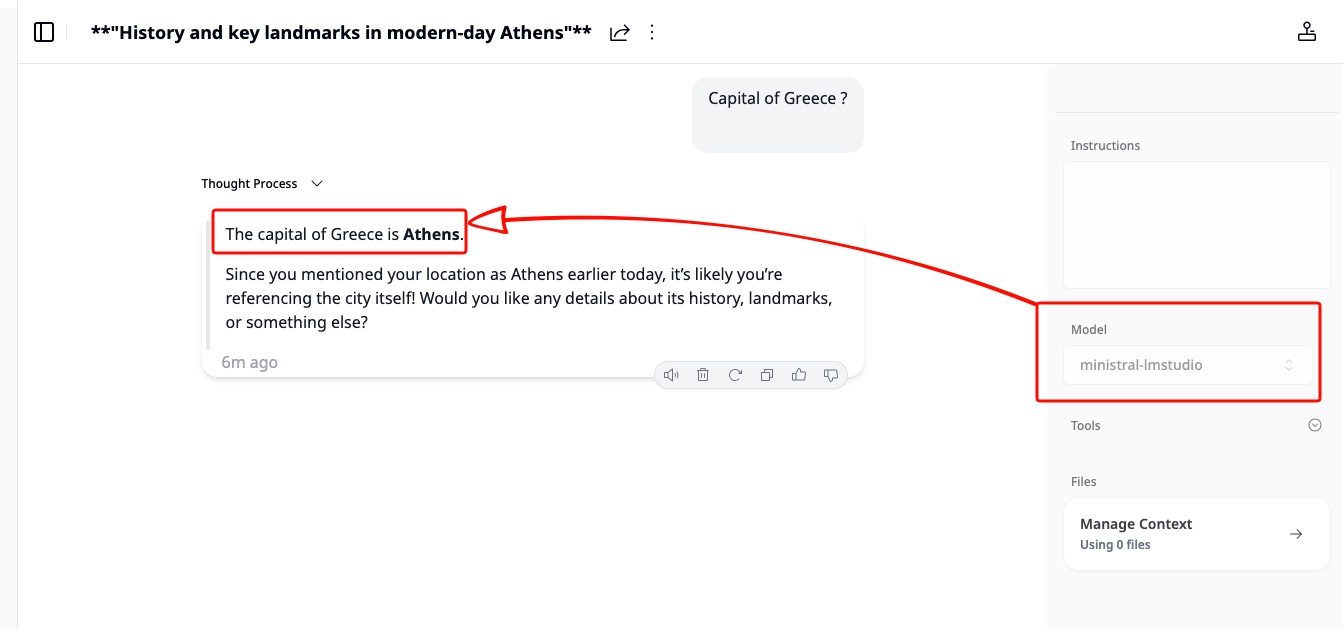
Then create a chat model in Khoj using one of the LiteLLM aliases, for example:
ministral-lmstudio
That is the key idea of this project: Khoj does not need to know whether the model is coming from LM Studio, vLLM, or Osaurus. It only talks to LiteLLM.
Khoj AI model API configuration
Khoj chat model configuration
Khoj using a LiteLLM chat model
That’s it!