





Disclaimer, this blog post is a proof of concept and not a security proposal. Change the HOST PATH to a specific directory.
Prologue
Coding Agents are a useful tool. They can access remote servers using ssh and then run all investigation commands on the destination. They can gather information, read and review all files and also make changes. It can read your secrets and audit your system. For me it’s a tool, how to use it it’s up to you. I have rebuild my homeassistant into an old laptop which has no other secrets than accessing local devices and I can create my automations from my agent. It’s useful.
I also want to use agents or subagents to audit remote systems, do investigations and produce reports for me to read. But I do not want agents to modify the remote system in any way. It should read files, look around, and help me understand what is running there — without giving it a real login and, more importantly, without letting it change anything. No write access, no root access to the actual VPS, and ideally no chance of an “oops, deleted a config” or drop a database.
Idea and architecture
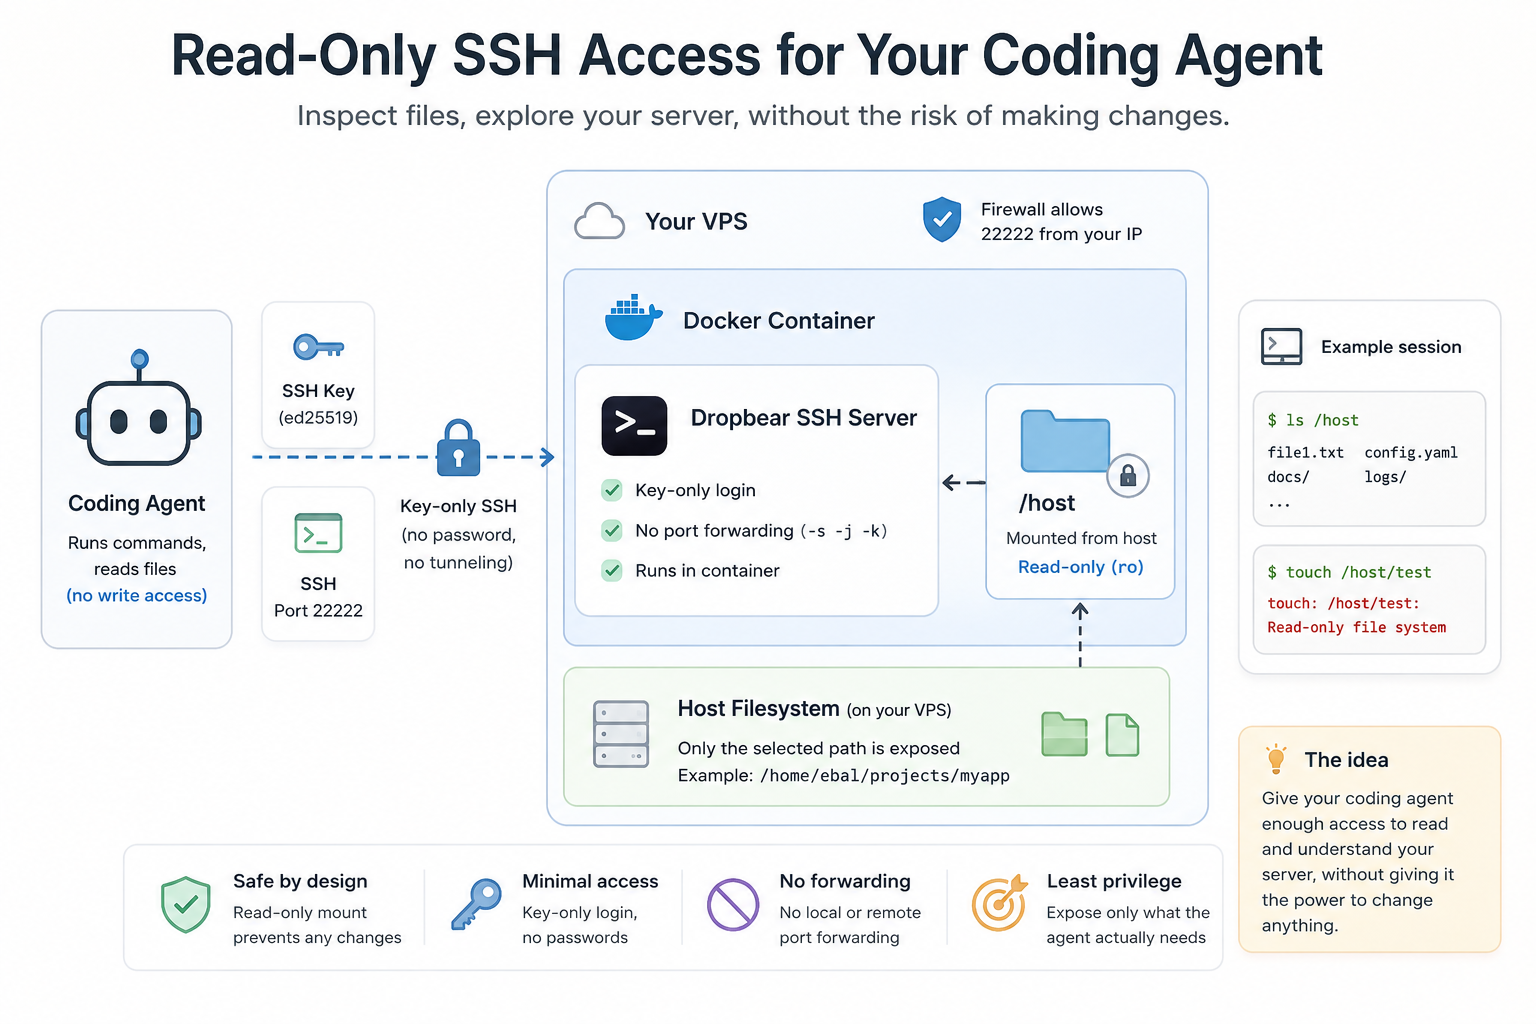
What I ended up with is pretty small and perhaps boring, which is exactly what I wanted: a tiny dropbear SSH server running in a docker container, with the part of the filesystem I want to expose mounted read-only.
This is how to reproduce it.
Dropbear is an SSH server and client. It is designed as a small-footprint alternative to OpenSSH, mostly for embedded systems, but it also works nicely for a throwaway, single-purpose SSH endpoint like this.
Step 1: make an SSH key just for this
Do not reuse your main SSH key for this. Generate a separate one, dedicated for the agent:
ssh-keygen -t ed25519
  -f ~/.ssh/dropbear_readonly
  -C "dropbear_readonly"
  -N ""
This gives you two files:
dropbear_readonly— keep this private. This is what the AI agent (or you) will use to log in.dropbear_readonly.pub— this one is fine to share. It actually goes on the server.
❯ ll
drwxr-xr-x   - ebal ebal 18 Aug 12:40 ..
drwxr-xr-x   - ebal ebal 18 Aug 12:41 .
.rw------- 411 ebal ebal 18 Aug 12:41 dropbear_readonly
.rw-r--r-- 103 ebal ebal 18 Aug 12:41 dropbear_readonly.pub
Step 2: the docker-compose.yml
ssh into the remote vps and inside a new service folder, create a file called docker-compose.yml:
---
services:
  ssh:
    image: alpine:latest
    restart: unless-stopped

    ports:
      - "${SSH_PORT:-22222}:22"

    volumes:
      - ${HOST_PATH:-/opt}:/host:ro
      - ./authorized_keys:/root/.ssh/authorized_keys:ro
      - dropbear-keys:/etc/dropbear

    command: >
      sh -c "
        apk add --no-cache dropbear bash &&
        mkdir -p /root/.ssh &&
        chmod 700 /root/.ssh &&
        exec dropbear -F -E -R -s -j -k -p 22
      "

    healthcheck:
      test: ["CMD", "pidof", "dropbear"]
      interval: 30s
      timeout: 3s
      retries: 3
      start_period: 10s

volumes:
  dropbear-keys:
The 2 parts you need to care about the most from a security point of view are these:
-
${HOST_PATH:-/opt}:/host:ro— this is the folder from the VPS that gets exposed inside the container. The important thing isro: the mount is read-only. -
Dropbear flags:
-s disables password authentication.
-j disables local forwarding, including Unix stream forwarding.
-k disables remote forwarding.
The container itself runs as root internally, but /host is still mounted read-only.
This is not a security advice.
Below you will also see an example with
/and important files like/host/var/run/docker.sockwill be exposed!
additional container hardening
read_only: true

security_opt:
  - no-new-privileges:true
Step 3: tell it which folder to share, and which port to use
I would not leave HOST_PATH at /opt unless that’s actually what you want to expose.
Again, it is better to point it at the specific project or directory the agent needs to inspect, rather than something broad like your whole home directory.
Create a .env file next to the compose file:
❯ cat > .env <<'EOF'
SSH_PORT=22222
HOST_PATH=/home/ebal/projects/myapp
EOF
or change the default values directly in the docker compose yaml file.
Step 4: add the public ssh key
Copy the .pub file you generated into an authorized_keys file in the same folder:
❯ mv dropbear_readonly.pub authorized_keys
 renamed 'dropbear_readonly.pub' -> 'authorized_keys'
Step 5: start dropbear
❯ docker compose upexample output:
❯ docker compose up

[+] up 2/2
 ✔ Network dropbear-ssh_default Created                                                                                                                                    0.4s
 ✔ Container dropbear-ssh-ssh-1 Created                                                                                                                                    0.3s
Attaching to ssh-1
ssh-1  | (1/7) Installing ncurses-terminfo-base (6.6_p20260516-r0)
ssh-1  | (2/7) Installing libncursesw (6.6_p20260516-r0)
ssh-1  | (3/7) Installing readline (8.3.3-r1)
ssh-1  | (4/7) Installing bash (5.3.9-r1)
ssh-1  |   Executing bash-5.3.9-r1.post-install
ssh-1  | (5/7) Installing skalibs-libs (2.15.0.0-r0)
ssh-1  | (6/7) Installing utmps-libs (0.1.3.3-r0)
ssh-1  | (7/7) Installing dropbear (2026.91-r0)
ssh-1  | Executing busybox-1.37.0-r31.trigger
ssh-1  | OK: 10.7 MiB in 23 packages
ssh-1  | [1] Aug 18 09:51:22 Not backgrounding
ssh-1  | [20] Aug 18 09:51:32 Child connection from 192.168.1.72:56149
ssh-1  | [20] Aug 18 09:51:34 Pubkey auth succeeded for 'root' with ssh-ed25519 key

w Enable Watch   d Detach
Then check that it actually came up:
❯ docker compose ps

NAME                  STATUS
dropbear-readonly-ssh-1  Up 12 seconds (healthy)
Step 6: test the login from your laptop
Back on your own machine:
❯ ssh -i ~/.ssh/dropbear_readonly -p 22222 root@your-vps-ipYou should land in a shell. /host is the project folder from your VPS, mounted read-only.
Is it real a readonly filesystem ?
Let’s test it, shall we ?
2420d93953fd:~# tail /host/etc/passwd

fwupd:x:969:969:Firmware update daemon:/var/lib/fwupd:/usr/bin/nologin
passim:x:968:968:Local Caching Server:/usr/share/empty:/usr/bin/nologin
alpm:x:967:967:Arch Linux Package Management:/:/usr/bin/nologin
beszel:x:1003:1005::/home/beszel:/bin/false
cups:x:209:209:cups helper user:/:/usr/bin/nologin
ntp:x:87:87:Network Time Protocol:/var/lib/ntp:/bin/false
minio:x:103:103:Minio Daemon User:/var/lib/minio:/usr/bin/nologin
pcscd:x:963:963:PC/SC Smart Card Daemon:/:/usr/bin/nologin
privoxy:x:42:42:Privoxy:/:/usr/bin/nologin
systemd-imds:x:948:948:systemd Instance Metadata:/:/usr/bin/nologin

2420d93953fd:~# rm -f /host/etc/passwd
rm: can't remove '/host/etc/passwd': Read-only file system

2420d93953fd:~# touch /host/root/file1
touch: /host/root/file1: Read-only file system
That Read-only file system error is basically the whole point.
That’s what you want to see.
Step 7: point the coding agent at it
Now give the coding agent the same three things you just used yourself:
- the host
- the port (
22222) - the private key (
dropbear_readonly)
Depending on the agent, that might be an SSH config entry, or just those values entered into some kind of remote filesystem / SSH setup.
Once connected, it can read and list files under /host, but it can’t modify, delete, or create anything there. If it tries, it’ll get the same Read-only file system error you saw above.
Or even better, update your .ssh/config
Host readonly
    Hostname <your-vps-ip>
    Port 22222
    User root
    IdentityFile ~/.ssh/dropbear_readonly
That’s it.
-Evaggelos
PS. An alternative method
There is always a similar and different solution, to run a coding agent directly to the destination (remote) server and keep the agent only to a specific directory. With this alternative solution we need an agent to each remote server.
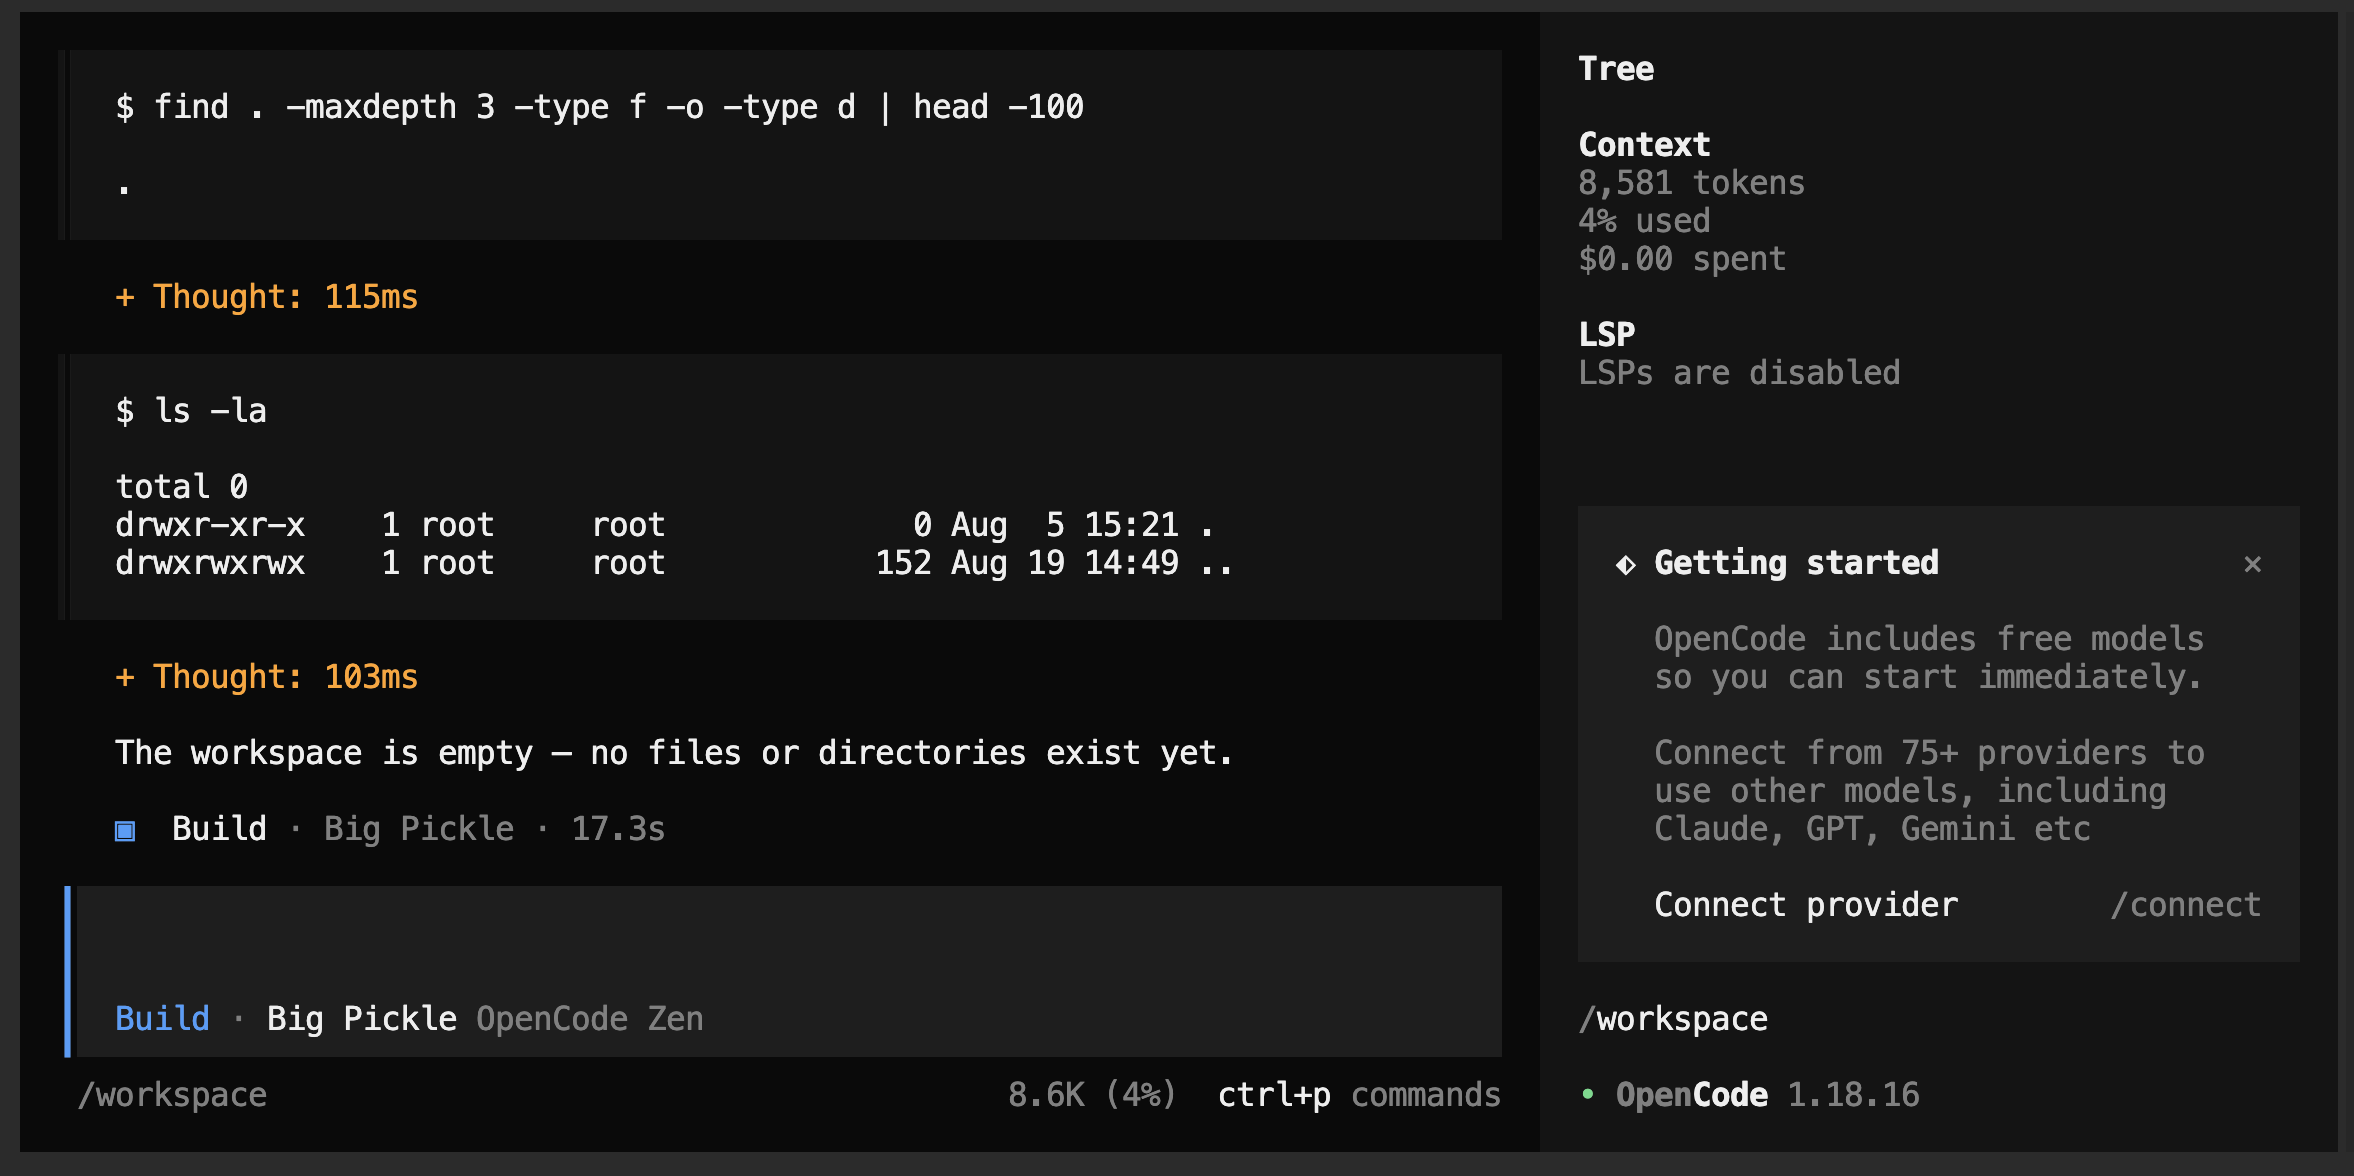
opencode in remote server example
so here is an example:
---
services:
  opencode-sandbox:
    # Pinned version - avoid ':latest',
    # recent builds have had regressions (e.g. TUI hangs)
    image: ghcr.io/anomalyco/opencode:1.18.16
    container_name: opencode_agent
    # Keep stdin open for the interactive TUI
    stdin_open: true
    # Allocate a TTY for interactive use
    tty: true
    # Mount local folder into the sandbox
    volumes:
      - ./sandbox:/workspace
    # Set /workspace as the default working directory
    working_dir: /workspace
    # Keep secrets (API keys) out of this file
    env_file:
      - opencode.env
    environment:
      - TZ=Europe/Athens
    # Prevent privilege escalation inside the container
    security_opt:
      - no-new-privileges:true
    # Cap memory - adjust to taste
    mem_limit: 2g
    # Cap CPU
    cpus: 2
    restart: unless-stopped
and the env example file: opencode.env
# ANTHROPIC_API_KEY=your_key_here
# OPENAI_API_KEY=your_key_here
❯ docker compose exec -ti opencode-sandbox opencodean example
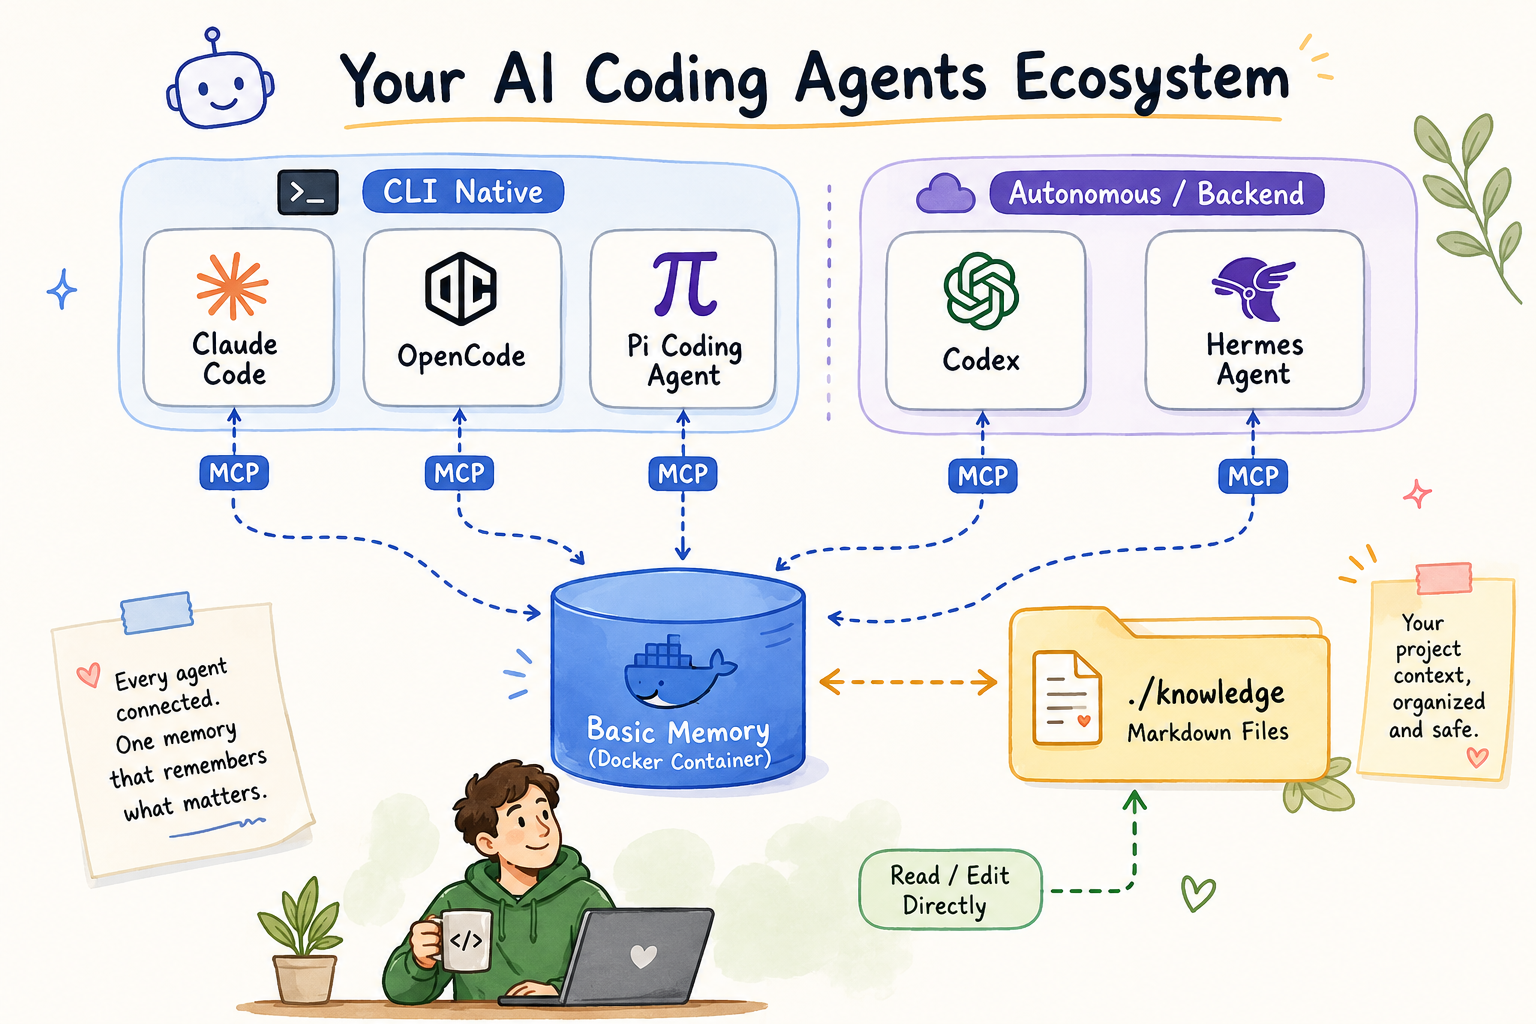
coding agents are useful, but they forget. I’ve find it from time and time to either repeat my self or creating skills to reuse them. But I also use multiple agents and on different machines too which is also complicated. I was looking for a way to keep a common memory to my agents. And built my services and setup without … forgetting !
This guide shows a simple MVP setup for giving your AI coding agents one shared memory system.
What we are building
I will be using Basic Memory as the memory service and connect agents through MCP, running it with docker compose using the official image.
Model Context Protocol (MCP) is an open standard introduced by Anthropic in November 2024 that enables AI agents and large language models (LLMs) to securely connect with external tools, data sources, and services
One agent writes a note, any agent — in any later session — can retrieve it back. You can also open the same files yourself, since they are just Markdown files on disk.So basic memory becomes a shared notebook for your coding agents.
What you need
You need:
- Docker
- Docker Compose
- Git (optional)
- A terminal
- One coding agent with MCP support
No model provider API key needed here. Basic Memory’s default semantic search runs on local FastEmbed embeddings.
Official docs:
- Basic Memory repo: https://github.com/basicmachines-co/basic-memory
- Basic Memory docs: https://docs.basicmemory.com/
- Basic Memory Docker guide: https://github.com/basicmachines-co/basic-memory/blob/main/docs/Docker.md
Why no model provider is needed
Some memory systems have an LLM read your conversation and extract facts before storing anything - every save costs a model call, and you need a provider API key for that.
Basic Memory skips this. The agent (or you) writes structured Markdown directly:
---
title: Testing Conventions
permalink: testing-conventions
tags: [testing]
---

# Testing Conventions

## Observations
- [tool] Use Vitest instead of Jest
- [rule] Do not edit generated files

## Relations
- relates_to [[Project Architecture]]
Observations, Relations, done. A local SQLite index gives full-text and semantic search over these files, no cloud calls.
Step 1: Start Basic Memory with Docker Compose
Default install is
uv tool install basic-memory(oruvx basic-memory mcp), a stdio MCP server per agent - no Docker needed. I wanted one server for all my agents, so Docker it is.
The pre-built image runs as UID/GID 1000, so create and own the folders first:
mkdir -p knowledge basic-memory-config
sudo chown -R 1000:1000 knowledge basic-memory-config
docker compose
docker-compose.yml
name: basic-memory

# runs the MCP server over SSE/HTTP on :8000 - no auth on that endpoint.
# keep it on a trusted network, or put a reverse proxy + auth in front of it.

services:
  basic-memory:
    image: ghcr.io/basicmachines-co/basic-memory:latest
    container_name: basic-memory-server

    volumes:
      - ./knowledge:/app/data:rw
      # config + sqlite index, container user is appuser -> /home/appuser
      - ./basic-memory-config:/home/appuser/.basic-memory:rw

    environment:
      - BASIC_MEMORY_DEFAULT_PROJECT=main
      - BASIC_MEMORY_SYNC_CHANGES=true
      - BASIC_MEMORY_LOG_LEVEL=INFO
      - BASIC_MEMORY_SYNC_DELAY=1000

    ports:
      - "8000:8000"

    command: ["basic-memory", "mcp", "--transport", "sse", "--host", "0.0.0.0", "--port", "8000"]

    restart: unless-stopped

    healthcheck:
      test: ["CMD", "basic-memory", "--version"]
      interval: 30s
      timeout: 10s
      retries: 3
      start_period: 30s
and start it:
docker compose -v up -dConfirm it’s healthy:
docker compose -v ps -a

# view logs
docker compose logs -f basic-memory
a healthy container looks like this in the logs:
❯ docker compose logs -f basic-memory
basic-memory-server  | [07/06/26 09:23:04] INFO     Starting MCP server 'Basic Memory'
basic-memory-server  |                              with transport 'sse' on
basic-memory-server  |                              http://0.0.0.0:8000/mcp
basic-memory-server  | INFO:     Uvicorn running on http://0.0.0.0:8000 (Press CTRL+C to quit)
Step 2: Confirm the project
The default project (main) is your ./knowledge folder, mounted into the container at /app/data. To add another project pointing at a different mounted folder:
docker exec basic-memory-server basic-memory project add my-project /app/data/my-project
docker exec basic-memory-server basic-memory project list
Decide upfront whether you want one shared notebook across all your repos, or one project per repo — it’s easier to choose now than to migrate later.
If you just want to have one shared notebook, then ignore project add my-project command.
Step 3: Connect Claude Code
Claude Code connects over SSE, worked fine against the Dockerized server:
claude mcp add --transport sse basic-memory http://localhost:8000/mcpVerify inside Claude Code:
/mcpExpect something like:
Local MCPs (/home/<user>/.claude.json [project: <project path>])
❯ basic-memory · ✔ connected · 23 tools
To remove it:
claude mcp remove basic-memoryThere’s also a Claude Code plugin for session-start briefings and /basic-memory:* commands, optional:
claude plugin marketplace add basicmachines-co/basic-memory --sparse .claude-plugin plugins/claude-code
claude plugin install basic-memory@basicmachines-co
OpenCode example
OpenCode has a native "remote" MCP type, also worked directly against the same server, no proxy. Add to ~/.config/opencode/opencode.json:
{
  "$schema": "https://opencode.ai/config.json",
  "mcp": {
    "basic-memory": {
      "type": "remote",
      "url": "http://localhost:8000/mcp",
      "enabled": true
    }
  }
}
Verify:
opencode mcp listExpect:
┌  MCP Servers
│
●  ✓ basic-memory connected
│      http://localhost:8000/mcp
│
└  1 server(s)
OpenCode’s config shape for remote MCP servers might change, check their docs if it stops working: https://opencode.ai/docs/mcp-servers/
Test it
Ask your connected agent, in plain language:
"Create a note about our project architecture decisions."A Markdown file should appear under ./knowledge on your host in real time. Open it — you’ll see the frontmatter, an Observations list, and a Relations list. That’s the entire format.
Then start a fresh session (or switch agents) and ask:
Retrieve all notes from basic-memoryIf the agent surfaces what you saved earlier, memory is working end to end. In practice it looks like this:
What to put in memory
Good:
- Project conventions
- Folder structure
- Testing framework
- Architecture decisions
- Things the agent should avoid
here is an example from my homepc:
❯ tree knowledge/
knowledge/
└── basic-memory
    ├── conventions
    │   └── Docker Healthcheck Convention.md
    ├── projects
    │   ├── Changelog Conventions.md
    │   ├── Deployment Preferences.md
    │   ├── Git Commit Conventions.md
    │   └── README Conventions.md
    └── services
        ├── Hermes Agent.md
        ├── Port Registry.md
        ├── Port Suggestion Registry.md
        └── Service Registry.md

5 directories, 9 files
Bad:
do not put
- Passwords
- Private keys
- Production tokens
- Customer private data
See the Security notes near the top — treat ./knowledge like any other sensitive project directory, and don’t commit it to a public repo unless that’s actually intended.
Troubleshooting
Agent can’t connect to the MCP server? run the proxy bridge manually and see what breaks:
uvx mcp-proxy http://localhost:8000/mcpYour coding agent cannot connect to an MCP server that isn’t reachable, obviously.
Notes not showing up, or search feels stale:
docker exec basic-memory-server basic-memory status
docker exec basic-memory-server basic-memory doctor
doctor checks file-vs-database consistency and rebuilds the local search index if it’s out of sync.
Running multiple projects and not sure which one is active:
docker exec basic-memory-server basic-memory project listI hope you find the article useful.
That’s it !
-Evaggelos
Run OpenCode, an AI coding agent on your own machine — no cloud, no API, no data ever leaving your computer privacy first and no costs!
Introduction
If you’ve been curious about running AI coding agents entirely on your own machine then this blog post is for you. We will walk through setting up OpenCode, a terminal-based AI coding agent, and connecting it to LM Studio so it uses our local language models (LLMs) that you control.
What You’ll Need
Before we begin, make sure you have the following:
- A reasonably modern computer (macbook M series Pro with Apple Silicon work great, for this blog post I am using Macbook M4 Pro)
- LM Studio installed — download it from lmstudio.ai
- Additional you can install/use Visual Studio Code!
What is a AI coding Agent ?
so OpenCode is an open source AI coding agent that
- Turn Ideas into Real Tools
- Automate Boring Repetitive Tasks
- Fix Broken Things
- Connect Different Apps Together
- Explain Technical Jargon
eg.
I need a simple website for my dog-walking business where people can book a time and see my prices.
and opencode starts working on that
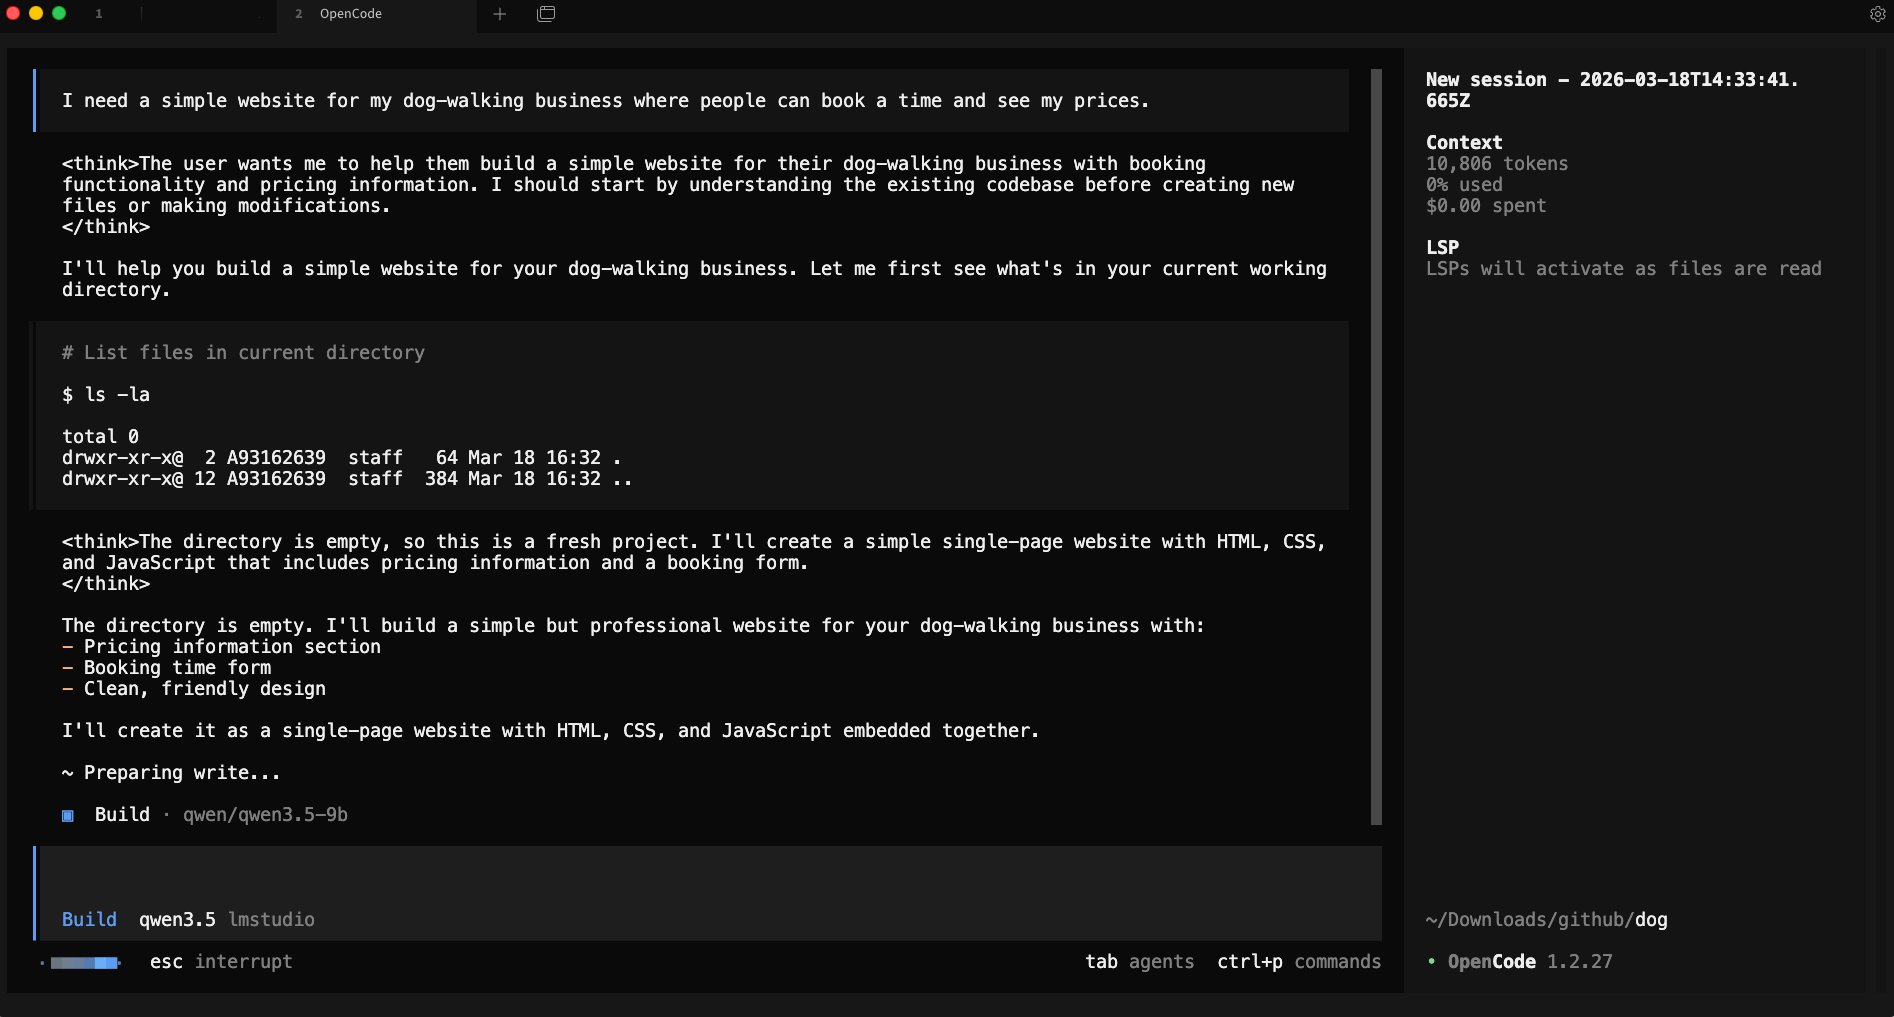
and the result is something like that, without writing a single line of code !
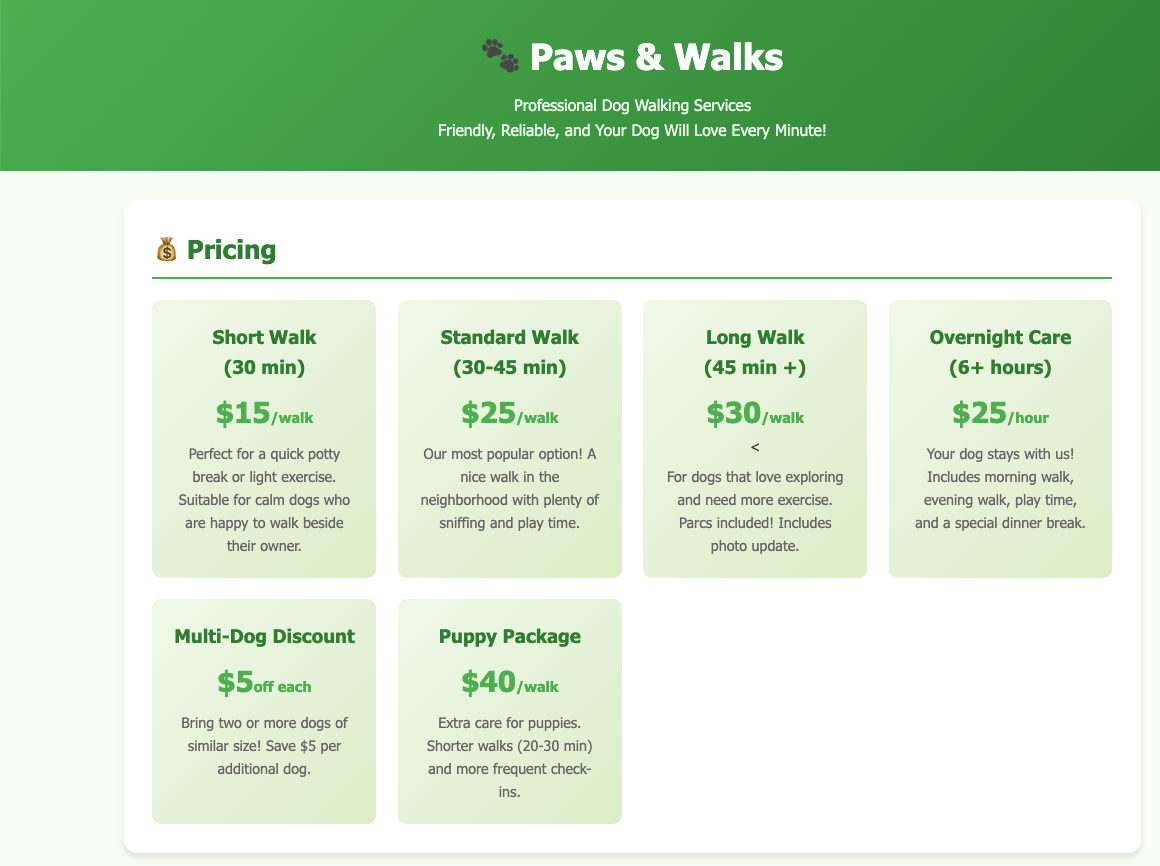
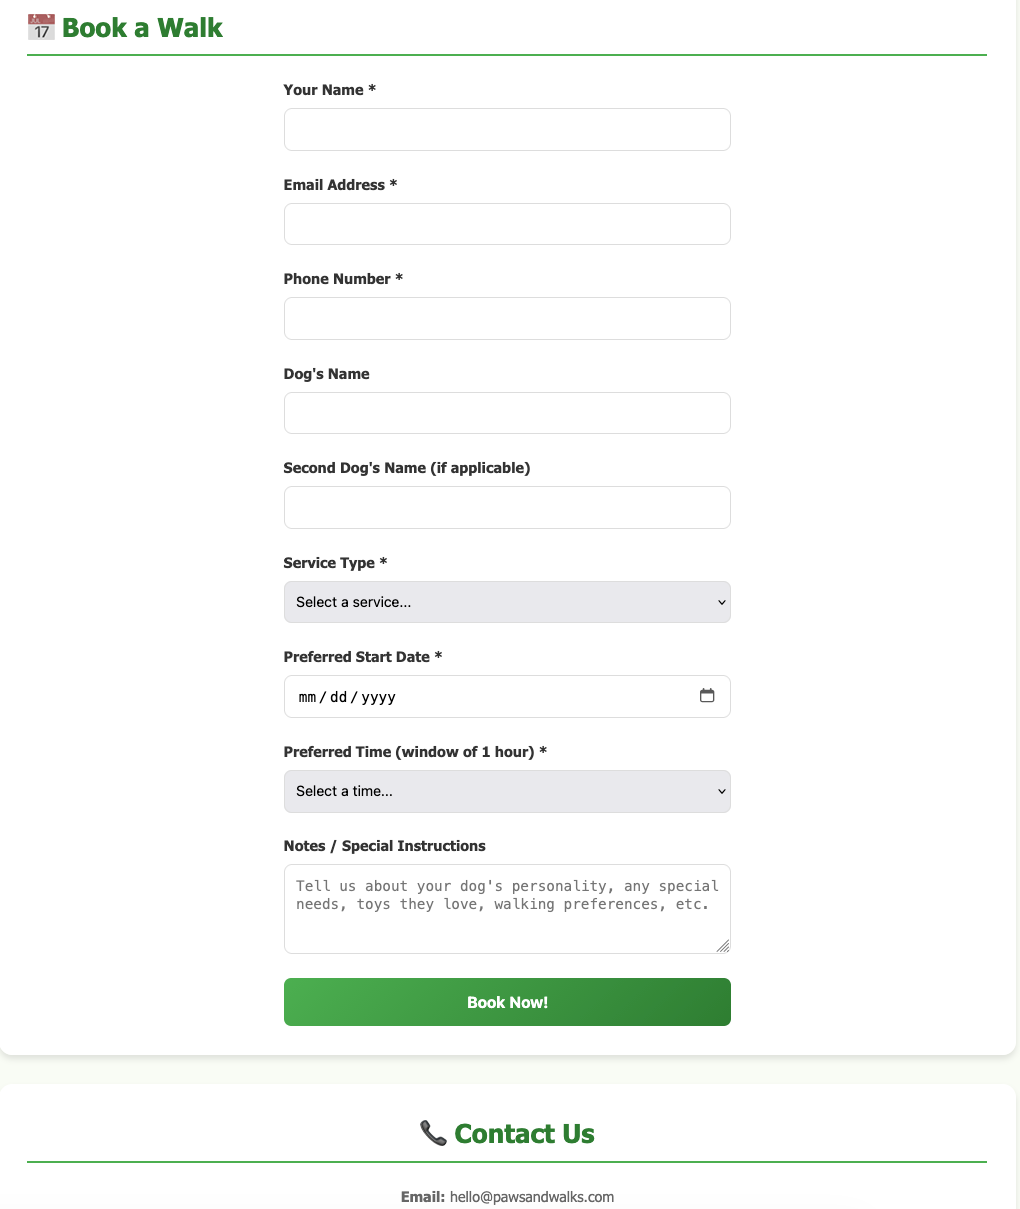
and yes, this example was made entirely on my macbook with opencode and lmstudio.
Install opencode
Open your terminal and run the official install script:
curl -fsSL https://opencode.ai/install | bashor via brew (my preferable way)
brew install anomalyco/tap/opencodeThis downloads and installs the opencode CLI tool. Once it’s done, close and reopen your terminal (or run source ~/.bashrc / source ~/.zshrc) so the command is available.
Verify it worked:
opencode --versioneg.
❯ opencode --version
1.2.27
Download a Model in LM Studio
Open LM Studio and use the built-in model browser to download a model. For this guide, we’ll use two good options that run well on consumer hardware:
- Ministral 3B — fast and lightweight, great for quick tasks
- Qwen 3.5 9B — more capable, needs more RAM/VRAM

Search for either model in LM Studio’s Discover tab and download it. Once downloaded, you’ll see it listed in your local models.
you can also use the CLI to get the models
eg. lms get mistralai/ministral-3-3b
❯ lms get mistralai/ministral-3-3b
   ✓ Satisfied mistralai/ministral-3-3b
   └─ ✓ Satisfied Ministral 3 3B Instruct 2512 Q4_K_M [GGUF]

⠋ Resolving download plan...
and list them lms ls
You have 3 models, taking up 9.62 GB of disk space.

LLM                                     PARAMS    ARCH        SIZE       DEVICE
mistralai/ministral-3-3b (1 variant)    3B        mistral3    2.99 GB    Local
qwen/qwen3.5-9b (1 variant)             9B        qwen35      6.55 GB    Local

EMBEDDING                               PARAMS    ARCH          SIZE        DEVICE
text-embedding-nomic-embed-text-v1.5              Nomic BERT    84.11 MB    Local
I am not going to analyse the models but in short, Qwen3.5-9B is best for a local, open, multimodal assistant that can handle:
- coding
- tool calling / agents
- long documents
- multilingual tasks
- document and image understanding
and fits in a a MacBook M4 Pro with 48GB RAM.
Important: Context Length
In simple words, context length is the AI’s short-term memory limit. Depending on the model and use, you need to adjust it on LM Studio. It is measured by tokens. Tokens are a chunk of a words. When using cloud AI models via API, the cost is measured on how many tokens you are using in a specific amount of time.
-
Use Small Context Lenght (4096 - 8192) when you have a quick question, review/reply to a short email or debug a small snippet of code. It will produce a quick reply.
-
Use Medium Context Length (32k) when you want to analyze a report, write a short story or working with a few coding files. It may take a couple minutes.
-
Use Large Context Length (128+) when you want to upload a big document, or you want to analyze a project at once. It will be slow, slower on local machines.
See below details about LM Studio and LLM.
Start the LM Studio Local Server
LM Studio includes a built-in local API server that speaks the OpenAI API format — which means tools like opencode can talk to it directly.
In LM Studio, go to the Local Server tab (the <-> icon on the left sidebar) and click Start Server. By default it runs at http://localhost:1234.
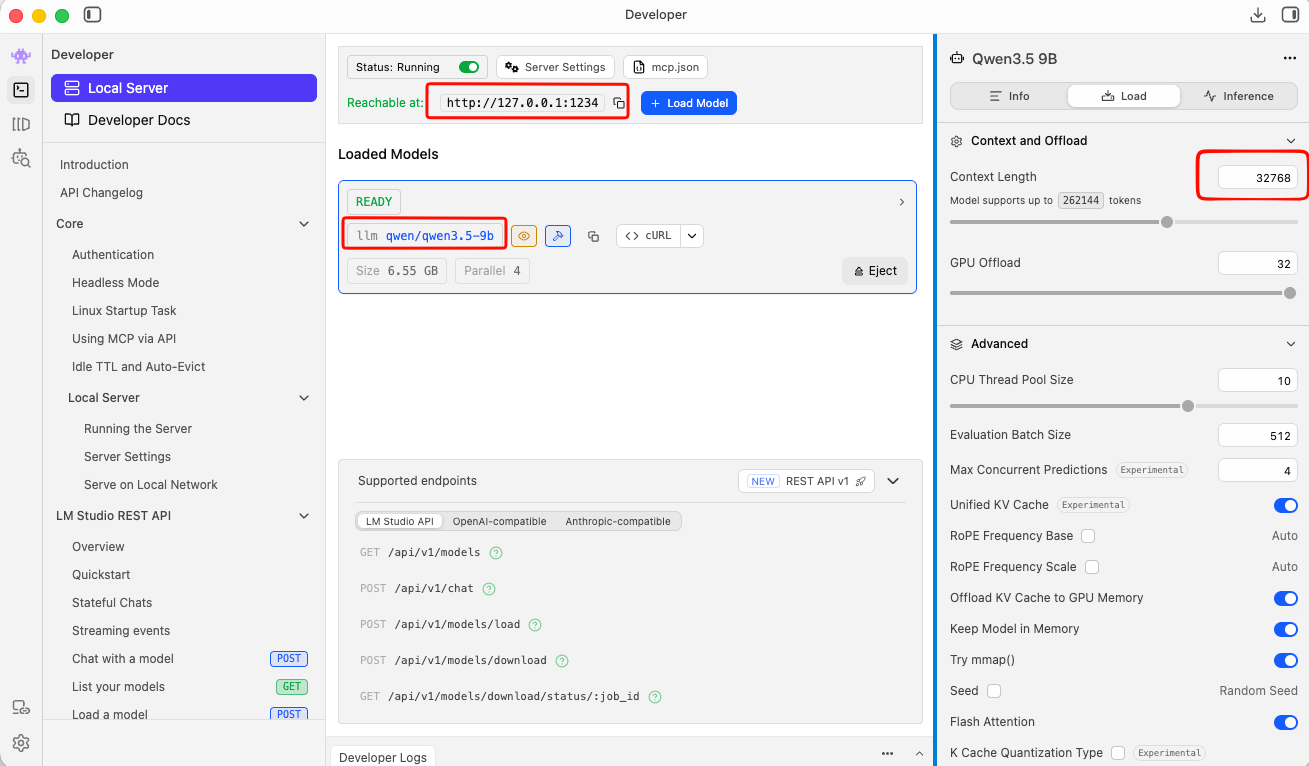
Tweak Settings
to get the best from LM Studio
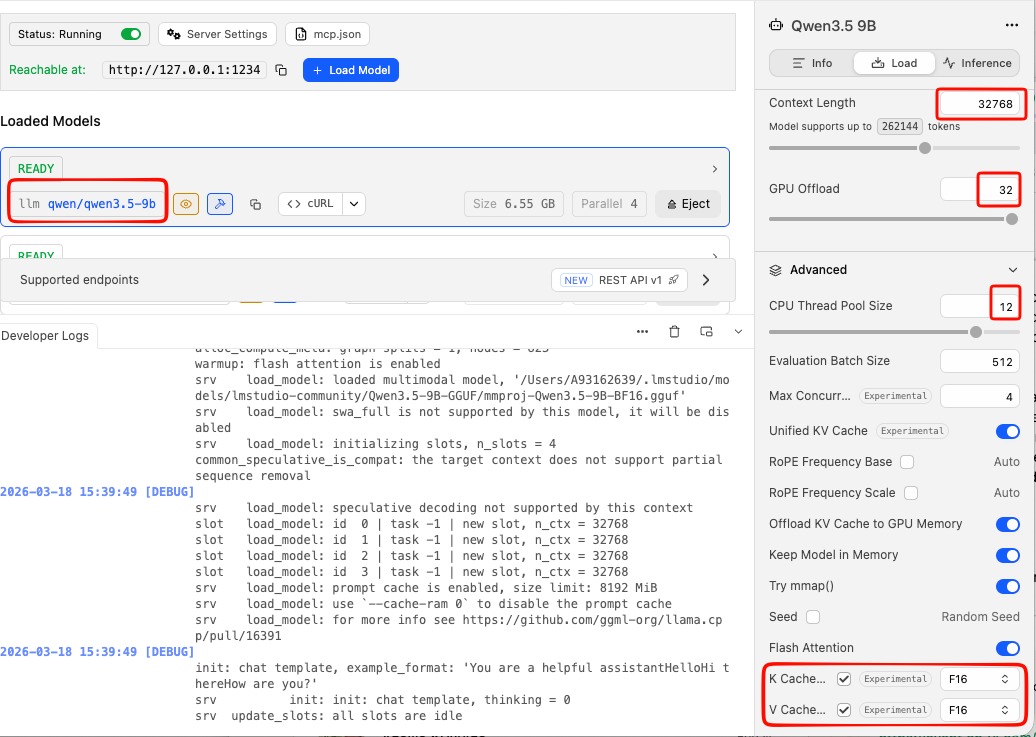
You can leave the server running in the background while you use opencode.
or you can use CLI to start LM Studio server:
❯ lms server start -p 1234 --bind 127.0.0.1
Waking up LM Studio service...
Success! Server is now running on port 1234
verify which models are available
by running in CLI a simple curl command curl -s http://localhost:1234/v1/models | jq .
{
  "data": [
    {
      "id": "qwen/qwen3.5-9b",
      "object": "model",
      "owned_by": "organization_owner"
    },
    {
      "id": "mistralai/ministral-3-3b",
      "object": "model",
      "owned_by": "organization_owner"
    },
    {
      "id": "text-embedding-nomic-embed-text-v1.5",
      "object": "model",
      "owned_by": "organization_owner"
    }
  ],
  "object": "list"
}
Configure opencode
opencode uses a config file called opencode.json stored in ~/.config/opencode/. You’ll need to create or edit this file to tell opencode about your LM Studio models.
Create the directory if it doesn’t exist:
mkdir -p ~/.config/opencodeThen create (or edit) the config file:
vim ~/.config/opencode/opencode.jsonPaste in the following configuration:
{
  "$schema": "https://opencode.ai/config.json",
  "provider": {
    "lmstudio": {
      "npm": "@ai-sdk/openai-compatible",
      "name": "lmstudio",
      "options": {
        "baseURL": "http://127.0.0.1:1234/v1",
        "apiKey": "lmstudio"
      },
      "models": {
        "qwen/qwen3.5-9b": {
          "name": "qwen3.5"
        },
        "mistralai/ministral-3-3b": {
          "name": "ministral3"
        }
      }
    }
  }
}
A few things to note:
- The
baseURLpoints to LM Studio’s local server — keep this as-is unless you’ve changed LM Studio’s port. - The
apiKeyvalue"lmstudio"is a placeholder — LM Studio doesn’t actually require a real API key, but the field needs to be present. - The model IDs (e.g.
mistralai/ministral-3-3b) must match exactly what LM Studio uses. You can check the model identifier in LM Studio’s model list.
Save and close the file.
Load a Model via the CLI (Optional but Useful)
LM Studio comes with a CLI tool called lms that lets you load and unload models from the terminal without opening the GUI. This is handy for scripting or keeping things lightweight.
First, unload any currently loaded model (to free memory):
lms unload "mistralai/ministral-3-3b"Then load it fresh with a specific context window size:
lms load "mistralai/ministral-3-3b" --context-length 16384The --context-length flag controls how much text the model can hold in memory at once. 16384 (16K tokens) is a good balance of capability and memory use. If you have more RAM to spare, try 32768.
full example with ministral
❯ lms unload "mistralai/ministral-3-3b"
Model "mistralai/ministral-3-3b" unloaded.

~
❯ lms load "mistralai/ministral-3-3b" --context-length 16384

Model loaded successfully in 2.67s.
(2.78 GiB)
To use the model in the API/SDK, use the identifier "mistralai/ministral-3-3b".
Test opencode with Your Local Model
opencode run --model lmstudio/mistralai/ministral-3-3b "capital of greece?"The --model flag follows the format lmstudio/<model-id>, where the model ID matches what you put in the config file.
You should see the model respond directly in your terminal. If everything is connected correctly, the response comes from your local machine — no internet required.
output:
> build · mistralai/ministral-3-3b

Athens.
Run opencode with Your Local Model
Now you’re ready to use opencode on your project.
Change to the code directory cd project
and to start an interactive session in your current project directory, just run:
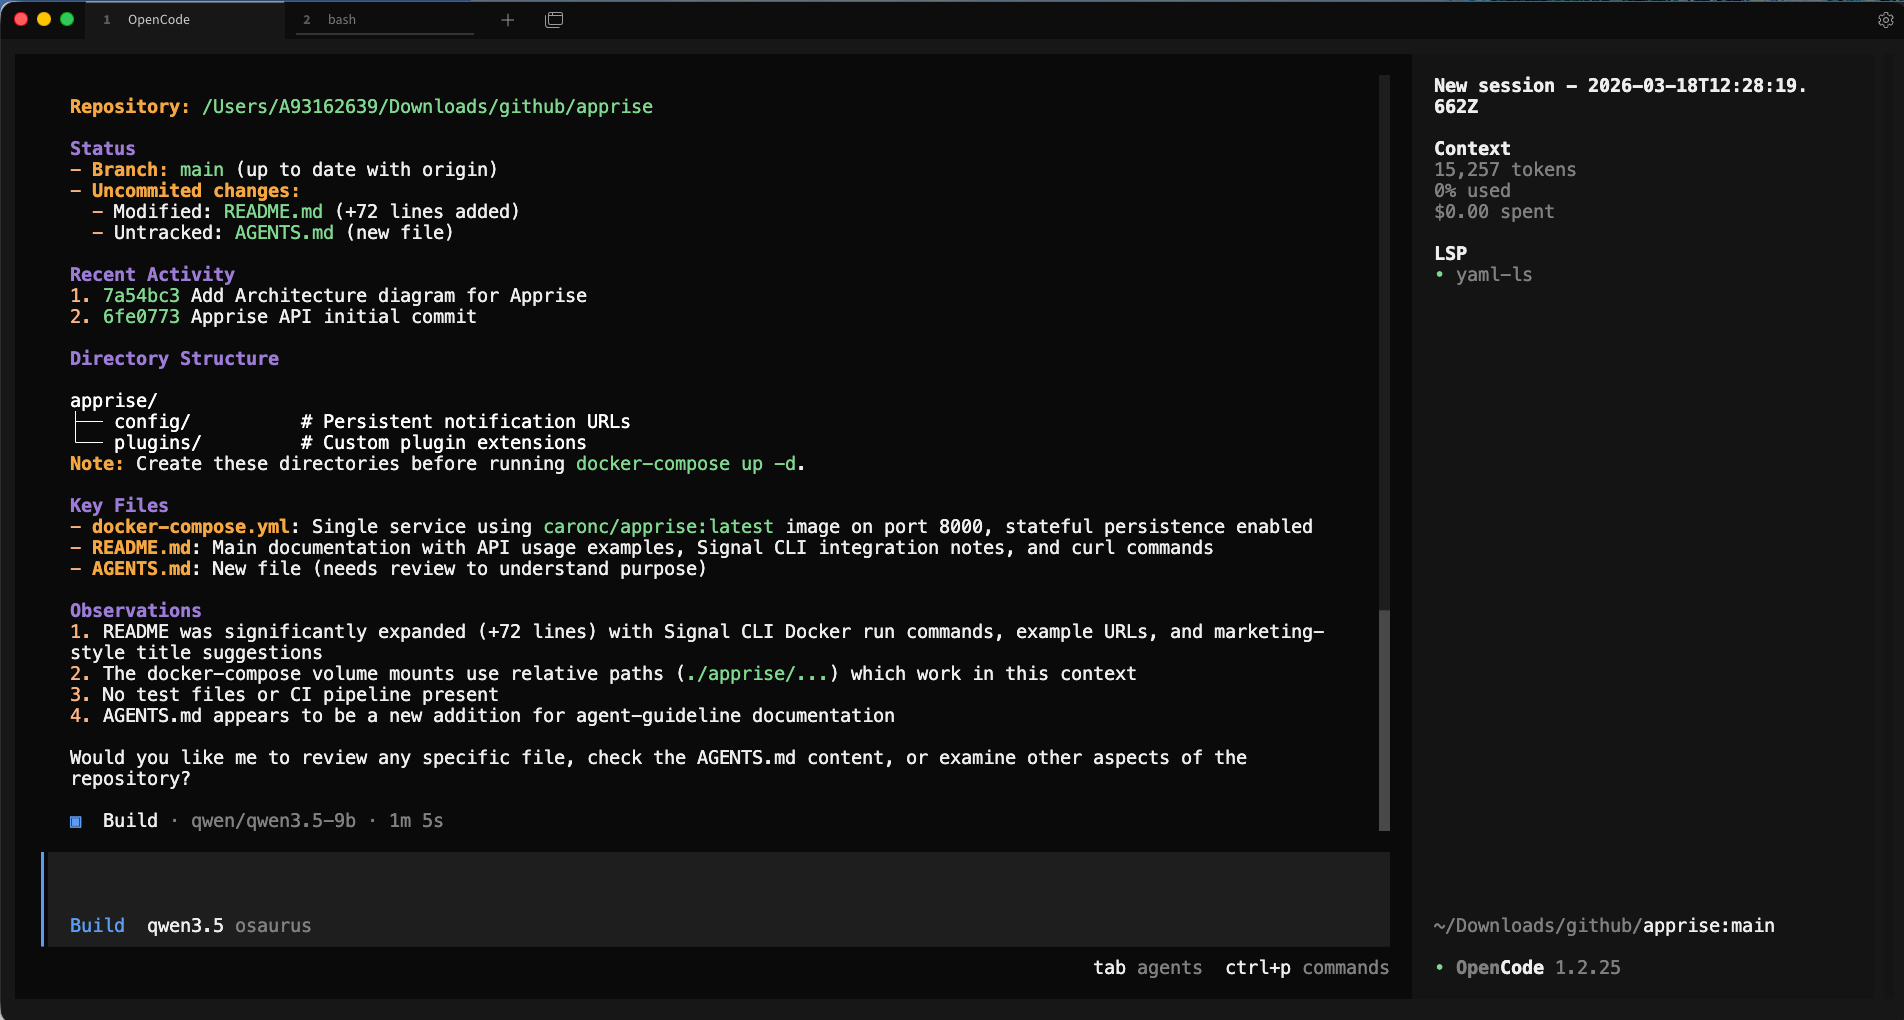
opencodeopencode will open its TUI (terminal user interface) where you can have a longer back-and-forth conversation, ask it to read files, write code, and more.
Verify opencode is using the correct model and type
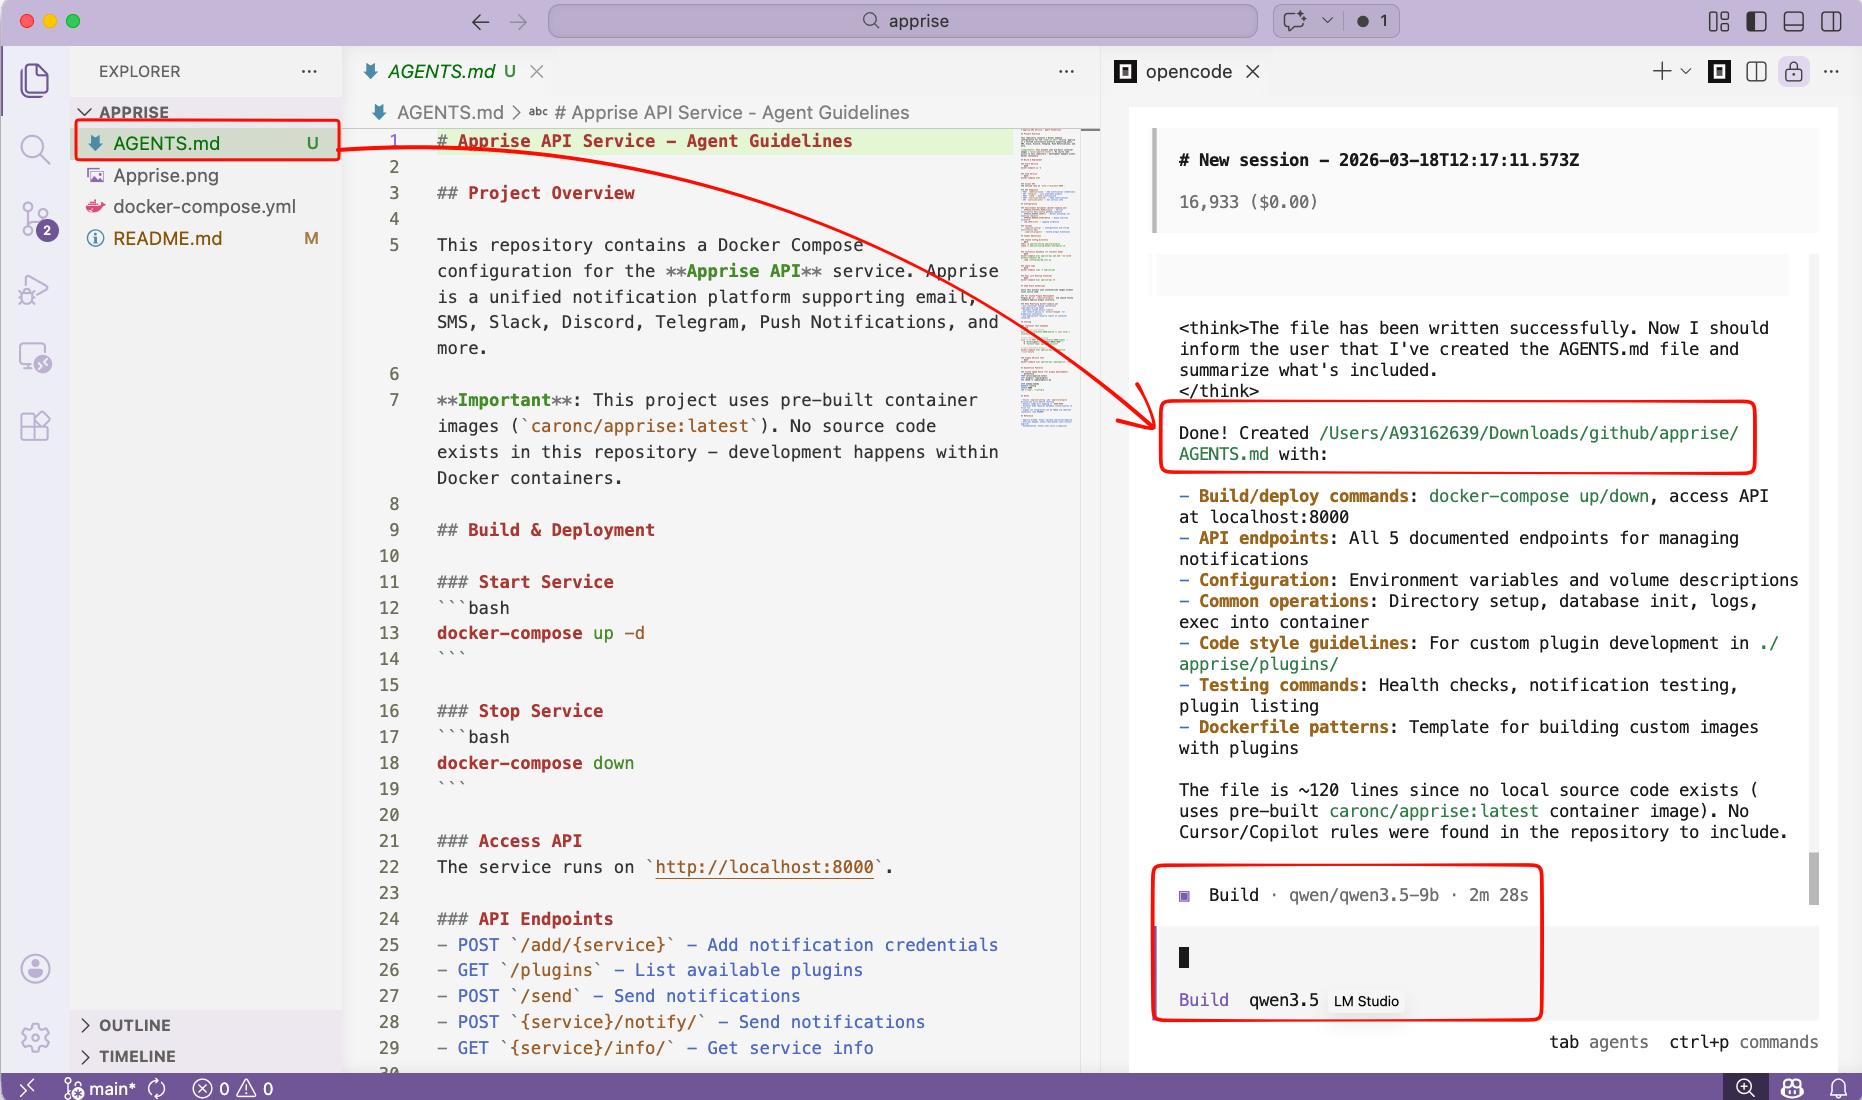
/initTo initial your project. It will create an AGENTS.md file for your project.
or you can use VS code with the opencode extension and use it from there !
That’s it!
Happy coding my friends.