





In my previous post I used Authelia in front of a self-hosted service to handle authentication before users are allowed. That works well when there is a human using a browser. Authelia can also act as an OAuth2 / OpenID Connect provider, which means applications can authenticate and obtain tokens without needing access from a user’s actual password.
In this article, I will enable OIDC, then register a small test client and verify that token generation works correctly. I am not connecting a “real” application yet, as it will be the subject of my next blog post.
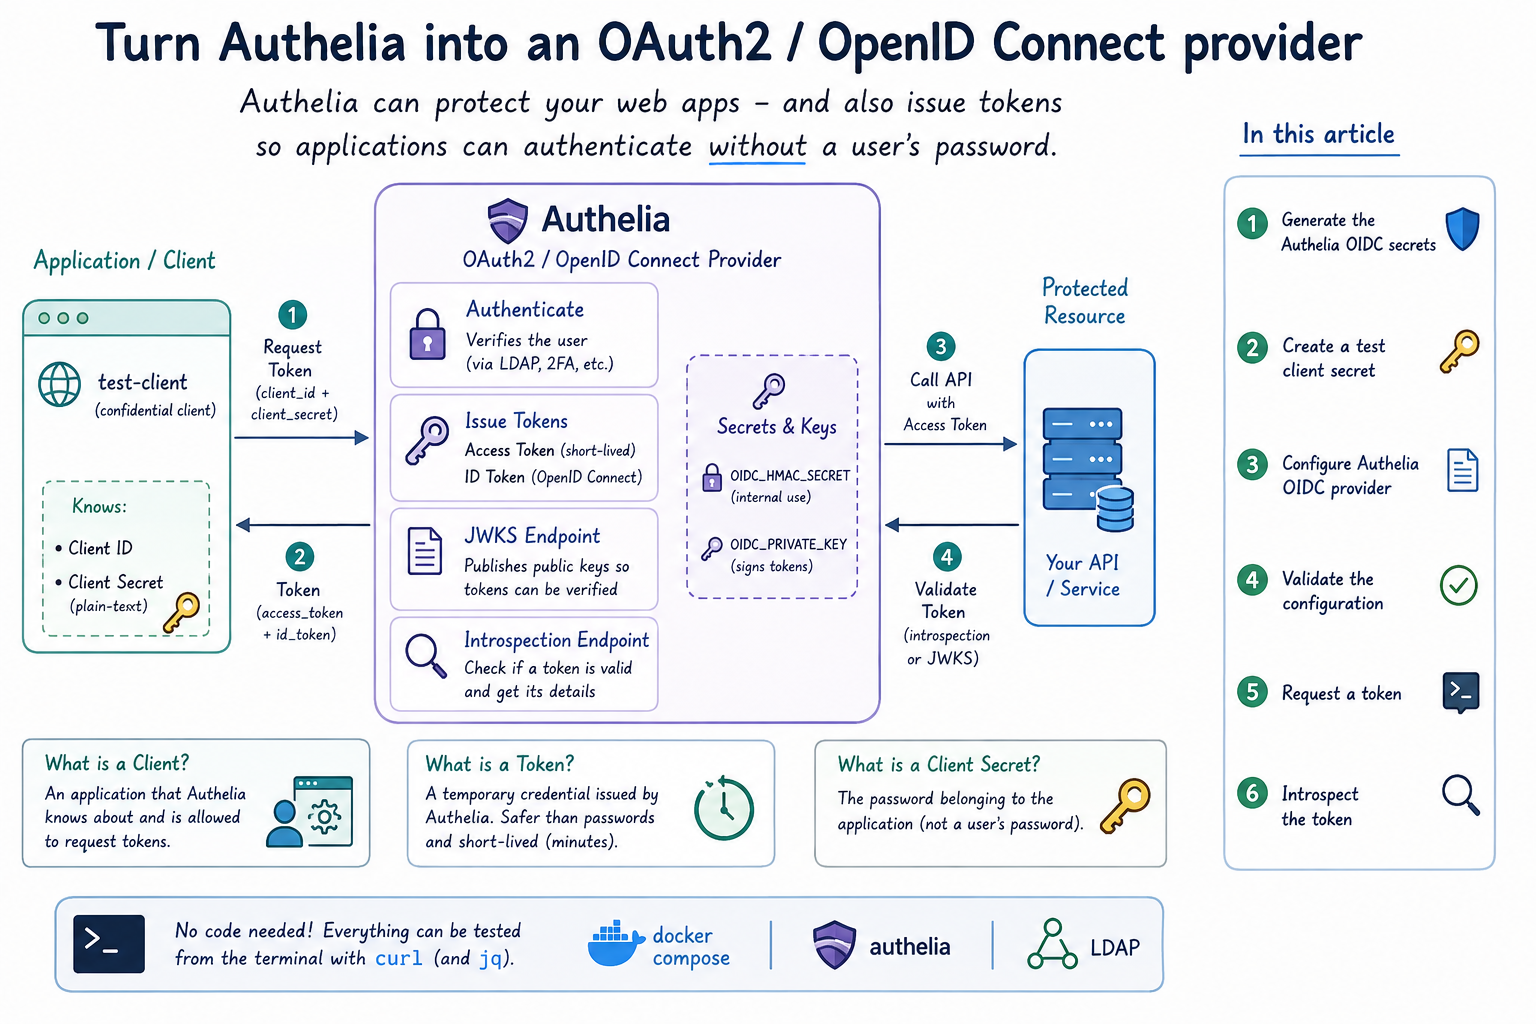
You don’t need to write any code for this. Everything can be tested from the terminal with curl.
What you need before starting
I am assuming you already have the Authelia setup from the previous article running with docker compose.
You’ll also need:
opensslcurl- optionally
jq, which makes JSON output easier to read :)
On Arch:
sudo pacman -S jq curl opensslOn Debian/Ubuntu:
sudo apt -y install jq curl opensslI’m keeping the same directory structure as before:
./authelia/
├── authelia.env
├── docker-compose.yaml
├── config/
│   └── configuration.yml
└── secrets/
    ├── JWT_SECRET
    ├── LDAP_PASSWORD
    ├── SESSION_SECRET
    └── STORAGE_ENCRYPTION_KEY
We’ll add two more files under secrets/ and extend configuration.yml.
What is OAuth ?
Before getting into the configuration, there are three (3) terms that we need to know.
Client
A client is simply an application that Authelia knows about and allows to request tokens.
In this example the client will be called:
test-clientClient secret
This is essentially the password belonging to the application.
It is not a user’s password.
The client uses it’s ID together with this secret when requesting a token.
Token
A token is a temporary credential issued by Authelia. Instead of passing usernames and passwords between services, applications can work with these short-lived credentials. Which is great, because if a bad actor “read” this token, it’s not like your username/password and only lives for a minute or two!
Step 1 - Generate the Authelia OIDC secrets
So, Authelia needs an HMAC secret and a private key for its OIDC provider.
From inside the ./authelia directory, run the below commands:
# This command generates a secure, random string of characters
openssl rand -hex 64 | tr -d 'n' > ./secrets/OIDC_HMAC_SECRET

# This command generates a RSA Private Key
openssl genrsa -out ./secrets/OIDC_PRIVATE_KEY 4096
New secrets:
OIDC_HMAC_SECRET

OIDC_PRIVATE_KEY
The HMAC secret is used internally by Authelia.
The RSA private key will be used for signing tokens so they can later be verified.
Change the permissions of secret files
chmod 600 ./secrets/OIDC_HMAC_SECRET ./secrets/OIDC_PRIVATE_KEYStep 2 - Create a test client secret
For testing I shall register a client called:
test-clientFirst generate a random secret for it:
openssl rand -hex 32BE Careful , this is a different random key than the above !
example output:
f8dfed59027a5fb575929edde48f5117fb199a504b92a699351a1ab8caed05cfSave the output temporarily somewhere safe.
You will need two versions of this secret:
- the plain-text value, which the client will use later
- a hashed version, which goes into Authelia’s configuration
Generate the hash with Authelia itself:
export YOUR_RANDOM_CLIENT_SECRET="< your random secret here >"

docker compose exec authelia authelia crypto hash generate pbkdf2
  --variant sha512
  --password "${YOUR_RANDOM_CLIENT_SECRET}"
  --no-confirm
The result should look roughly like:
Digest: $pbkdf2-sha512$...Save it the hashed secret to a new secret file:
docker compose exec authelia authelia crypto hash generate pbkdf2
  --variant sha512
  --password "${YOUR_RANDOM_CLIENT_SECRET}"
  --no-confirm | awk '{print $NF}' > ./secrets/OIDC_CLIENT_SECRET_HASH
Keep the original plain-text secret. We will need it when testing the token endpoint.
Step 3 - Configure Athelia OIDC provider
Why some secrets are variables and some files?
Ideally we want to have a dynamic setup to easily rotate secrets etc, but and althouth authelia -technically- allows you to pass complex JSON objects via environment variables, it is messy and prune to errors. Especially with intentation and formating.
Open:
./config/configuration.ymland add a new top-level identity_providers section.
Do not remove any existing configuration.
identity_providers:

  # OpenID Connect (Identity Provider)
  oidc:
    # hmac_secret is now handled by docker-compose.yaml!
    # hmac_secret: '<paste the contents of OIDC_HMAC_SECRET here>'

    # The JWK's issuer configures JSON Web Keys
    jwks:
      - key_id: 'primary'
        algorithm: 'RS256'
        use: 'sig'
        key: {{ secret "/config/secrets/OIDC_PRIVATE_KEY" | mindent 10 "|" | msquote }}

    # Clients is a list of registered clients and their configuration.
    clients:
      - client_id: 'test-client'
        client_name: 'Test client for OIDC'
        # client_secret: '<paste the hashed secret from Step 2 here>'
        # or
        # client_secret: <read it from volume mount'
        client_secret: {{ secret "/config/secrets/OIDC_CLIENT_SECRET_HASH" }}

        public: false

        authorization_policy: 'one_factor'

        token_endpoint_auth_method: 'client_secret_post'

        scopes:
          - 'test-scope'

        grant_types:
          - 'client_credentials'

        response_types: []
update docker compose
and update docker compose yaml file to add secret and envirnment variable:
services:
  authelia:
    # ... your other authelia config ...

    volumes:
      - ./config:/config
      # Mount the private key file generated in the blog post into the container
      - ./secrets/OIDC_PRIVATE_KEY:/config/secrets/OIDC_PRIVATE_KEY:ro
      - ./secrets/OIDC_CLIENT_SECRET_HASH:/config/secrets/OIDC_CLIENT_SECRET_HASH:ro

    environment:
      # ...
      # Enable the template filter so Authelia can parse the {{ secret }} syntax
      - X_AUTHELIA_CONFIG_FILTERS=template
      # Notice the _FILE suffix at the end of the variable name
      - AUTHELIA_IDENTITY_PROVIDERS_OIDC_HMAC_SECRET_FILE=/run/secrets/AUTHELIA_IDENTITY_PROVIDERS_OIDC_HMAC_SECRET

    secrets:
      # ...
      - AUTHELIA_IDENTITY_PROVIDERS_OIDC_HMAC_SECRET

secrets:
  # ...
  AUTHELIA_IDENTITY_PROVIDERS_OIDC_HMAC_SECRET:
    file: ./secrets/OIDC_HMAC_SECRET
Alternative you can print the two secret files with:
cat ./secrets/OIDC_HMAC_SECRETcat ./secrets/OIDC_PRIVATE_KEYand copy their contents into the configuration.
client fields
A few fields are worth pointing out.
grant_types
We’re using:
grant_types:
  - 'client_credentials'
The client credentials flow is useful for machine-to-machine authentication.
There is no browser login involved. The application authenticates using their client_id and client_secret.
For what I want to test here, this is the simplest option.
scopes
For the time beging I am using:
scopes:
  - 'test-scope'
There is nothing special about the name. It is just a test scope that we will request later with curl.
Also, be careful with the YAML indentation. A misplaced space is enough to break the configuration. Ask me how I know this!
Step 4 - Validate the configuration
Before restarting anything, validate the configuration:
docker compose run --rm authelia authelia config validate --config /config/configuration.ymlIf everything is correct, you should see:
Configuration parsed and loaded successfully without errors.example output:
~> sudo docker compose run --rm authelia authelia config validate --config /config/configuration.yml

Container traefik-authelia-run-7afd8b44e1ad Creating
Container traefik-authelia-run-7afd8b44e1ad Created
Configuration parsed and loaded successfully without errors.
If validation fails, fix the configuration before continuing.
In my experience, indentation and incorrectly pasted keys are the first things worth checking.
Now restart Authelia:
docker compose restart authelia
# docker compose ps authelia

NAME          IMAGE                                       COMMAND                  SERVICE       CREATED          STATUS                    PORTS
authelia      authelia/authelia:4.39                      "/app/entrypoint.sh"     authelia      15 seconds ago   Up 14 seconds (healthy)   9091/tcp
watch the logs:
docker compose logs -f autheliaMake sure Authelia starts normally and there are no OIDC related configuration errors.
Press Ctrl+C once you’re satisfied everything is running or d to detach if started authelia with docker compose up authelia
Step 5 - Request a token
Now we can test the authelia oidc provider.
Replace:
authelia.example.orgwith your actual Authelia hostname.
and also:
YOUR_RANDOM_CLIENT_SECRETwith the original plain-text secret generated in Step 2.
Run:
curl -s -X POST https://authelia.example.org/api/oidc/token
  -d 'grant_type=client_credentials'
  -d 'client_id=test-client'
  -d 'client_secret=PASTE_YOUR_RANDOM_SECRET_HERE'
  -d 'scope=test-scope' | jq
A successful response should look similar to this:
{
  "access_token": "authelia_at_< ... >",
  "expires_in": 3599,
  "scope": "test-scope",
  "token_type": "bearer"
}
At this point Authelia has successfully authenticated the client and issued an access token for 1hour !
Copy the value of:
access_tokenbecause we will use it in the next test.
my preferable way:
ACCESS_TOKEN=$(curl -s -X POST https://authelia.example.org/api/oidc/token   -d 'grant_type=client_credentials'   -d 'client_id=test-client'   -d "client_s
ecret=${YOUR_RANDOM_CLIENT_SECRET}"  -d 'scope=test-scope' | jq -r .access_token)
If you get an error, these are the first things I’d check:
invalid_client— verify theclient_idand client secretinvalid_scope— make sure the requested scope matches the configured scopeunauthorized_client— check thatclient_credentialsis included undergrant_types
Step 6 - Introspect the token
Generating a token is only half the test.
I also want to verify that Authelia can recognise the token afterwards and report whether it is still valid.
That’s what the introspection endpoint is for.
Type:
curl -s -X POST https://authelia.example.org/api/oidc/introspection
     -u "test-client:${YOUR_RANDOM_CLIENT_SECRET}"
     -d "token=${ACCESS_TOKEN}" | jq .
a valid token should return something similar to:
{
  "active": true,
  "client_id": "test-client",
  "exp": 1786554376,
  "iat": 1786550776,
  "scope": "test-scope"
}
The part we care about here is:
"active": trueThat confirms that Authelia recognises the token and considers it valid.
The response also includes the client ID, scope and expiry timestamp.
Once the token expires, introspecting the same token should return it as inactive.
That’s it
-Evaggelos