





Disclaimer, this blog post is a proof of concept and not a security proposal. Change the HOST PATH to a specific directory.
Prologue
Coding Agents are a useful tool. They can access remote servers using ssh and then run all investigation commands on the destination. They can gather information, read and review all files and also make changes. It can read your secrets and audit your system. For me it’s a tool, how to use it it’s up to you. I have rebuild my homeassistant into an old laptop which has no other secrets than accessing local devices and I can create my automations from my agent. It’s useful.
I also want to use agents or subagents to audit remote systems, do investigations and produce reports for me to read. But I do not want agents to modify the remote system in any way. It should read files, look around, and help me understand what is running there — without giving it a real login and, more importantly, without letting it change anything. No write access, no root access to the actual VPS, and ideally no chance of an “oops, deleted a config” or drop a database.
Idea and architecture
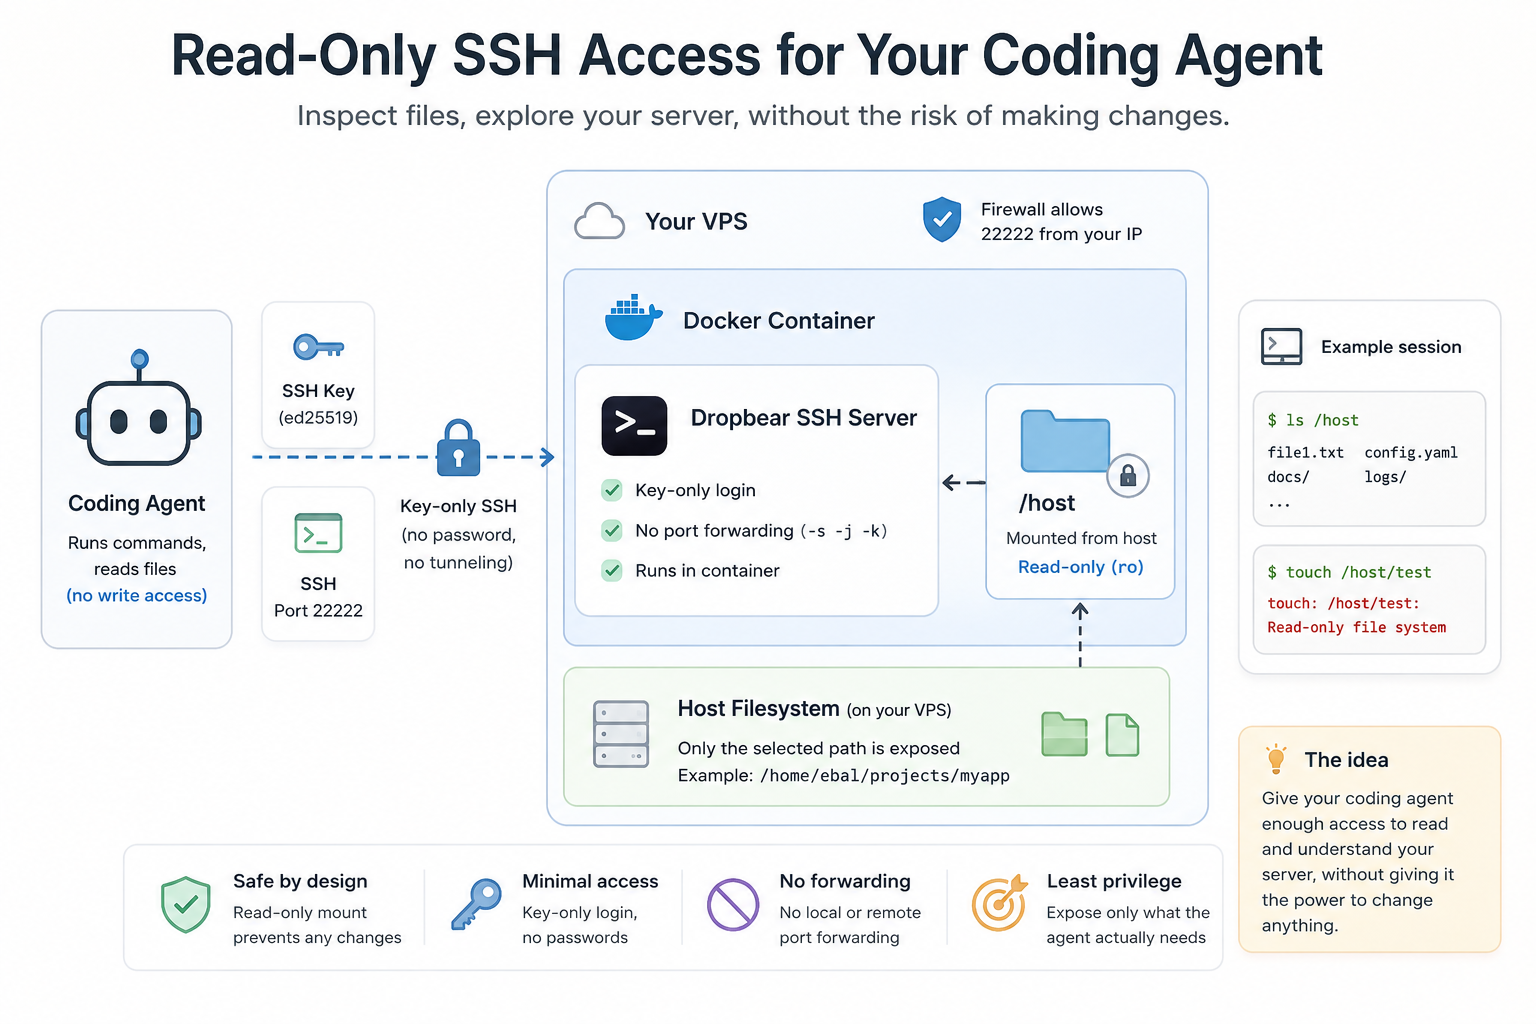
What I ended up with is pretty small and perhaps boring, which is exactly what I wanted: a tiny dropbear SSH server running in a docker container, with the part of the filesystem I want to expose mounted read-only.
This is how to reproduce it.
Dropbear is an SSH server and client. It is designed as a small-footprint alternative to OpenSSH, mostly for embedded systems, but it also works nicely for a throwaway, single-purpose SSH endpoint like this.
Step 1: make an SSH key just for this
Do not reuse your main SSH key for this. Generate a separate one, dedicated for the agent:
ssh-keygen -t ed25519
  -f ~/.ssh/dropbear_readonly
  -C "dropbear_readonly"
  -N ""
This gives you two files:
dropbear_readonly— keep this private. This is what the AI agent (or you) will use to log in.dropbear_readonly.pub— this one is fine to share. It actually goes on the server.
❯ ll
drwxr-xr-x   - ebal ebal 18 Aug 12:40 ..
drwxr-xr-x   - ebal ebal 18 Aug 12:41 .
.rw------- 411 ebal ebal 18 Aug 12:41 dropbear_readonly
.rw-r--r-- 103 ebal ebal 18 Aug 12:41 dropbear_readonly.pub
Step 2: the docker-compose.yml
ssh into the remote vps and inside a new service folder, create a file called docker-compose.yml:
---
services:
  ssh:
    image: alpine:latest
    restart: unless-stopped

    ports:
      - "${SSH_PORT:-22222}:22"

    volumes:
      - ${HOST_PATH:-/opt}:/host:ro
      - ./authorized_keys:/root/.ssh/authorized_keys:ro
      - dropbear-keys:/etc/dropbear

    command: >
      sh -c "
        apk add --no-cache dropbear bash &&
        mkdir -p /root/.ssh &&
        chmod 700 /root/.ssh &&
        exec dropbear -F -E -R -s -j -k -p 22
      "

    healthcheck:
      test: ["CMD", "pidof", "dropbear"]
      interval: 30s
      timeout: 3s
      retries: 3
      start_period: 10s

volumes:
  dropbear-keys:
The 2 parts you need to care about the most from a security point of view are these:
-
${HOST_PATH:-/opt}:/host:ro— this is the folder from the VPS that gets exposed inside the container. The important thing isro: the mount is read-only. -
Dropbear flags:
-s disables password authentication.
-j disables local forwarding, including Unix stream forwarding.
-k disables remote forwarding.
The container itself runs as root internally, but /host is still mounted read-only.
This is not a security advice.
Below you will also see an example with
/and important files like/host/var/run/docker.sockwill be exposed!
additional container hardening
read_only: true

security_opt:
  - no-new-privileges:true
Step 3: tell it which folder to share, and which port to use
I would not leave HOST_PATH at /opt unless that’s actually what you want to expose.
Again, it is better to point it at the specific project or directory the agent needs to inspect, rather than something broad like your whole home directory.
Create a .env file next to the compose file:
❯ cat > .env <<'EOF'
SSH_PORT=22222
HOST_PATH=/home/ebal/projects/myapp
EOF
or change the default values directly in the docker compose yaml file.
Step 4: add the public ssh key
Copy the .pub file you generated into an authorized_keys file in the same folder:
❯ mv dropbear_readonly.pub authorized_keys
 renamed 'dropbear_readonly.pub' -> 'authorized_keys'
Step 5: start dropbear
❯ docker compose upexample output:
❯ docker compose up

[+] up 2/2
 ✔ Network dropbear-ssh_default Created                                                                                                                                    0.4s
 ✔ Container dropbear-ssh-ssh-1 Created                                                                                                                                    0.3s
Attaching to ssh-1
ssh-1  | (1/7) Installing ncurses-terminfo-base (6.6_p20260516-r0)
ssh-1  | (2/7) Installing libncursesw (6.6_p20260516-r0)
ssh-1  | (3/7) Installing readline (8.3.3-r1)
ssh-1  | (4/7) Installing bash (5.3.9-r1)
ssh-1  |   Executing bash-5.3.9-r1.post-install
ssh-1  | (5/7) Installing skalibs-libs (2.15.0.0-r0)
ssh-1  | (6/7) Installing utmps-libs (0.1.3.3-r0)
ssh-1  | (7/7) Installing dropbear (2026.91-r0)
ssh-1  | Executing busybox-1.37.0-r31.trigger
ssh-1  | OK: 10.7 MiB in 23 packages
ssh-1  | [1] Aug 18 09:51:22 Not backgrounding
ssh-1  | [20] Aug 18 09:51:32 Child connection from 192.168.1.72:56149
ssh-1  | [20] Aug 18 09:51:34 Pubkey auth succeeded for 'root' with ssh-ed25519 key

w Enable Watch   d Detach
Then check that it actually came up:
❯ docker compose ps

NAME                  STATUS
dropbear-readonly-ssh-1  Up 12 seconds (healthy)
Step 6: test the login from your laptop
Back on your own machine:
❯ ssh -i ~/.ssh/dropbear_readonly -p 22222 root@your-vps-ipYou should land in a shell. /host is the project folder from your VPS, mounted read-only.
Is it real a readonly filesystem ?
Let’s test it, shall we ?
2420d93953fd:~# tail /host/etc/passwd

fwupd:x:969:969:Firmware update daemon:/var/lib/fwupd:/usr/bin/nologin
passim:x:968:968:Local Caching Server:/usr/share/empty:/usr/bin/nologin
alpm:x:967:967:Arch Linux Package Management:/:/usr/bin/nologin
beszel:x:1003:1005::/home/beszel:/bin/false
cups:x:209:209:cups helper user:/:/usr/bin/nologin
ntp:x:87:87:Network Time Protocol:/var/lib/ntp:/bin/false
minio:x:103:103:Minio Daemon User:/var/lib/minio:/usr/bin/nologin
pcscd:x:963:963:PC/SC Smart Card Daemon:/:/usr/bin/nologin
privoxy:x:42:42:Privoxy:/:/usr/bin/nologin
systemd-imds:x:948:948:systemd Instance Metadata:/:/usr/bin/nologin

2420d93953fd:~# rm -f /host/etc/passwd
rm: can't remove '/host/etc/passwd': Read-only file system

2420d93953fd:~# touch /host/root/file1
touch: /host/root/file1: Read-only file system
That Read-only file system error is basically the whole point.
That’s what you want to see.
Step 7: point the coding agent at it
Now give the coding agent the same three things you just used yourself:
- the host
- the port (
22222) - the private key (
dropbear_readonly)
Depending on the agent, that might be an SSH config entry, or just those values entered into some kind of remote filesystem / SSH setup.
Once connected, it can read and list files under /host, but it can’t modify, delete, or create anything there. If it tries, it’ll get the same Read-only file system error you saw above.
Or even better, update your .ssh/config
Host readonly
    Hostname <your-vps-ip>
    Port 22222
    User root
    IdentityFile ~/.ssh/dropbear_readonly
That’s it.
-Evaggelos
PS. An alternative method
There is always a similar and different solution, to run a coding agent directly to the destination (remote) server and keep the agent only to a specific directory. With this alternative solution we need an agent to each remote server.
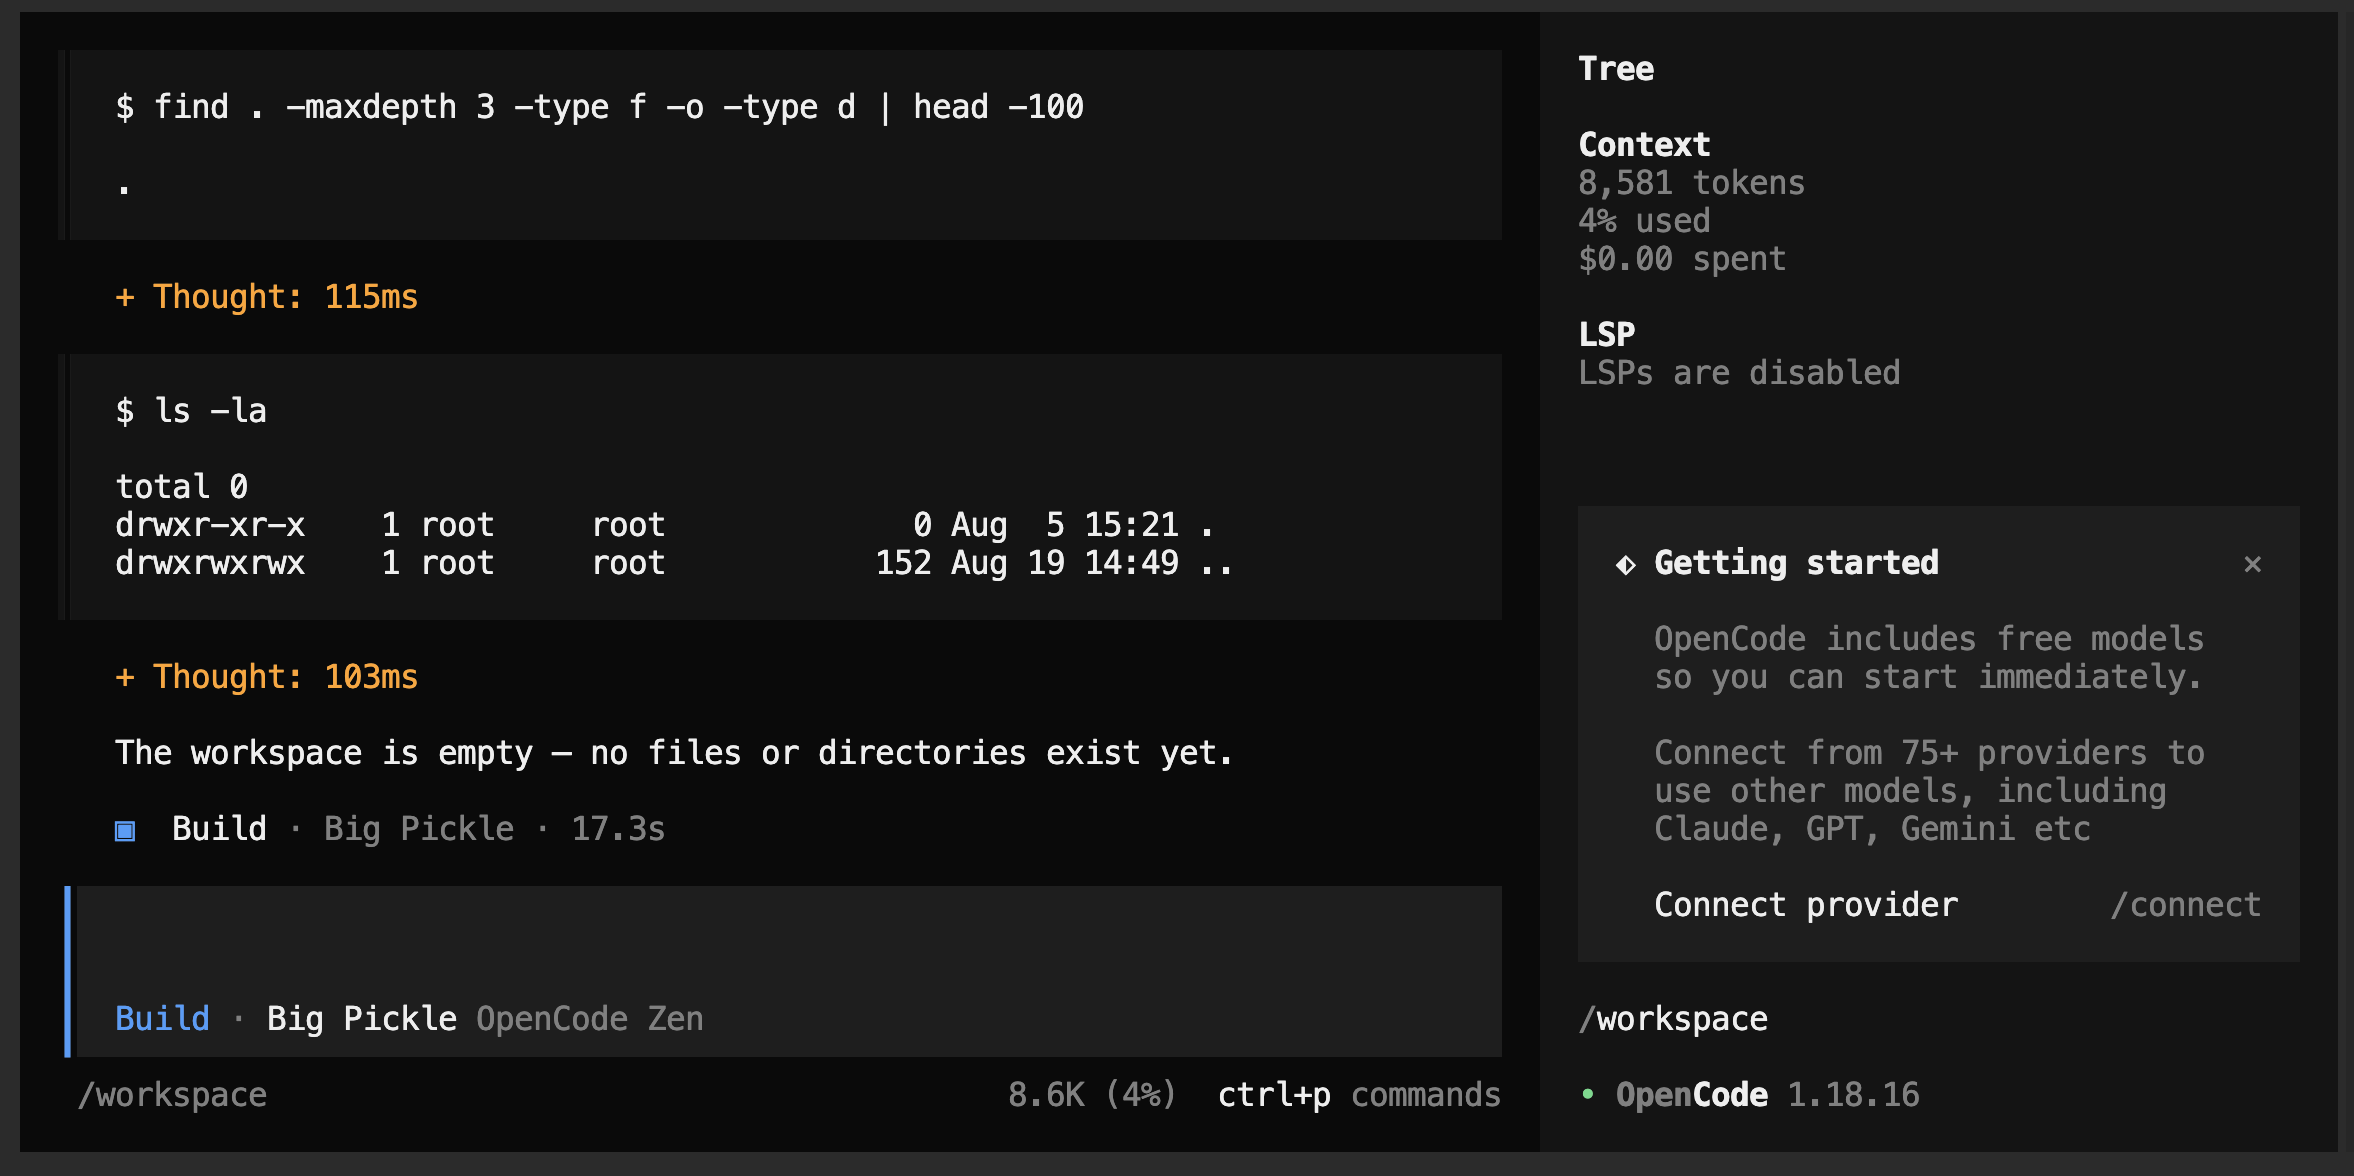
opencode in remote server example
so here is an example:
---
services:
  opencode-sandbox:
    # Pinned version - avoid ':latest',
    # recent builds have had regressions (e.g. TUI hangs)
    image: ghcr.io/anomalyco/opencode:1.18.16
    container_name: opencode_agent
    # Keep stdin open for the interactive TUI
    stdin_open: true
    # Allocate a TTY for interactive use
    tty: true
    # Mount local folder into the sandbox
    volumes:
      - ./sandbox:/workspace
    # Set /workspace as the default working directory
    working_dir: /workspace
    # Keep secrets (API keys) out of this file
    env_file:
      - opencode.env
    environment:
      - TZ=Europe/Athens
    # Prevent privilege escalation inside the container
    security_opt:
      - no-new-privileges:true
    # Cap memory - adjust to taste
    mem_limit: 2g
    # Cap CPU
    cpus: 2
    restart: unless-stopped
and the env example file: opencode.env
# ANTHROPIC_API_KEY=your_key_here
# OPENAI_API_KEY=your_key_here
❯ docker compose exec -ti opencode-sandbox opencodean example
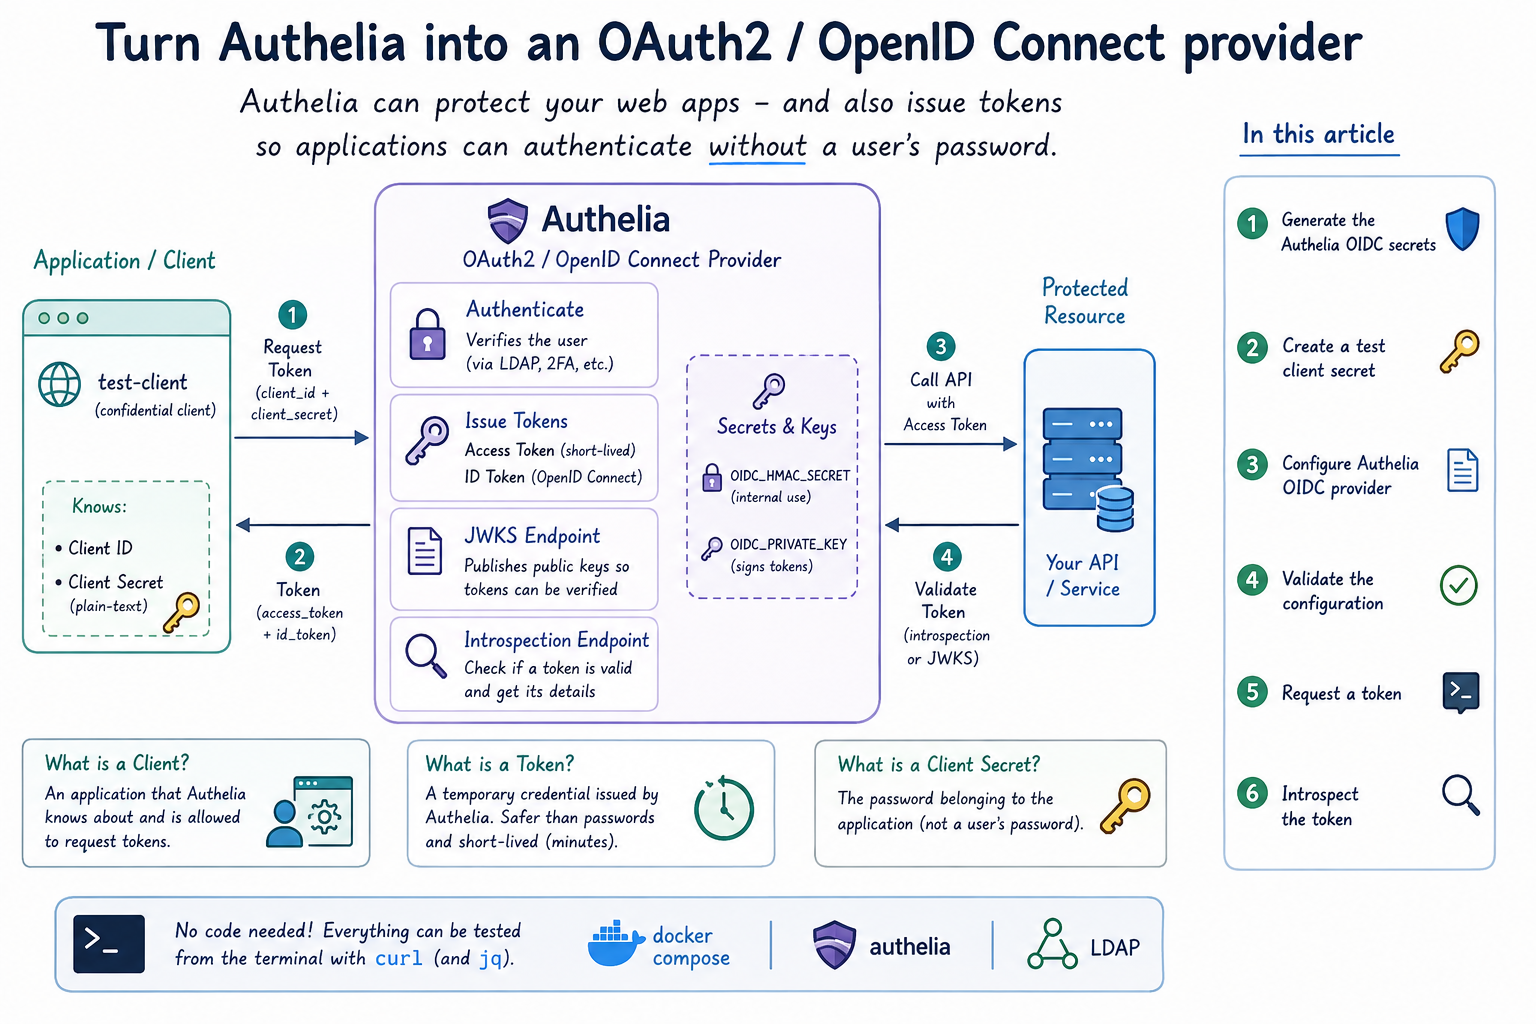
In my previous post I used Authelia in front of a self-hosted service to handle authentication before users are allowed. That works well when there is a human using a browser. Authelia can also act as an OAuth2 / OpenID Connect provider, which means applications can authenticate and obtain tokens without needing access from a user’s actual password.
In this article, I will enable OIDC, then register a small test client and verify that token generation works correctly. I am not connecting a “real” application yet, as it will be the subject of my next blog post.
You don’t need to write any code for this. Everything can be tested from the terminal with curl.
What you need before starting
I am assuming you already have the Authelia setup from the previous article running with docker compose.
You’ll also need:
opensslcurl- optionally
jq, which makes JSON output easier to read :)
On Arch:
sudo pacman -S jq curl opensslOn Debian/Ubuntu:
sudo apt -y install jq curl opensslI’m keeping the same directory structure as before:
./authelia/
├── authelia.env
├── docker-compose.yaml
├── config/
│   └── configuration.yml
└── secrets/
    ├── JWT_SECRET
    ├── LDAP_PASSWORD
    ├── SESSION_SECRET
    └── STORAGE_ENCRYPTION_KEY
We’ll add two more files under secrets/ and extend configuration.yml.
What is OAuth ?
Before getting into the configuration, there are three (3) terms that we need to know.
Client
A client is simply an application that Authelia knows about and allows to request tokens.
In this example the client will be called:
test-clientClient secret
This is essentially the password belonging to the application.
It is not a user’s password.
The client uses it’s ID together with this secret when requesting a token.
Token
A token is a temporary credential issued by Authelia. Instead of passing usernames and passwords between services, applications can work with these short-lived credentials. Which is great, because if a bad actor “read” this token, it’s not like your username/password and only lives for a minute or two!
Step 1 - Generate the Authelia OIDC secrets
So, Authelia needs an HMAC secret and a private key for its OIDC provider.
From inside the ./authelia directory, run the below commands:
# This command generates a secure, random string of characters
openssl rand -hex 64 | tr -d 'n' > ./secrets/OIDC_HMAC_SECRET

# This command generates a RSA Private Key
openssl genrsa -out ./secrets/OIDC_PRIVATE_KEY 4096
New secrets:
OIDC_HMAC_SECRET

OIDC_PRIVATE_KEY
The HMAC secret is used internally by Authelia.
The RSA private key will be used for signing tokens so they can later be verified.
Change the permissions of secret files
chmod 600 ./secrets/OIDC_HMAC_SECRET ./secrets/OIDC_PRIVATE_KEYStep 2 - Create a test client secret
For testing I shall register a client called:
test-clientFirst generate a random secret for it:
openssl rand -hex 32BE Careful , this is a different random key than the above !
example output:
f8dfed59027a5fb575929edde48f5117fb199a504b92a699351a1ab8caed05cfSave the output temporarily somewhere safe.
You will need two versions of this secret:
- the plain-text value, which the client will use later
- a hashed version, which goes into Authelia’s configuration
Generate the hash with Authelia itself:
export YOUR_RANDOM_CLIENT_SECRET="< your random secret here >"

docker compose exec authelia authelia crypto hash generate pbkdf2
  --variant sha512
  --password "${YOUR_RANDOM_CLIENT_SECRET}"
  --no-confirm
The result should look roughly like:
Digest: $pbkdf2-sha512$...Save it the hashed secret to a new secret file:
docker compose exec authelia authelia crypto hash generate pbkdf2
  --variant sha512
  --password "${YOUR_RANDOM_CLIENT_SECRET}"
  --no-confirm | awk '{print $NF}' > ./secrets/OIDC_CLIENT_SECRET_HASH
Keep the original plain-text secret. We will need it when testing the token endpoint.
Step 3 - Configure Athelia OIDC provider
Why some secrets are variables and some files?
Ideally we want to have a dynamic setup to easily rotate secrets etc, but and althouth authelia -technically- allows you to pass complex JSON objects via environment variables, it is messy and prune to errors. Especially with intentation and formating.
Open:
./config/configuration.ymland add a new top-level identity_providers section.
Do not remove any existing configuration.
identity_providers:

  # OpenID Connect (Identity Provider)
  oidc:
    # hmac_secret is now handled by docker-compose.yaml!
    # hmac_secret: '<paste the contents of OIDC_HMAC_SECRET here>'

    # The JWK's issuer configures JSON Web Keys
    jwks:
      - key_id: 'primary'
        algorithm: 'RS256'
        use: 'sig'
        key: {{ secret "/config/secrets/OIDC_PRIVATE_KEY" | mindent 10 "|" | msquote }}

    # Clients is a list of registered clients and their configuration.
    clients:
      - client_id: 'test-client'
        client_name: 'Test client for OIDC'
        # client_secret: '<paste the hashed secret from Step 2 here>'
        # or
        # client_secret: <read it from volume mount'
        client_secret: {{ secret "/config/secrets/OIDC_CLIENT_SECRET_HASH" }}

        public: false

        authorization_policy: 'one_factor'

        token_endpoint_auth_method: 'client_secret_post'

        scopes:
          - 'test-scope'

        grant_types:
          - 'client_credentials'

        response_types: []
update docker compose
and update docker compose yaml file to add secret and envirnment variable:
services:
  authelia:
    # ... your other authelia config ...

    volumes:
      - ./config:/config
      # Mount the private key file generated in the blog post into the container
      - ./secrets/OIDC_PRIVATE_KEY:/config/secrets/OIDC_PRIVATE_KEY:ro
      - ./secrets/OIDC_CLIENT_SECRET_HASH:/config/secrets/OIDC_CLIENT_SECRET_HASH:ro

    environment:
      # ...
      # Enable the template filter so Authelia can parse the {{ secret }} syntax
      - X_AUTHELIA_CONFIG_FILTERS=template
      # Notice the _FILE suffix at the end of the variable name
      - AUTHELIA_IDENTITY_PROVIDERS_OIDC_HMAC_SECRET_FILE=/run/secrets/AUTHELIA_IDENTITY_PROVIDERS_OIDC_HMAC_SECRET

    secrets:
      # ...
      - AUTHELIA_IDENTITY_PROVIDERS_OIDC_HMAC_SECRET

secrets:
  # ...
  AUTHELIA_IDENTITY_PROVIDERS_OIDC_HMAC_SECRET:
    file: ./secrets/OIDC_HMAC_SECRET
Alternative you can print the two secret files with:
cat ./secrets/OIDC_HMAC_SECRETcat ./secrets/OIDC_PRIVATE_KEYand copy their contents into the configuration.
client fields
A few fields are worth pointing out.
grant_types
We’re using:
grant_types:
  - 'client_credentials'
The client credentials flow is useful for machine-to-machine authentication.
There is no browser login involved. The application authenticates using their client_id and client_secret.
For what I want to test here, this is the simplest option.
scopes
For the time beging I am using:
scopes:
  - 'test-scope'
There is nothing special about the name. It is just a test scope that we will request later with curl.
Also, be careful with the YAML indentation. A misplaced space is enough to break the configuration. Ask me how I know this!
Step 4 - Validate the configuration
Before restarting anything, validate the configuration:
docker compose run --rm authelia authelia config validate --config /config/configuration.ymlIf everything is correct, you should see:
Configuration parsed and loaded successfully without errors.example output:
~> sudo docker compose run --rm authelia authelia config validate --config /config/configuration.yml

Container traefik-authelia-run-7afd8b44e1ad Creating
Container traefik-authelia-run-7afd8b44e1ad Created
Configuration parsed and loaded successfully without errors.
If validation fails, fix the configuration before continuing.
In my experience, indentation and incorrectly pasted keys are the first things worth checking.
Now restart Authelia:
docker compose restart authelia
# docker compose ps authelia

NAME          IMAGE                                       COMMAND                  SERVICE       CREATED          STATUS                    PORTS
authelia      authelia/authelia:4.39                      "/app/entrypoint.sh"     authelia      15 seconds ago   Up 14 seconds (healthy)   9091/tcp
watch the logs:
docker compose logs -f autheliaMake sure Authelia starts normally and there are no OIDC related configuration errors.
Press Ctrl+C once you’re satisfied everything is running or d to detach if started authelia with docker compose up authelia
Step 5 - Request a token
Now we can test the authelia oidc provider.
Replace:
authelia.example.orgwith your actual Authelia hostname.
and also:
YOUR_RANDOM_CLIENT_SECRETwith the original plain-text secret generated in Step 2.
Run:
curl -s -X POST https://authelia.example.org/api/oidc/token
  -d 'grant_type=client_credentials'
  -d 'client_id=test-client'
  -d 'client_secret=PASTE_YOUR_RANDOM_SECRET_HERE'
  -d 'scope=test-scope' | jq
A successful response should look similar to this:
{
  "access_token": "authelia_at_< ... >",
  "expires_in": 3599,
  "scope": "test-scope",
  "token_type": "bearer"
}
At this point Authelia has successfully authenticated the client and issued an access token for 1hour !
Copy the value of:
access_tokenbecause we will use it in the next test.
my preferable way:
ACCESS_TOKEN=$(curl -s -X POST https://authelia.example.org/api/oidc/token   -d 'grant_type=client_credentials'   -d 'client_id=test-client'   -d "client_s
ecret=${YOUR_RANDOM_CLIENT_SECRET}"  -d 'scope=test-scope' | jq -r .access_token)
If you get an error, these are the first things I’d check:
invalid_client— verify theclient_idand client secretinvalid_scope— make sure the requested scope matches the configured scopeunauthorized_client— check thatclient_credentialsis included undergrant_types
Step 6 - Introspect the token
Generating a token is only half the test.
I also want to verify that Authelia can recognise the token afterwards and report whether it is still valid.
That’s what the introspection endpoint is for.
Type:
curl -s -X POST https://authelia.example.org/api/oidc/introspection
     -u "test-client:${YOUR_RANDOM_CLIENT_SECRET}"
     -d "token=${ACCESS_TOKEN}" | jq .
a valid token should return something similar to:
{
  "active": true,
  "client_id": "test-client",
  "exp": 1786554376,
  "iat": 1786550776,
  "scope": "test-scope"
}
The part we care about here is:
"active": trueThat confirms that Authelia recognises the token and considers it valid.
The response also includes the client ID, scope and expiry timestamp.
Once the token expires, introspecting the same token should return it as inactive.
That’s it
-Evaggelos
I like running a few services either on my private homelab or on various cloud VPS. I prefer self-hosted applications and my security/privacy setup is to have a different username/email with a different password for each one of them. With password managers like vaultwarden/Bitwarden this is easier. What I would like to do next is to restrict access and protect my cloud applications behind a single login page and add 2FA to them. That’s what Authelia does.
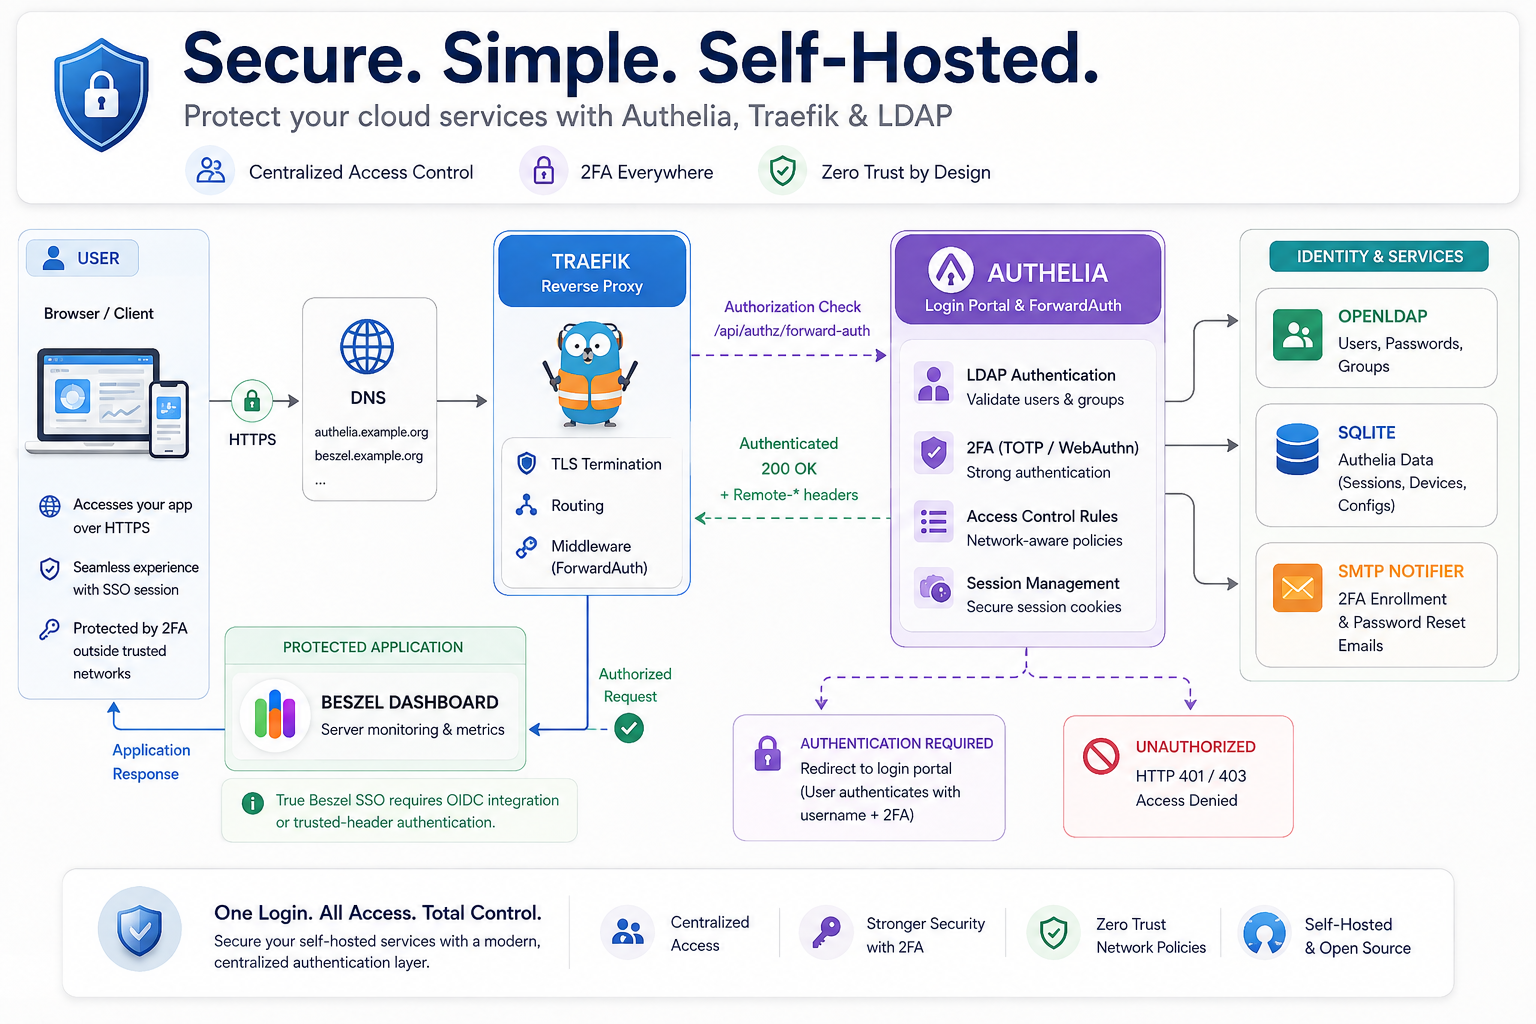
In this article I will walk you through on how to setup authelia, and to make it concrete, we will protect Beszel, which is a lightweight server-monitoring dashboard that tracks CPU, RAM, disk, and network usage of your machines. It’s a great first useful, simple, and easy to tell at a glance whether the login wall is working.
Prerequisites
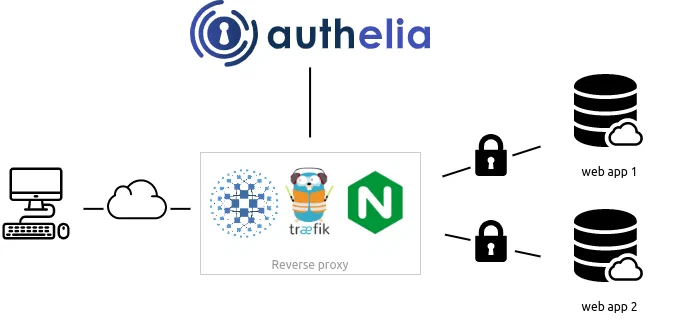
- Authelia — the login page that decides who gets in
- Authelia MUST be served via the https scheme. This is not optional even for testing!
- Authelia is a companion of reverse proxies like Traefik (good news)
- Traefik — your existing reverse proxy, which it will tell to ask Authelia’s permission before letting anyone through your application
- Your existing LDAP server — the directory of usernames and passwords Authelia will check against
- I user openldap already, so it’s useful to use an existing database.
- Beszel — the example app we’ll put behind the login page
- a new DNS name for authelia, like
authelia.example.org
Authelia Architecture
Directory layout
Here is the folder layout (under traefik directory):
./authelia/
├── authelia.env
├── docker-compose.yaml
├── config/
│   └── configuration.yml
└── secrets/
    ├── JWT_SECRET
    ├── LDAP_PASSWORD
    ├── SESSION_SECRET
    └── STORAGE_ENCRYPTION_KEY
Step 1 — Create the folders
Authelia needs two folders: one for its configuration file, and one for its secret keys. Actually the secret directory is a choice for storing the authelia secrets that we will create at the next step.
mkdir -p ./authelia/config
mkdir -p ./authelia/secrets
Step 2 — Generate the secret keys
Authelia relies on a few long, random strings to keep things secure: one to sign password-reset links, one to encrypt your login session, and one to encrypt its small local database. Rather than pasting these into a config file in plain sight, we’ll save each one into its own private file.
copy/paste the below commands in your terminal to generate all secrets:
openssl rand -hex 32 | tr -d 'n' > ./authelia/secrets/JWT_SECRET
openssl rand -hex 32 | tr -d 'n' > ./authelia/secrets/SESSION_SECRET
openssl rand -hex 32 | tr -d 'n' > ./authelia/secrets/STORAGE_ENCRYPTION_KEY
Now add your LDAP bind password:
echo -n "YOUR_LDAP_BIND_PASSWORD" > ./authelia/secrets/LDAP_PASSWORDFinally, update permissions to these files so only your user can read them:
chmod 600 ./authelia/secrets/*What each file is for:
| File | Purpose |
|---|---|
JWT_SECRET |
Signs password-reset links so they can’t be forged |
SESSION_SECRET |
Encrypts your login session cookie |
STORAGE_ENCRYPTION_KEY |
Encrypts Authelia’s local database (registered devices, sessions) |
LDAP_PASSWORD |
The password Authelia uses to log into your LDAP server and search it |
Do not commit this
secretsfolder to git, and never share these files, to avoid anyone to impersonate your authelia.
Step 3 — Authelia configuration file
Create a new configuration file at ./authelia/config/configuration.yml.
Replacing the <...> placeholders with your own details and domain.
I use example.com for the ldap server and example.org for application domain. Which means I have multiple domains on the LDAP.
---
identity_validation:
  reset_password:

definitions:
  network:
    internal:
      - '10.10.0.0/16'
      - '172.16.0.0/12'
      - '192.168.2.0/24'
      - '100.64.0.0/10'  # tailscale network
    my_static:
      - '<my_static_ip>/32'

authentication_backend:
  ldap:
    address: 'ldaps://<ldap_ip>:636'
    implementation: 'custom'
    tls:
      server_name: 'openldap.example.com'
    base_dn: 'dc=example,dc=com'
    additional_users_dn: 'ou=People'
    # login with either username or email address
    users_filter: '(&(|({username_attribute}={input})({mail_attribute}={input}))(objectClass=person))'
    additional_groups_dn: 'ou=Groups'
    groups_filter: '(&(member={dn})(objectClass=groupOfNames))'
    user: 'cn=admin,dc=example,dc=com'
    attributes:
      username: 'uid'
      display_name: 'cn'
      mail: 'mail'

access_control:
  default_policy: 'deny'

  rules:
    - domain: 'blog.example.org' # allow blog to everybody
      policy: 'bypass'

    - domain: 'beszel.example.org' # bypass beszel for my networks
      policy: 'bypass'
      networks:
        - 'internal'
        - 'my_static'

    - domain: 'beszel.example.org' # username/password to access beszel for all other networks.
      #policy: 'one_factor'
      policy: 'two_factor'

# session cookies to authorize user access to various protected websites
session:
  name: 'authelia_session'
  cookies:
    - domain: 'example.org'
      authelia_url: 'https://authelia.example.org'
      default_redirection_url: 'https://beszel.example.org'

# storage options: sqlite, mysql & postgres
storage:
  local:
    path: '/config/db.sqlite3'

# switch to SMTP in production
notifier:
  filesystem:
    filename: '/config/notification.txt'
...
Validate authelia configuration
if you need to verify authelia configuration at any point, use:
docker compose run --rm authelia authelia config validate --config /config/configuration.yml
a typical resul should be:
# docker compose run --rm authelia
  authelia config validate --config /config/configuration.yml

Container traefik-authelia-run-ef4ec807d5b6 Creating
Container traefik-authelia-run-ef4ec807d5b6 Created
Configuration parsed and loaded successfully without errors.
Step 4 — Create the Beszel user in LDAP
the LDAP directory is the source of truth for who gets in, so we need at least one user to log in with. On your LDAP server, generate a hashed password for that user. The main idea is that the the ldap user and the beszel user have the same credentials to autologin. Eitherwise you just need to login twice :)
slappasswd -h {SSHA} -s "YOUR_BESZEL_PASSWORD"Copy the output — it should look like {SSHA}abc123... — and create a file called beszel.ldif with this content (adjust uid, cn, mail to fit your setup):
dn: uid=beszel,ou=People,dc=example,dc=com
objectClass: inetOrgPerson
objectClass: organizationalPerson
objectClass: person
objectClass: posixAccount
objectClass: top
cn: Beszel User
givenName: Beszel
homeDirectory: /home/beszel
mail: beszel@example.org
sn: User
uid: beszel
uidNumber: 1001
gidNumber: 1001
userPassword: {SSHA}<hashed_password>
Now add it to your directory. Run this on your LDAP server (or from any machine that can reach it and has the ldap-utils tools installed):
ldapadd -x -D "cn=admin,dc=example,dc=com" -W -f beszel.ldifYou’ll be prompted for the LDAP admin password, then the user is created. That’s the account you’ll type into Authelia’s login page in Step 8.
the above ldap diff is an example, adapt it accordinly to your needs and setup.
Step 5 — Add Authelia to your docker-compose.yml
Create ./authelia/docker-compose.yaml with this content:
---
services:
  authelia:
    image: authelia/authelia:4.39.20
    container_name: authelia
    restart: unless-stopped
    volumes:
      - ./config:/config
    healthcheck:
      disable: false
    secrets:
      - AUTHELIA_JWT_SECRET
      - AUTHELIA_LDAP_PASSWORD
      - AUTHELIA_SESSION_SECRET
      - AUTHELIA_STORAGE_ENCRYPTION_KEY
    env_file:
      - ./authelia.env

secrets:
  AUTHELIA_JWT_SECRET:
    file: ./secrets/JWT_SECRET
  AUTHELIA_LDAP_PASSWORD:
    file: ./secrets/LDAP_PASSWORD
  AUTHELIA_SESSION_SECRET:
    file: ./secrets/SESSION_SECRET
  AUTHELIA_STORAGE_ENCRYPTION_KEY:
    file: ./secrets/STORAGE_ENCRYPTION_KEY
Then create ./authelia/authelia.env (change the timezone to yours). Change the log level to debug if also needed:
AUTHELIA_LOG_LEVEL=info

TZ=Europe/Athens

AUTHELIA_AUTHENTICATION_BACKEND_LDAP_PASSWORD_FILE=/run/secrets/AUTHELIA_LDAP_PASSWORD
AUTHELIA_SESSION_SECRET_FILE=/run/secrets/AUTHELIA_SESSION_SECRET
AUTHELIA_STORAGE_ENCRYPTION_KEY_FILE=/run/secrets/AUTHELIA_STORAGE_ENCRYPTION_KEY
AUTHELIA_IDENTITY_VALIDATION_RESET_PASSWORD_JWT_SECRET_FILE=/run/secrets/AUTHELIA_JWT_SECRET
A few things worth knowing about this block:
- No
ports:line. There is no need to expose Authelia directly to the internet — Traefik will talk to it privately, container-to-container, over the shared network. - No custom healthcheck needed. The Authelia image already includes one built in — Docker will automatically mark the container “healthy” or “unhealthy” without you configuring anything.
- The
secrets:block mounts each secret file into the container at/run/secrets/..., read-only. Theenv_filelines then just tell Authelia where to find each one. This keeps the actual secret values out ofdocker inspectoutput, unlike writing them straight as environment variables.
hey! do not forgot to update traefik docker-compose.yaml to include authelia docker compose yaml
include:
  # authelia.example.org: authentication and authorization server and portal
  - path: ./authelia/docker-compose.yaml
Step 6 — Tell Traefik about Authelia
I am using YAML dynamic configuration with Traefik and not labels, for me it’s more clear that way. I keep everyting under etc_traefik/dynamic/
First, we add the middleware aka the reusable “ask Authelia before letting this request through” rule. Create middlewares.yml if you have not yet a middleware yaml file.
http:
  middlewares:

    authelia:
      forwardAuth:
        # address: "http://authelia:9091/api/verify?rd=https://authelia.example.org/"
        address: "http://authelia:9091/api/authz/forward-auth"
        trustForwardHeader: true
        maxResponseBodySize: 8192
        authResponseHeaders:
          - Remote-User
          - Remote-Groups
          - Remote-Name
          - Remote-Email
Then, we create the router — so the login page itself is reachable at https://authelia.example.org and also auto create the TLS certifcate with letsencrypt.
authelia.yml:
http:
  routers:
    authelia:
      rule: 'Host(`authelia.example.org`)'
      entryPoints: ["websecure"]
      service: "authelia"
      tls:
        certResolver: letsencrypt

    authelia-http:
      rule: 'Host(`authelia.example.org`)'
      entryPoints:
        - web
      service: "authelia"
      middlewares:
        - redirect-to-https

  services:
    authelia:
      loadBalancer:
        servers:
          - url: "http://authelia:9091"
Notes:
certResolver: letsencrypt— use whatever you named your certificate resolver in Traefik’s main config (the one that gets you your Let’s Encrypt certificates). If yours has a different name, change it here.authelia-httpjust catches plainhttp://requests and redirects them tohttps://— this assumes you already have aredirect-to-httpsmiddleware defined in your Traefik dynamic config, which is a standard pattern.- Make sure both
authelia.example.organdbeszel.example.orgalready have DNS records (anArecord) pointing at your server, same as your other subdomains.
Step 7 — Put Beszel behind the login page
Now for the authelia part to beszel. Update beszel.yml in the same Traefik dynamic config folder. If Beszel already has a router file, it should look this:
http:
  routers:
    beszel:
      rule: 'Host(`beszel.example.org`)'
      entryPoints: ["websecure"]
      service: "beszel"
      tls:
        certResolver: letsencrypt
      middlewares:
        - authelia@file     # <-- this line is the only change

    beszel-http:
      rule: 'Host(`beszel.example.org`)'
      entryPoints:
        - web
      service: "beszel"
      middlewares:
        - redirect-to-https

  services:
    beszel:
      loadBalancer:
        servers:
          - url: "http://beszel:8090"
The whole magic is: - authelia@file in the middleware list. (The @file suffix just tells Traefik the middleware is defined in a dynamic file.
Any router you add that line to is now protected: visitors get redirected to the Authelia login page first.
TRUSTED_AUTH_HEADER
Do not forget to add TRUSTED_AUTH_HEADER to your beszel docker compose yaml file, to allow autologin!
beszel-docker-compose.yml
environment:
  USER_CREATION: false
  TRUSTED_AUTH_HEADER: "Remote-Email"
With this, it will
Step 8 — Start authelia.
From the ./authelia folder:
docker compose up -d authelia
docker compose logs -f authelia
Traefik is already watching its dynamic config folder, so it will pick up the new files automatically — no restart needed.
Monitor docker compose logs in the console.
Open https://authelia.example.org in your browser. You should see Authelia’s login page.
Then open https://beszel.example.org on a new tab.
- From home (on your local network, or from your fixed home IP): you should land straight on Beszel — no authelia login, thanks to the
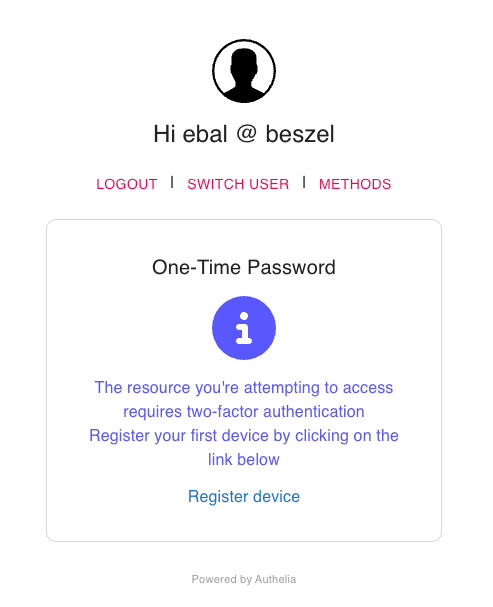
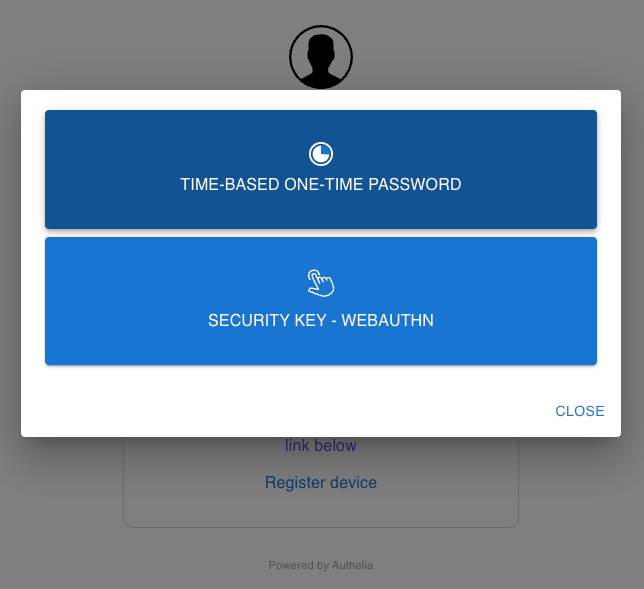
bypassrule for trusted networks. - From anywhere else (try your phone on mobile data or brave via tor): you’ll be redirected to the authelia login page. Log in with the
beszeluser or email and the password you set in ldap, and you should autologin on Beszel, now authenticated. Magic ! - The public blog (
blog.example.org) stays open to everyone — check it still loads without a login.
That’s it !
Evaggelos