





I am in the process of migrating my self-hosted email server to a new virtual private server. I also want to upgrade and test some new features, more specifically add oauth2 capabilities with an authentication and authorization server. To avoid big mistakes and keeping my current backend, I looked into how to proxy IMAP traffic to a new mail setup.
Fortunately, dovecot, has the ability to act as an imap proxy. The setup is really easy. I will run everything local on my archlinux homepc, so I do not need to expose anything till I am ready. My preferred way to run services is via containers and docker compose make this really easy.
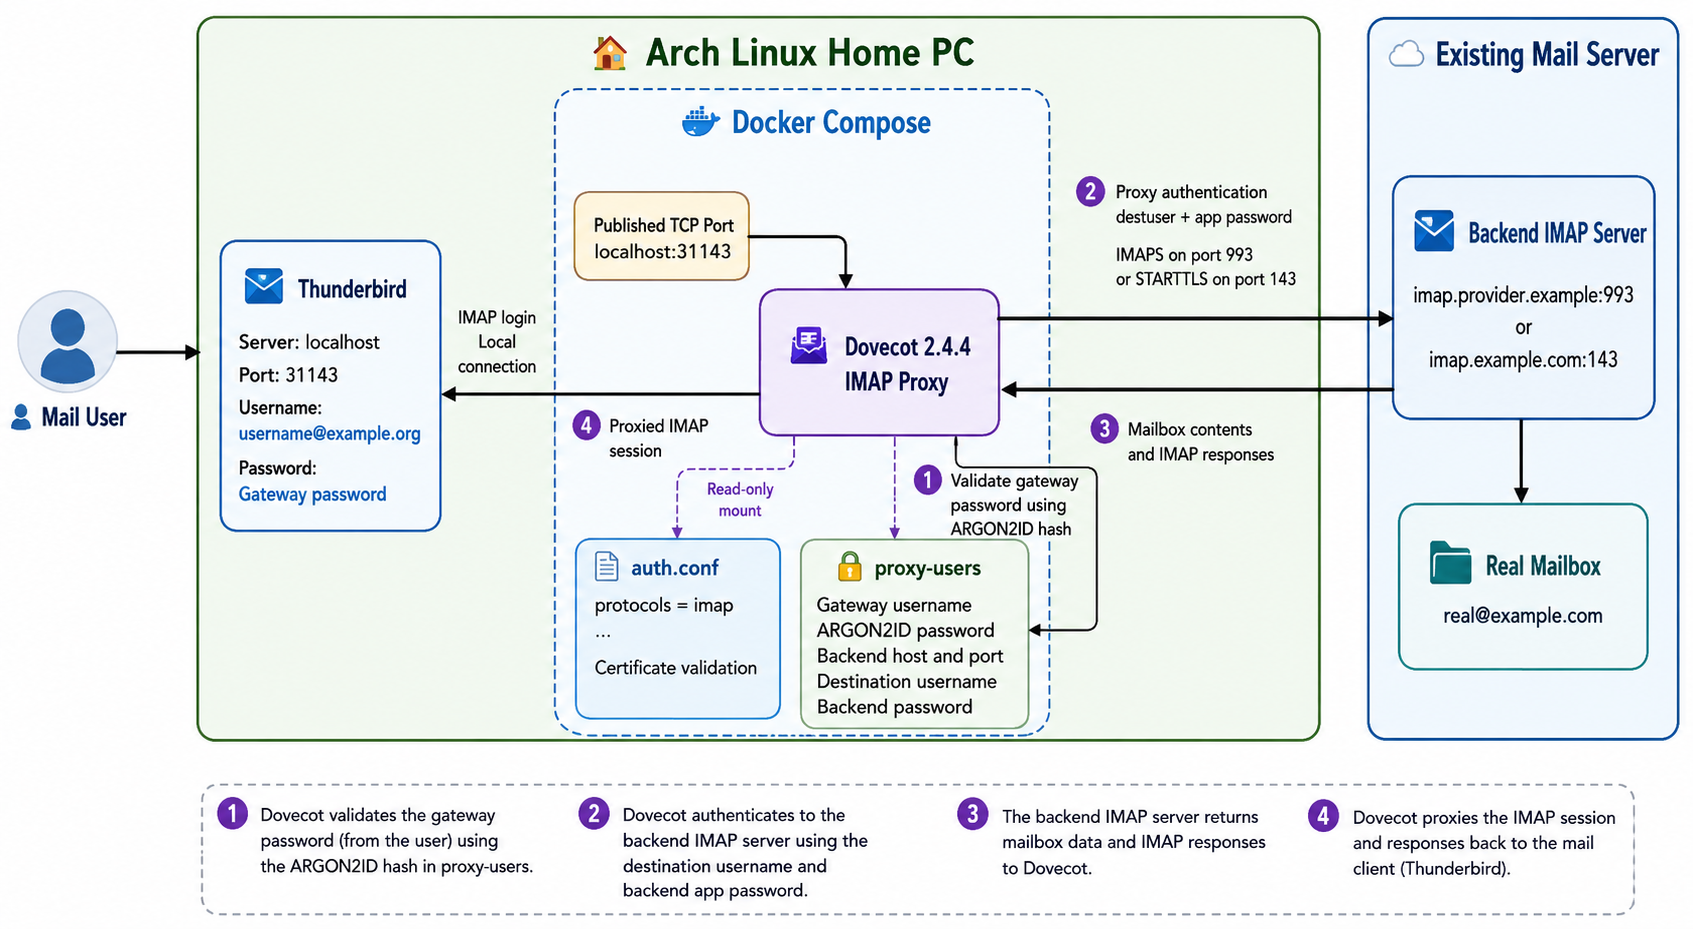
dovecot docker compose
Let’s start with the dovecot docker compose setup.
docker-compose.yml
---
services:
  dovecot:
    image: dovecot/dovecot:2.4.4
    container_name: dovecot
    restart: unless-stopped
    ports:
      - 31143:31143
    volumes:
      - ./auth.conf:/etc/dovecot/conf.d/auth.conf:ro
      - ./proxy-users:/etc/dovecot/proxy-users:ro
Note: You can either use latest tag if you prefer. It is a best practice to avoid latest so you always know what is the running version, but you can also use dovecot/dovecot:latest if you like.
Run the below command to download the container image:
docker compose -v pulldovecot configuration
Now, let’s dive into the configuration files.
auth.conf
# Tells Dovecot to only load and listen for the IMAP protocol.

# Enable only the IMAP protocol.
protocols = imap

# Authentication used by the IMAP client.
auth_mechanisms = plain login

# Required when the IMAP client connects without TLS.
# Safe only on a private, non-published Docker network.
auth_allow_cleartext = yes

# Authenticate the local gateway account and return proxy fields.
passdb passwd-file {
    passwd_file_path = /etc/dovecot/proxy-users
}

# Tells Dovecot which Certificate Authorities (CAs) to trust.

# Use ca-certificates to check TLS/SSL
ssl_client_ca_file = /etc/ssl/certs/ca-certificates.crt

# enforces strict certificate validation
ssl_client_require_valid_cert = yes
Let’s explain everything.
This is a local instance, so there is no need to be extravagance configuration.
- Enable only the IMAP protocol.
- Enable plain login for the imap client e.g. thunderbird.
- Allow clear text password, as we do not have TLS (for now).
- Use a text file for username, password and proxy to the real imap mail server.
- Enable TLS/SSL check (our real imap server uses startTLS) and
- Validate the certificate of our real imap server.
Start the dovecot docker compose service
docker compose -v up
No worries if it fails, the
Username and Password
Now the important thing, how to create a new user and how to proxy to the real imap mail server !
But before that, let’s create a new secure password:
docker compose exec dovecot doveadm pw -s ARGON2ID
This is a test password.
a full example
❯ docker compose exec dovecot doveadm pw -s ARGON2ID

Enter new password: <test>
Retype new password: <test>

{ARGON2ID}$argon2id$v=19$m=65536,t=3,p=1$I4BtU8w1KdKI6DNxdJ4aNQ$gP+dEXRDp7vD7IBirwHPe3HqXPwKfbDV+nh8qsdBhaE
It is important to keep the output.
Next item on the list, to select a new username.
And I chose: username@example.org 🙂
For SSL (TCP Port: 993), the proxy settings are:
host=imap.provider.example
port=993
ssl=yes
destuser=real@example.com
pass=app-password
For starttls the proxy settings are:
host=imap.example.com
port=143 starttls=yes
destuser=real@example.com
pass=REAL_APP_PASSWORD
proxy_mech=CRAM-MD5
And I’ve added the CRAM-MD5 (encrypted password) just for additional info.
Now, let’s put everything together
vim proxy-users
{ARGON2ID}$argon2id$v=19$m=65536,t=3,p=1$I4BtU8w1KdKI6DNxdJ4aNQ$gP+dEXRDp7vD7IBirwHPe3HqXPwKfbDV+nh8qsdBhaE::::::proxy=y host=imap.provider.example port=993 ssl=yes destuser=real@example.com pass=app-passwordAnd make sure you change ownership and permissions before you start the container.
sudo chown 1000:1000 proxy-users
sudo chmod 600 proxy-users
Let’s recreate or stop/start dovecot docker compose and test it
docker compose -v down
docker compose -v up -d
thunderbird
finally let’s check our mail client
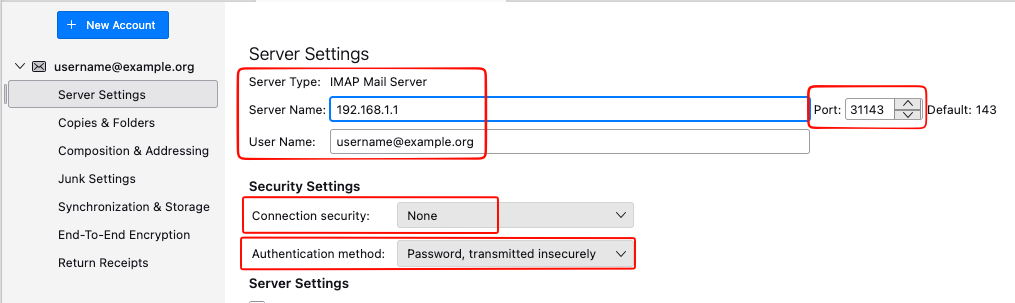
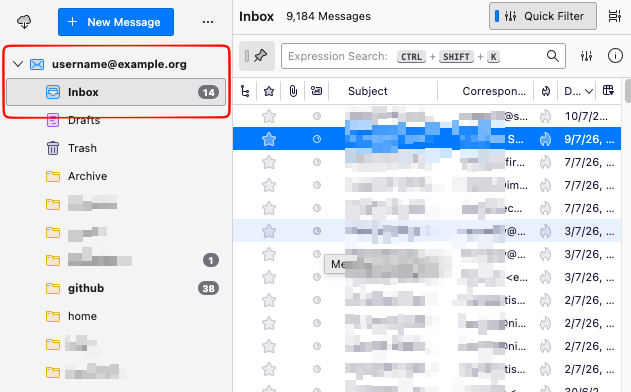
That’s it!
Evaggelos
coding agents are useful, but they forget. I’ve find it from time and time to either repeat my self or creating skills to reuse them. But I also use multiple agents and on different machines too which is also complicated. I was looking for a way to keep a common memory to my agents. And built my services and setup without … forgetting !
This guide shows a simple MVP setup for giving your AI coding agents one shared memory system.
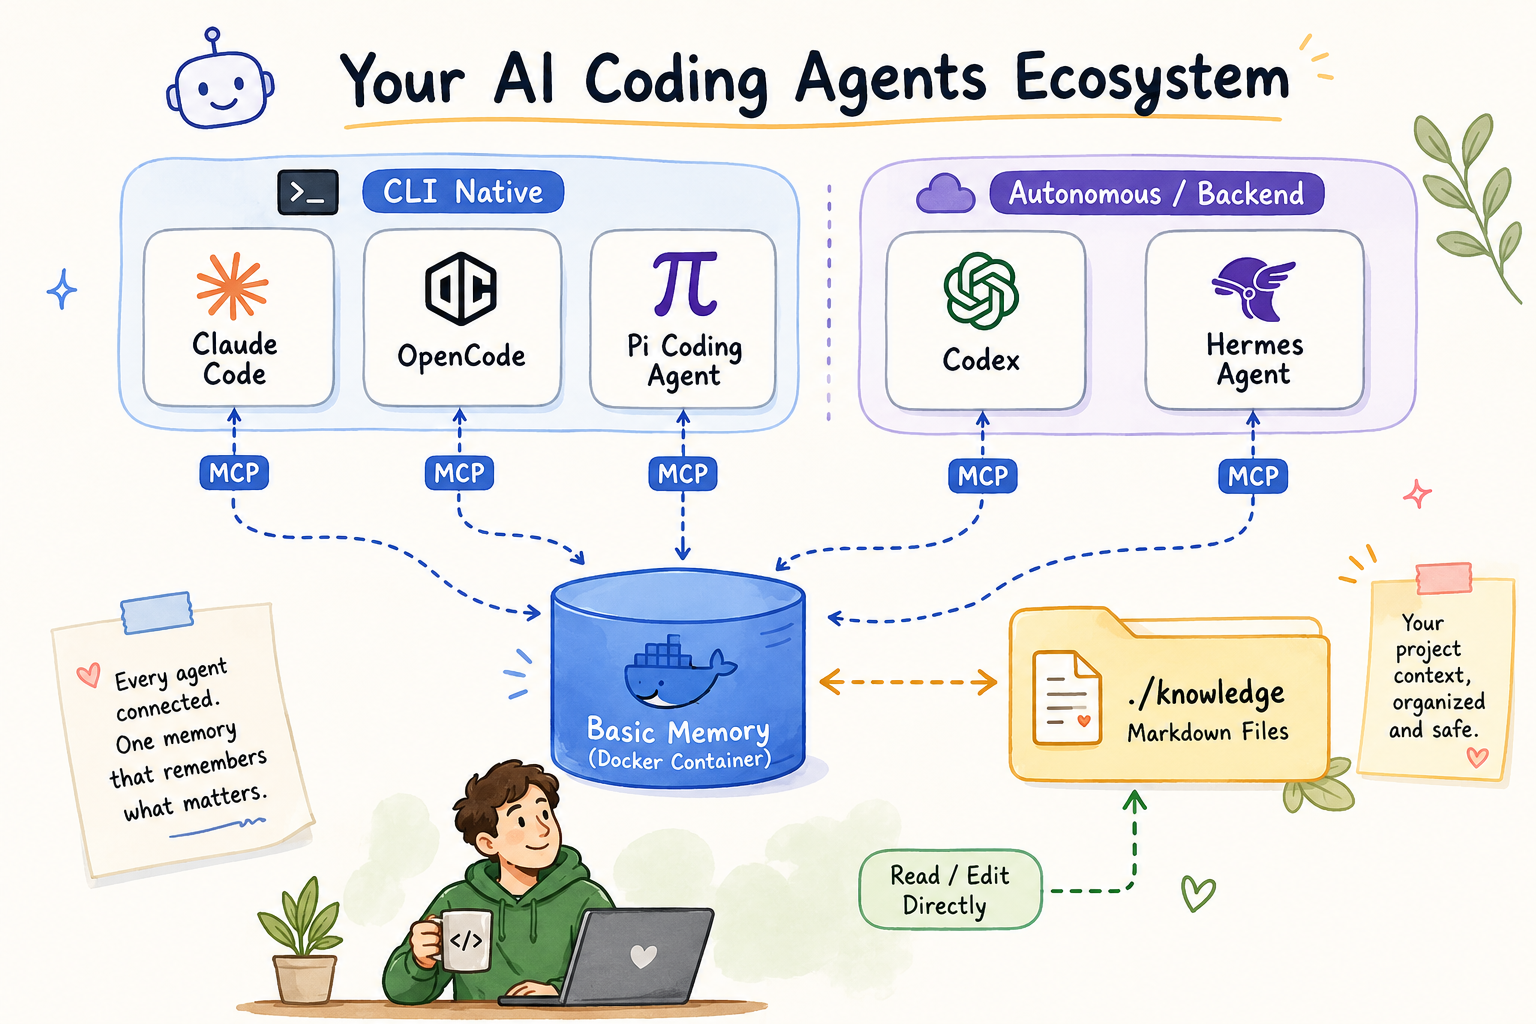
What we are building
I will be using Basic Memory as the memory service and connect agents through MCP, running it with docker compose using the official image.
Model Context Protocol (MCP) is an open standard introduced by Anthropic in November 2024 that enables AI agents and large language models (LLMs) to securely connect with external tools, data sources, and services
One agent writes a note, any agent — in any later session — can retrieve it back. You can also open the same files yourself, since they are just Markdown files on disk.So basic memory becomes a shared notebook for your coding agents.
What you need
You need:
- Docker
- Docker Compose
- Git (optional)
- A terminal
- One coding agent with MCP support
No model provider API key needed here. Basic Memory’s default semantic search runs on local FastEmbed embeddings.
Official docs:
- Basic Memory repo: https://github.com/basicmachines-co/basic-memory
- Basic Memory docs: https://docs.basicmemory.com/
- Basic Memory Docker guide: https://github.com/basicmachines-co/basic-memory/blob/main/docs/Docker.md
Why no model provider is needed
Some memory systems have an LLM read your conversation and extract facts before storing anything - every save costs a model call, and you need a provider API key for that.
Basic Memory skips this. The agent (or you) writes structured Markdown directly:
---
title: Testing Conventions
permalink: testing-conventions
tags: [testing]
---

# Testing Conventions

## Observations
- [tool] Use Vitest instead of Jest
- [rule] Do not edit generated files

## Relations
- relates_to [[Project Architecture]]
Observations, Relations, done. A local SQLite index gives full-text and semantic search over these files, no cloud calls.
Step 1: Start Basic Memory with Docker Compose
Default install is
uv tool install basic-memory(oruvx basic-memory mcp), a stdio MCP server per agent - no Docker needed. I wanted one server for all my agents, so Docker it is.
The pre-built image runs as UID/GID 1000, so create and own the folders first:
mkdir -p knowledge basic-memory-config
sudo chown -R 1000:1000 knowledge basic-memory-config
docker compose
docker-compose.yml
name: basic-memory

# runs the MCP server over SSE/HTTP on :8000 - no auth on that endpoint.
# keep it on a trusted network, or put a reverse proxy + auth in front of it.

services:
  basic-memory:
    image: ghcr.io/basicmachines-co/basic-memory:latest
    container_name: basic-memory-server

    volumes:
      - ./knowledge:/app/data:rw
      # config + sqlite index, container user is appuser -> /home/appuser
      - ./basic-memory-config:/home/appuser/.basic-memory:rw

    environment:
      - BASIC_MEMORY_DEFAULT_PROJECT=main
      - BASIC_MEMORY_SYNC_CHANGES=true
      - BASIC_MEMORY_LOG_LEVEL=INFO
      - BASIC_MEMORY_SYNC_DELAY=1000

    ports:
      - "8000:8000"

    command: ["basic-memory", "mcp", "--transport", "sse", "--host", "0.0.0.0", "--port", "8000"]

    restart: unless-stopped

    healthcheck:
      test: ["CMD", "basic-memory", "--version"]
      interval: 30s
      timeout: 10s
      retries: 3
      start_period: 30s
and start it:
docker compose -v up -dConfirm it’s healthy:
docker compose -v ps -a

# view logs
docker compose logs -f basic-memory
a healthy container looks like this in the logs:
❯ docker compose logs -f basic-memory
basic-memory-server  | [07/06/26 09:23:04] INFO     Starting MCP server 'Basic Memory'
basic-memory-server  |                              with transport 'sse' on
basic-memory-server  |                              http://0.0.0.0:8000/mcp
basic-memory-server  | INFO:     Uvicorn running on http://0.0.0.0:8000 (Press CTRL+C to quit)
Step 2: Confirm the project
The default project (main) is your ./knowledge folder, mounted into the container at /app/data. To add another project pointing at a different mounted folder:
docker exec basic-memory-server basic-memory project add my-project /app/data/my-project
docker exec basic-memory-server basic-memory project list
Decide upfront whether you want one shared notebook across all your repos, or one project per repo — it’s easier to choose now than to migrate later.
If you just want to have one shared notebook, then ignore project add my-project command.
Step 3: Connect Claude Code
Claude Code connects over SSE, worked fine against the Dockerized server:
claude mcp add --transport sse basic-memory http://localhost:8000/mcpVerify inside Claude Code:
/mcpExpect something like:
Local MCPs (/home/<user>/.claude.json [project: <project path>])
❯ basic-memory · ✔ connected · 23 tools
To remove it:
claude mcp remove basic-memoryThere’s also a Claude Code plugin for session-start briefings and /basic-memory:* commands, optional:
claude plugin marketplace add basicmachines-co/basic-memory --sparse .claude-plugin plugins/claude-code
claude plugin install basic-memory@basicmachines-co
OpenCode example
OpenCode has a native "remote" MCP type, also worked directly against the same server, no proxy. Add to ~/.config/opencode/opencode.json:
{
  "$schema": "https://opencode.ai/config.json",
  "mcp": {
    "basic-memory": {
      "type": "remote",
      "url": "http://localhost:8000/mcp",
      "enabled": true
    }
  }
}
Verify:
opencode mcp listExpect:
┌  MCP Servers
│
●  ✓ basic-memory connected
│      http://localhost:8000/mcp
│
└  1 server(s)
OpenCode’s config shape for remote MCP servers might change, check their docs if it stops working: https://opencode.ai/docs/mcp-servers/
Test it
Ask your connected agent, in plain language:
"Create a note about our project architecture decisions."A Markdown file should appear under ./knowledge on your host in real time. Open it — you’ll see the frontmatter, an Observations list, and a Relations list. That’s the entire format.
Then start a fresh session (or switch agents) and ask:
Retrieve all notes from basic-memoryIf the agent surfaces what you saved earlier, memory is working end to end. In practice it looks like this:
What to put in memory
Good:
- Project conventions
- Folder structure
- Testing framework
- Architecture decisions
- Things the agent should avoid
here is an example from my homepc:
❯ tree knowledge/
knowledge/
└── basic-memory
    ├── conventions
    │   └── Docker Healthcheck Convention.md
    ├── projects
    │   ├── Changelog Conventions.md
    │   ├── Deployment Preferences.md
    │   ├── Git Commit Conventions.md
    │   └── README Conventions.md
    └── services
        ├── Hermes Agent.md
        ├── Port Registry.md
        ├── Port Suggestion Registry.md
        └── Service Registry.md

5 directories, 9 files
Bad:
do not put
- Passwords
- Private keys
- Production tokens
- Customer private data
See the Security notes near the top — treat ./knowledge like any other sensitive project directory, and don’t commit it to a public repo unless that’s actually intended.
Troubleshooting
Agent can’t connect to the MCP server? run the proxy bridge manually and see what breaks:
uvx mcp-proxy http://localhost:8000/mcpYour coding agent cannot connect to an MCP server that isn’t reachable, obviously.
Notes not showing up, or search feels stale:
docker exec basic-memory-server basic-memory status
docker exec basic-memory-server basic-memory doctor
doctor checks file-vs-database consistency and rebuilds the local search index if it’s out of sync.
Running multiple projects and not sure which one is active:
docker exec basic-memory-server basic-memory project listI hope you find the article useful.
That’s it !
-Evaggelos