





Containers is an package application with all the files, libraries, and runtime it needs. They are a common way to develop, test, and deploy server software, most known are docker containers at the moment and in macOS the two most common tools: Docker desktop and OrbStack.
Apple’s container tool takes a different approach: it creates and runs Linux containers using lightweight virtual machines on Apple silicon Macs. It works with OCI-compatible images, so you can pull images from standard registries and build images that can run in other OCI-compatible tools.
This guide walks through installing container, starting the system service, running an Ubuntu shell, and building a simple “Hello, world” web server.
What you need
- A Mac with Apple silicon: M1, M2, M3, M4, or newer
- macOS 26
- Administrator access to install the tool
Apple supports container on macOS 26 because it depends on newer virtualization and networking features. Older macOS versions may work for some workflows, but they are not officially supported. Command availability can also vary by macOS version.
Install container
Download the latest signed installer from the Apple container GitHub releases page:
https://github.com/apple/container/releases
Open the .pkg file and follow the installer prompts.
follow the below instracturions
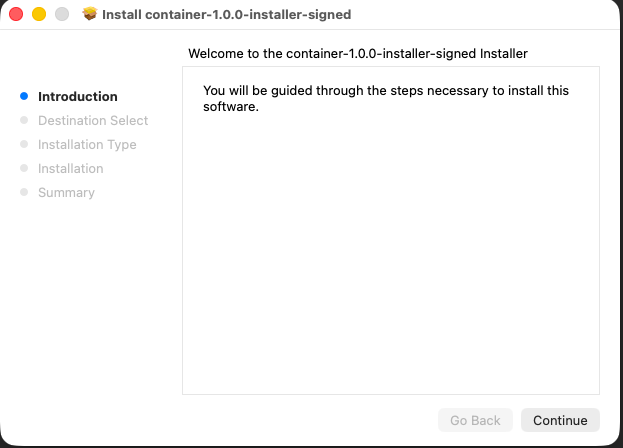
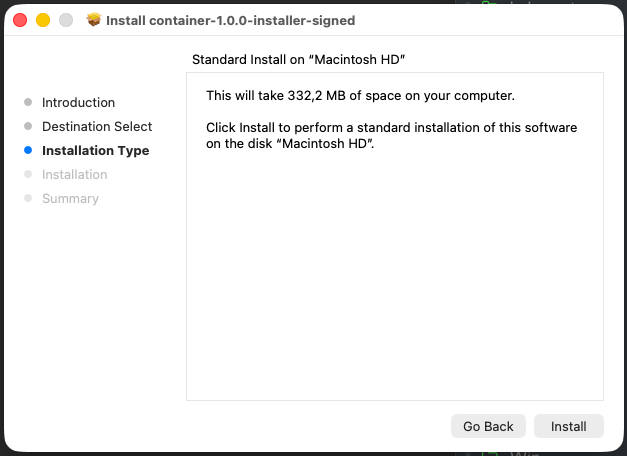
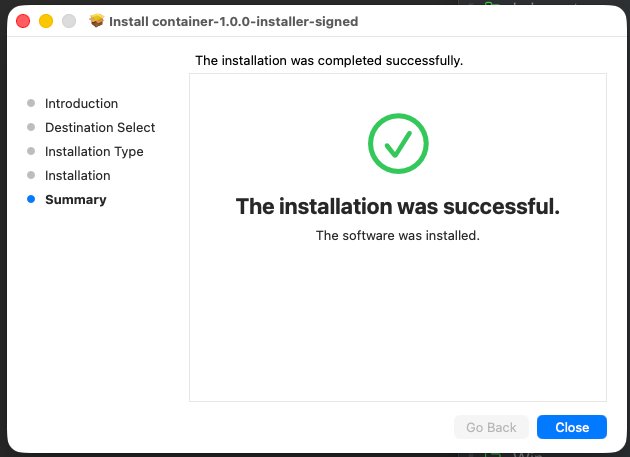
After installation, open Terminal and start the system service:
container system startThe first time you run this command, container may ask whether you want to install a recommended Linux kernel. Type y and press Enter.
Example output:
❯ container system start

Launching container-apiserver...
Testing access to container-apiserver...
Verifying machine API server is running...
No default kernel configured.
Install the recommended default kernel from [https://github.com/kata-containers/kata-containers/releases/download/3.28.0/kata-static-3.28.0-arm64.tar.zst]? [Y/n]: y
Installing kernel...
Check that the service is running:
container system statusoutput:
❯ container system status

FIELD              VALUE
status             running
appRoot            /Users/A93162639/Library/Application Support/com.apple.container/
installRoot        /usr/local/
logRoot
apiserver.version  container-apiserver version 1.0.0 (build: release, commit: ee848e3)
apiserver.commit   ee848e3ebfd7c73b04dd419683be54fb450b8779
apiserver.build    release
apiserver.appName  container-apiserver
Then list all containers:
container list --allAn empty table is fine. It means the service is running and you have not created any containers yet.
Test it with an Ubuntu shell
Now run your first Linux container and attach an interactive shell:
container run -it ubuntu:latest /bin/bashInside the container, try:
uname -a

cat /etc/os-release
You should see Linux system information and Ubuntu release details:
root@9bb5a5b9-40a6-4a55-8093-f76c7d70c8eb:/# uname -a
Linux 9bb5a5b9-40a6-4a55-8093-f76c7d70c8eb 6.18.15 #1 SMP Tue Mar 17 01:36:53 UTC 2026 aarch64 GNU/Linux

root@9bb5a5b9-40a6-4a55-8093-f76c7d70c8eb:/# cat /etc/os-release
PRETTY_NAME="Ubuntu 26.04 LTS"
NAME="Ubuntu"
VERSION_ID="26.04"
VERSION="26.04 LTS"
ID=ubuntu
ID_LIKE=debian
Your Ubuntu version and kernel version may differ depending on when you run the command. The important part is that you are inside a Linux environment running on your Mac.
Exit the container:
exit
Limit Resources: CPU - MEM
Another useful feature is when you want to limut resources, like CPU and Memory inside the apple container. You can simple do that by:
container run -it --cpus 2 --memory 2G ubuntu:latest /bin/bash
result:
root@e3beed8c-42f0-4aaa-8fc6-e1d8d969641f:/# top -bn1 -1
top - 21:03:33 up 0 min,  0 users,  load average: 0.06, 0.02, 0.00
Tasks:   2 total,   1 running,   1 sleeping,   0 stopped,   0 zombie
%Cpu0  :  0.0 us,  0.0 sy,  0.0 ni,100.0 id,  0.0 wa,  0.0 hi,  0.0 si,  0.0 st
%Cpu1  :  0.0 us,  0.0 sy,  0.0 ni,100.0 id,  0.0 wa,  0.0 hi,  0.0 si,  0.0 s
%Cpu2  :  0.0 us,  0.0 sy,  0.0 ni,100.0 id,  0.0 wa,  0.0 hi,  0.0 si,  0.0 st
MiB Mem :   2113.3 total,   1909.6 free,     71.0 used,    154.2 buff/cache       MiB Swap:      0.0 total,      0.0 free,      0.0 used.   2042.3 avail Mem

    PID USER      PR  NI    VIRT    RES    SHR S  %CPU  %MEM     TIME+ COMMAND
      1 root      20   0    5128   3808   3280 S   0.0   0.2   0:00.01 bash
      9 root      20   0    7060   4452   2548 R   0.0   0.2   0:00.00 top

root@e3beed8c-42f0-4aaa-8fc6-e1d8d969641f:/# grep -c ^processor /proc/cpuinfo
3

root@291ed90e-621e-460e-ae70-73f4befcb0a4:/# free
               total        used        free      shared  buff/cache   available
Mem:         2163972       68876     1959220           4      157972     2095096
Swap:              0           0           0
root@291ed90e-621e-460e-ae70-73f4befcb0a4:/#
root@291ed90e-621e-460e-ae70-73f4befcb0a4:/#
Now list running containers:
container listYou may see an empty table because the Ubuntu shell exited. To include stopped containers, run:
container list --allExample:
ID                                    IMAGE                            OS     ARCH   STATE    IP  CPUS  MEMORY   STARTED
9bb5a5b9-40a6-4a55-8093-f76c7d70c8eb  docker.io/library/ubuntu:latest  linux  arm64  stopped      4     1024 MB  2026-06-24T20:15:59Z
Build a “Hello, world” web server
Next, build a tiny Python web server image.
Create a new project directory:
mkdir hello-container
cd hello-container
Create a file called Dockerfile:
touch DockerfileOpen it in your editor and paste:
FROM docker.io/python:alpine

WORKDIR /app

RUN echo '<h1>Hello from Apple container!</h1>' > index.html

CMD ["python3", "-m", "http.server", "80"]
This image starts from a lightweight Python base image, creates a simple HTML page, and runs Python’s built-in web server on port 80.
Build the image
From the same directory as your Dockerfile, run:
container build --tag hello-web --file Dockerfile .The . at the end tells the builder to use the current directory as the build context. The command pulls the base image, runs the Dockerfile instructions, and tags the result as hello-web.
After your first build, you may see a builder container when you list containers. That is expected; container uses it to build images.
Run the web server
Start the container in the background:
container run --name my-site --detach --rm hello-webHere’s what the flags mean:
--name my-sitegives the container a friendly name.--detachruns it in the background.--rmautomatically removes the container when it stops.
List running containers:
container listLook for the IP address in the IP column. It may look something like this:
ID        IMAGE                                                OS     ARCH   STATE    IP               CPUS  MEMORY   STARTED
my-site   hello-web:latest                                     linux  arm64  running  192.168.64.4/24  4     1024 MB  2026-06-24T20:28:15Z
buildkit  ghcr.io/apple/container-builder-shim/builder:0.12.0  linux  arm64  running  192.168.64.3/24  2     2048 MB  2026-06-24T20:27:48Z
Open the site in your browser:
open http://192.168.64.4Replace 192.168.64.4 with the IP address shown on your machine.
You should see:
Hello from Apple container!
Optional: use localhost instead
If you prefer opening the site through localhost, publish the container port to your Mac. The container run command supports --publish / -p for mapping a container port to a host port.
Stop the current container first:
container stop my-siteThen run it again with port publishing:
container run --name my-site --detach --rm --publish 8080:80 hello-webOpen:
open http://localhost:8080This maps port 8080 on your Mac to port 80 inside the container.

View logs
To see what the web server is logging, run:
container logs my-siteYou should see HTTP request logs from Python’s web server.
result:
❯ container logs my-site
192.168.64.1 - - [24/Jun/2026 20:36:03] "GET / HTTP/1.1" 200 -
192.168.64.1 - - [24/Jun/2026 20:36:03] code 404, message File not found
192.168.64.1 - - [24/Jun/2026 20:36:03] "GET /favicon.ico HTTP/1.1" 404 -
Clean up
Stop the container:
container stop my-siteBecause you started it with --rm, container removes it automatically after it stops.
Check again:
container list --allThe my-site container should no longer appear.
That’s it,
Evaggelos!
systemd
Latest systemd version now contains the systemd-importd daemon .
That means that we can use machinectl to import a tar or a raw image from the internet to use it with the systemd-nspawn command.
so here is an example
machinectl
from my archlinux box:
# cat /etc/arch-release
Arch Linux releaseCentOS 7
We can download the tar centos7 docker image from the docker hub registry:
# machinectl pull-tar --verify=no https://github.com/CentOS/sig-cloud-instance-images/raw/79db851f4016c283fb3d30f924031f5a866d51a1/docker/centos-7-docker.tar.xz
...
Created new local image 'centos-7-docker'.
Operation completed successfully.
Exiting.
we can verify that:
# ls -la /var/lib/machines/centos-7-docker
total 28
dr-xr-xr-x 1 root root   158 Jan  7 18:59 .
drwx------ 1 root root   488 Feb  1 21:17 ..
-rw-r--r-- 1 root root 11970 Jan  7 18:59 anaconda-post.log
lrwxrwxrwx 1 root root     7 Jan  7 18:58 bin -> usr/bin
drwxr-xr-x 1 root root     0 Jan  7 18:58 dev
drwxr-xr-x 1 root root  1940 Jan  7 18:59 etc
drwxr-xr-x 1 root root     0 Nov  5  2016 home
lrwxrwxrwx 1 root root     7 Jan  7 18:58 lib -> usr/lib
lrwxrwxrwx 1 root root     9 Jan  7 18:58 lib64 -> usr/lib64
drwxr-xr-x 1 root root     0 Nov  5  2016 media
drwxr-xr-x 1 root root     0 Nov  5  2016 mnt
drwxr-xr-x 1 root root     0 Nov  5  2016 opt
drwxr-xr-x 1 root root     0 Jan  7 18:58 proc
dr-xr-x--- 1 root root   120 Jan  7 18:59 root
drwxr-xr-x 1 root root   104 Jan  7 18:59 run
lrwxrwxrwx 1 root root     8 Jan  7 18:58 sbin -> usr/sbin
drwxr-xr-x 1 root root     0 Nov  5  2016 srv
drwxr-xr-x 1 root root     0 Jan  7 18:58 sys
drwxrwxrwt 1 root root   140 Jan  7 18:59 tmp
drwxr-xr-x 1 root root   106 Jan  7 18:58 usr
drwxr-xr-x 1 root root   160 Jan  7 18:58 var
systemd-nspawn
Now test we can test it:
[root@myhomepc ~]# systemd-nspawn --machine=centos-7-docker
Spawning container centos-7-docker on /var/lib/machines/centos-7-docker.
Press ^] three times within 1s to kill container.

[root@centos-7-docker ~]#
[root@centos-7-docker ~]#
[root@centos-7-docker ~]# cat /etc/redhat-release
CentOS Linux release 7.4.1708 (Core)
[root@centos-7-docker ~]#
[root@centos-7-docker ~]# exit
logout
Container centos-7-docker exited successfully.
and now returning to our system:
[root@myhomepc ~]#
[root@myhomepc ~]#
[root@myhomepc ~]# cat /etc/arch-release
Arch Linux release
Ubuntu 16.04.4 LTS
ubuntu example:
# machinectl pull-tar --verify=no https://github.com/tianon/docker-brew-ubuntu-core/raw/46511cf49ad5d2628f3e8d88e1f8b18699a3ad8f/xenial/ubuntu-xenial-core-cloudimg-amd64-root.tar.gz

# systemd-nspawn --machine=ubuntu-xenial-core-cloudimg-amd64-root
Spawning container ubuntu-xenial-core-cloudimg-amd64-root on /var/lib/machines/ubuntu-xenial-core-cloudimg-amd64-root.
Press ^] three times within 1s to kill container.
Timezone Europe/Athens does not exist in container, not updating container timezone.
root@ubuntu-xenial-core-cloudimg-amd64-root:~# root@ubuntu-xenial-core-cloudimg-amd64-root:~# cat /etc/os-release NAME="Ubuntu"
VERSION="16.04.4 LTS (Xenial Xerus)"
ID=ubuntu
ID_LIKE=debian
PRETTY_NAME="Ubuntu 16.04.4 LTS"
VERSION_ID="16.04"
HOME_URL="http://www.ubuntu.com/"
SUPPORT_URL="http://help.ubuntu.com/"
BUG_REPORT_URL="http://bugs.launchpad.net/ubuntu/"
VERSION_CODENAME=xenial
UBUNTU_CODENAME=xenialroot@ubuntu-xenial-core-cloudimg-amd64-root:~# exitlogout
Container ubuntu-xenial-core-cloudimg-amd64-root exited successfully.# cat /etc/os-release NAME="Arch Linux"
PRETTY_NAME="Arch Linux"
ID=arch
ID_LIKE=archlinux
ANSI_COLOR="0;36"
HOME_URL="https://www.archlinux.org/"
SUPPORT_URL="https://bbs.archlinux.org/"
BUG_REPORT_URL="https://bugs.archlinux.org/"Docker Swarm
The native Docker Container Orchestration system is Docker Swarm that in simple terms means that you can have multiple docker machines (hosts) to run your multiple docker containers (replicas). It is best to work with Docker Engine v1.12 and above as docker engine includes docker swarm natively.
Docker Swarm logo:

In not so simply terms, docker instances (engines) running on multiple machines (nodes), communicating together (VXLAN) as a cluster (swarm).
Nodes
To begin with, we need to create our docker machines. One of the nodes must be the manager and the others will run as workers. For testing purposes I will run three (3) docker engines:
- Manager Docker Node: myengine0
- Worker Docker Node 1: myengine1
- Worker Docker Node 2: myengine2
Drivers
A docker node is actually a machine that runs the docker engine in the swarm mode. The machine can be a physical, virtual, a virtualbox, a cloud instance, a VPS, a AWS etc etc
As the time of this blog post, officially docker supports natively the below drivers:
- Amazon Web Services
- Microsoft Azure
- Digital Ocean
- Exoscale
- Google Compute Engine
- Generic
- Microsoft Hyper-V
- OpenStack
- Rackspace
- IBM Softlayer
- Oracle VirtualBox
- VMware vCloud Air
- VMware Fusion
- VMware vSphere
QEMU - KVM
but there are unofficial drivers also.
I will use the qemu - kvm driver from this github repository: https://github.com/dhiltgen/docker-machine-kvm
The simplest way to add the kvm driver is this:
> cd /usr/local/bin/
> sudo -s
# wget -c https://github.com/dhiltgen/docker-machine-kvm/releases/download/v0.7.0/docker-machine-driver-kvm
# chmod 0750 docker-machine-driver-kvm
Docker Machines
The next thing we need to do, is to create our docker machines. Look on your distro’s repositories:
# yes | pacman -S docker-machineManager
$ docker-machine create -d kvm myengine0

Running pre-create checks...
Creating machine...
(myengine0) Image cache directory does not exist, creating it at /home/ebal/.docker/machine/cache...
(myengine0) No default Boot2Docker ISO found locally, downloading the latest release...
(myengine0) Latest release for github.com/boot2docker/boot2docker is v1.13.1
(myengine0) Downloading /home/ebal/.docker/machine/cache/boot2docker.iso from https://github.com/boot2docker/boot2docker/releases/download/v1.13.1/boot2docker.iso...
(myengine0) 0%....10%....20%....30%....40%....50%....60%....70%....80%....90%....100%
(myengine0) Copying /home/ebal/.docker/machine/cache/boot2docker.iso to /home/ebal/.docker/machine/machines/myengine0/boot2docker.iso...

Waiting for machine to be running, this may take a few minutes...
Detecting operating system of created instance...
Waiting for SSH to be available...
Detecting the provisioner...
Provisioning with boot2docker...
Copying certs to the local machine directory...
Copying certs to the remote machine...
Setting Docker configuration on the remote daemon...
Checking connection to Docker...
Docker is up and running!
To see how to connect your Docker Client to the Docker Engine running on this virtual machine, run: docker-machine env myengine0
Worker 1
$ docker-machine create -d kvm myengine1
Running pre-create checks...
Creating machine...
(myengine1) Copying /home/ebal/.docker/machine/cache/boot2docker.iso to /home/ebal/.docker/machine/machines/myengine1/boot2docker.iso...
Waiting for machine to be running, this may take a few minutes...
Detecting operating system of created instance...
Waiting for SSH to be available...
Detecting the provisioner...
Provisioning with boot2docker...
Copying certs to the local machine directory...
Copying certs to the remote machine...
Setting Docker configuration on the remote daemon...
Checking connection to Docker...
Docker is up and running!
To see how to connect your Docker Client to the Docker Engine running on this virtual machine, run: docker-machine env myengine1
Worker 2
$ docker-machine create -d kvm myengine2
Running pre-create checks...
Creating machine...
(myengine2) Copying /home/ebal/.docker/machine/cache/boot2docker.iso to /home/ebal/.docker/machine/machines/myengine2/boot2docker.iso...
Waiting for machine to be running, this may take a few minutes...
Detecting operating system of created instance...
Waiting for SSH to be available...
Detecting the provisioner...
Provisioning with boot2docker...
Copying certs to the local machine directory...
Copying certs to the remote machine...
Setting Docker configuration on the remote daemon...
Checking connection to Docker...
Docker is up and running!
To see how to connect your Docker Client to the Docker Engine running on this virtual machine, run: docker-machine env myengine2
List your Machines
$ docker-machine env myengine0
export DOCKER_TLS_VERIFY="1"
export DOCKER_HOST="tcp://192.168.42.126:2376"
export DOCKER_CERT_PATH="/home/ebal/.docker/machine/machines/myengine0"
export DOCKER_MACHINE_NAME="myengine0"
# Run this command to configure your shell:
# eval $(docker-machine env myengine0)
$ docker-machine ls

NAME        ACTIVE   DRIVER   STATE     URL                         SWARM   DOCKER    ERRORS
myengine0   -        kvm      Running   tcp://192.168.42.126:2376           v1.13.1
myengine1   -        kvm      Running   tcp://192.168.42.51:2376            v1.13.1
myengine2   -        kvm      Running   tcp://192.168.42.251:2376           v1.13.1
Inspect
You can get the IP of your machines with:
$ docker-machine ip myengine0
192.168.42.126

$ docker-machine ip myengine1
192.168.42.51

$ docker-machine ip myengine2
192.168.42.251
with ls as seen above or use the inspect parameter for a full list of information regarding your machines in a json format:
$ docker-machine inspect myengine0
If you have jq you can filter out some info
$ docker-machine inspect myengine0  | jq .'Driver.DiskPath'

"/home/ebal/.docker/machine/machines/myengine0/myengine0.img"
SSH
To enter inside the kvm docker machine, you can use ssh
Manager
$ docker-machine ssh myengine0

                        ##         .
                  ## ## ##        ==
               ## ## ## ## ##    ===
           /"""""""""""""""""___/ ===
      ~~~ {~~ ~~~~ ~~~ ~~~~ ~~~ ~ /  ===- ~~~
           ______ o           __/
                          __/
              ___________/
 _                 _   ____     _            _
| |__   ___   ___ | |_|___  __| | ___   ___| | _____ _ __
| '_  / _  / _ | __| __) / _` |/ _  / __| |/ / _  '__|
| |_) | (_) | (_) | |_ / __/ (_| | (_) | (__|   <  __/ |
|_.__/ ___/ ___/ __|_______,_|___/ ___|_|____|_|
Boot2Docker version 1.13.1, build HEAD : b7f6033 - Wed Feb  8 20:31:48 UTC 2017
Docker version 1.13.1, build 092cba3
Worker 1
$ docker-machine ssh myengine1

                        ##         .
                  ## ## ##        ==
               ## ## ## ## ##    ===
           /"""""""""""""""""___/ ===
      ~~~ {~~ ~~~~ ~~~ ~~~~ ~~~ ~ /  ===- ~~~
           ______ o           __/
                          __/
              ___________/
 _                 _   ____     _            _
| |__   ___   ___ | |_|___  __| | ___   ___| | _____ _ __
| '_  / _  / _ | __| __) / _` |/ _  / __| |/ / _  '__|
| |_) | (_) | (_) | |_ / __/ (_| | (_) | (__|   <  __/ |
|_.__/ ___/ ___/ __|_______,_|___/ ___|_|____|_|
Boot2Docker version 1.13.1, build HEAD : b7f6033 - Wed Feb  8 20:31:48 UTC 2017
Docker version 1.13.1, build 092cba3
Worker 2
$ docker-machine ssh myengine2

                        ##         .
                  ## ## ##        ==
               ## ## ## ## ##    ===
           /"""""""""""""""""___/ ===
      ~~~ {~~ ~~~~ ~~~ ~~~~ ~~~ ~ /  ===- ~~~
           ______ o           __/
                          __/
              ___________/
 _                 _   ____     _            _
| |__   ___   ___ | |_|___  __| | ___   ___| | _____ _ __
| '_  / _  / _ | __| __) / _` |/ _  / __| |/ / _  '__|
| |_) | (_) | (_) | |_ / __/ (_| | (_) | (__|   <  __/ |
|_.__/ ___/ ___/ __|_______,_|___/ ___|_|____|_|
Boot2Docker version 1.13.1, build HEAD : b7f6033 - Wed Feb  8 20:31:48 UTC 2017
Docker version 1.13.1, build 092cba3
Swarm Cluster
Now it’s time to build a swarm of docker machines!
Initialize the manager
docker@myengine0:~$  docker swarm init --advertise-addr 192.168.42.126

Swarm initialized: current node (jwyrvepkz29ogpcx18lgs8qhx) is now a manager.

To add a worker to this swarm, run the following command:

    docker swarm join
    --token SWMTKN-1-4vpiktzp68omwayfs4c3j5mrdrsdavwnewx5834g9cp6p1koeo-bgcwtrz6srt45qdxswnneb6i9
    192.168.42.126:2377

To add a manager to this swarm, run 'docker swarm join-token manager' and follow the instructions.
Join Worker 1
docker@myengine1:~$  docker swarm join
>     --token SWMTKN-1-4vpiktzp68omwayfs4c3j5mrdrsdavwnewx5834g9cp6p1koeo-bgcwtrz6srt45qdxswnneb6i9
>     192.168.42.126:2377

This node joined a swarm as a worker.
Join Worker 2
docker@myengine2:~$   docker swarm join
>     --token SWMTKN-1-4vpiktzp68omwayfs4c3j5mrdrsdavwnewx5834g9cp6p1koeo-bgcwtrz6srt45qdxswnneb6i9
>     192.168.42.126:2377

This node joined a swarm as a worker.
From the manager
docker@myengine0:~$  docker node ls

ID                           HOSTNAME   STATUS  AVAILABILITY  MANAGER STATUS
jwyrvepkz29ogpcx18lgs8qhx *  myengine0  Ready   Active        Leader
m5akhw7j60fru2d0an4lnsgr3    myengine2  Ready   Active
sfau3r42bqbhtz1c6v9hnld67    myengine1  Ready   Active
Info
We can find more information about the docker-machines running the docker info command when you have ssh-ed the nodes:
eg. the swarm part:
manager
Swarm: active
 NodeID: jwyrvepkz29ogpcx18lgs8qhx
 Is Manager: true
 ClusterID: 8fjv5fzp0wtq9hibl7w2v65cs
 Managers: 1
 Nodes: 3
 Orchestration:
  Task History Retention Limit: 5
 Raft:
  Snapshot Interval: 10000
  Number of Old Snapshots to Retain: 0
  Heartbeat Tick: 1
  Election Tick: 3
 Dispatcher:
  Heartbeat Period: 5 seconds
 CA Configuration:
  Expiry Duration: 3 months
 Node Address: 192.168.42.126
 Manager Addresses:
  192.168.42.126:2377
worker1
Swarm: active
 NodeID: sfau3r42bqbhtz1c6v9hnld67
 Is Manager: false
 Node Address: 192.168.42.51
 Manager Addresses:
  192.168.42.126:2377
worker 2
Swarm: active
 NodeID: m5akhw7j60fru2d0an4lnsgr3
 Is Manager: false
 Node Address: 192.168.42.251
 Manager Addresses:
  192.168.42.126:2377
Services
Now it’s time to test our docker swarm by running a container service across our entire fleet!
For testing purposes we chose 6 replicas of an nginx container:
docker@myengine0:~$ docker service create --replicas 6 -p 80:80 --name web nginx

ql6iogo587ibji7e154m7npal
List images
docker@myengine0:~$  docker images
REPOSITORY          TAG                 IMAGE ID            CREATED             SIZE
nginx               <none>              db079554b4d2        9 days ago          182 MB
List of services
regarding your docker registry or your internet connection, we will see the replicas running:
docker@myengine0:~$ docker service ls
ID            NAME  MODE        REPLICAS  IMAGE
ql6iogo587ib  web   replicated  0/6       nginx:latest

docker@myengine0:~$ docker service ls
ID            NAME  MODE        REPLICAS  IMAGE
ql6iogo587ib  web   replicated  2/6       nginx:latest

docker@myengine0:~$ docker service ls
ID            NAME  MODE        REPLICAS  IMAGE
ql6iogo587ib  web   replicated  3/6       nginx:latest

docker@myengine0:~$ docker service ls
ID            NAME  MODE        REPLICAS  IMAGE
ql6iogo587ib  web   replicated  6/6       nginx:latest
docker@myengine0:~$  docker service ps web

ID            NAME   IMAGE         NODE       DESIRED STATE  CURRENT STATE           ERROR  PORTS
t3v855enecgv  web.1  nginx:latest  myengine1  Running        Running 17 minutes ago
xgwi91plvq00  web.2  nginx:latest  myengine2  Running        Running 17 minutes ago
0l6h6a0va2fy  web.3  nginx:latest  myengine0  Running        Running 16 minutes ago
qchj744k0e45  web.4  nginx:latest  myengine1  Running        Running 17 minutes ago
udimh2bokl8k  web.5  nginx:latest  myengine2  Running        Running 17 minutes ago
t50yhhtngbac  web.6  nginx:latest  myengine0  Running        Running 16 minutes ago
Browser
To verify that our replicas are running as they should:
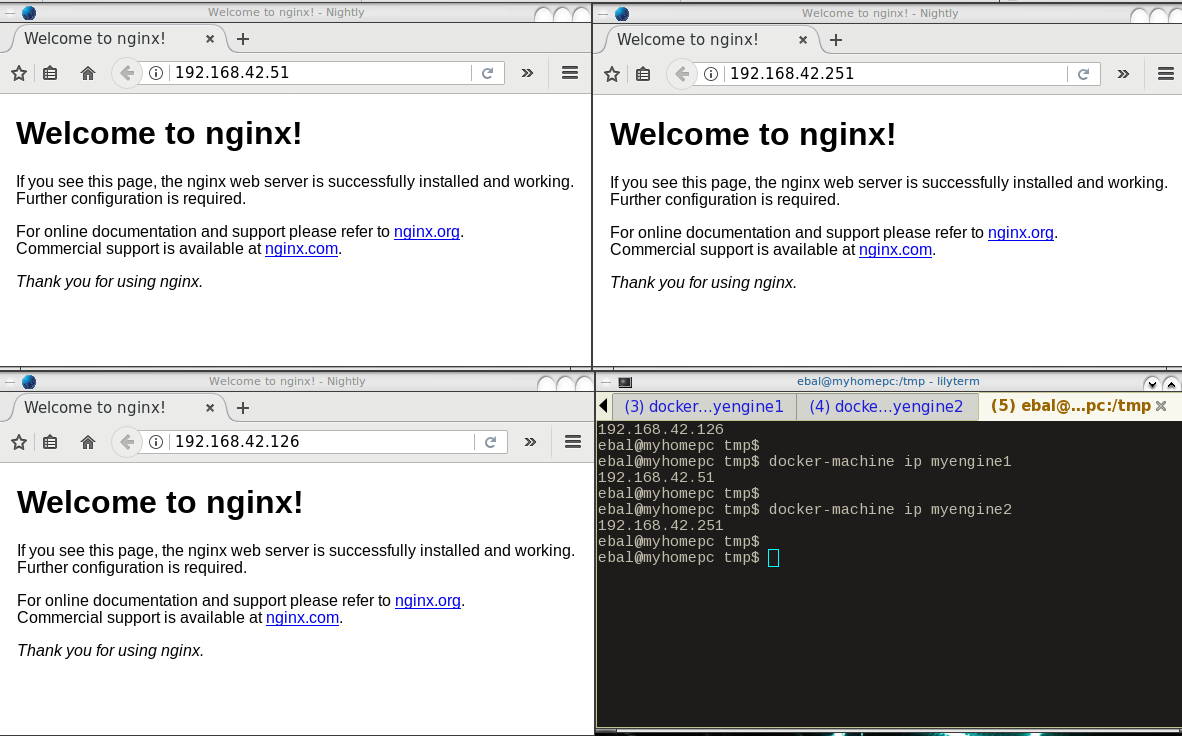
Scaling a service
It’s really interesting that we can scale out or scale down our replicas on the fly !
from the manager
docker@myengine0:~$  docker service ls
ID            NAME  MODE        REPLICAS  IMAGE
ql6iogo587ib  web   replicated  6/6       nginx:latest

docker@myengine0:~$ docker service ps web
ID            NAME   IMAGE         NODE       DESIRED STATE  CURRENT STATE       ERROR  PORTS
t3v855enecgv  web.1  nginx:latest  myengine1  Running        Running 3 days ago
xgwi91plvq00  web.2  nginx:latest  myengine2  Running        Running 3 days ago
0l6h6a0va2fy  web.3  nginx:latest  myengine0  Running        Running 3 days ago
qchj744k0e45  web.4  nginx:latest  myengine1  Running        Running 3 days ago
udimh2bokl8k  web.5  nginx:latest  myengine2  Running        Running 3 days ago
t50yhhtngbac  web.6  nginx:latest  myengine0  Running        Running 3 days ago
Scale Down
from the manager
$ docker service scale web=3
web scaled to 3

docker@myengine0:~$ docker service ls
ID            NAME  MODE        REPLICAS  IMAGE
ql6iogo587ib  web   replicated  3/3       nginx:latest

docker@myengine0:~$ docker service ps web
ID            NAME   IMAGE         NODE       DESIRED STATE  CURRENT STATE       ERROR  PORTS
0l6h6a0va2fy  web.3  nginx:latest  myengine0  Running        Running 3 days ago
qchj744k0e45  web.4  nginx:latest  myengine1  Running        Running 3 days ago
udimh2bokl8k  web.5  nginx:latest  myengine2  Running        Running 3 days ago
Scale Up
from the manager
docker@myengine0:~$ docker service scale web=8
web scaled to 8
docker@myengine0:~$
docker@myengine0:~$ docker service ls
ID            NAME  MODE        REPLICAS  IMAGE
ql6iogo587ib  web   replicated  3/8       nginx:latest
docker@myengine0:~$
docker@myengine0:~$ docker service ls
ID            NAME  MODE        REPLICAS  IMAGE
ql6iogo587ib  web   replicated  4/8       nginx:latest
docker@myengine0:~$
docker@myengine0:~$ docker service ls
ID            NAME  MODE        REPLICAS  IMAGE
ql6iogo587ib  web   replicated  8/8       nginx:latest
docker@myengine0:~$
docker@myengine0:~$
docker@myengine0:~$ docker service ps web
ID            NAME   IMAGE         NODE       DESIRED STATE  CURRENT STATE           ERROR  PORTS
lyhoyseg8844  web.1  nginx:latest  myengine1  Running        Running 7 seconds ago
w3j9bhcn9f6e  web.2  nginx:latest  myengine2  Running        Running 8 seconds ago
0l6h6a0va2fy  web.3  nginx:latest  myengine0  Running        Running 3 days ago
qchj744k0e45  web.4  nginx:latest  myengine1  Running        Running 3 days ago
udimh2bokl8k  web.5  nginx:latest  myengine2  Running        Running 3 days ago
vr8jhbum8tlg  web.6  nginx:latest  myengine1  Running        Running 7 seconds ago
m4jzati4ddpp  web.7  nginx:latest  myengine2  Running        Running 8 seconds ago
7jek2zvuz6fs  web.8  nginx:latest  myengine0  Running        Running 11 seconds ago